
KB ID 0000180
Problem
It’s been a while since I posted run through’s on WDS – they were on Server 2003, and were for deploying Windows XP.
I’ve completely re-written this page and shot a series of videos to make the process a little easier to understand.
Solution
Step 1 Notes
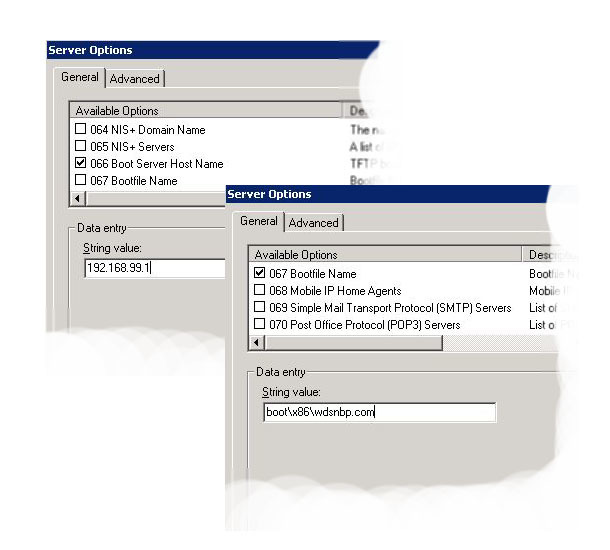
1. If the WDS Server is NOT the DHCP server then do NOT tick both the DHCP options, (as stated in the video), on your DHCP scope configure “DHCP Options” 66 and 67, like so;
2. If you are going to capture and deploy x64 Bit images you want to import the x64 bit boot.wim file from either the Windows 7 OR Windows Server 2008 R2 DVD (In the sources Directory).
Step 2 (Capture the Windows 7 Reference Machine).
Step 2 Notes
1. If your having trouble with talking to the WDS server over the network you may need to import the network drivers into the boot images on the WDS server, see here and here.
2. Make sure your machines are able to boot from the network.
3. If you CANT see a drive to image then sysprep did not complete correctly.
Step 3 (Prepare and Import the Unattended Answer files).
1. Windows Automated Install Kit (Windows 7) LINK
2. Sysprep Modules to Add for WDSClientUnattend.xml
-=-=-=-=-=-=-=-=-=-=-=-=-=-=-=-=-=-=-=-=-=-=-=-=-=-=-=-
1. WindowsPE
amd64_Microsoft-Windows-International-Core-WinPE
InputLocale = en-GB SystemLocale = en-GB UILanguage = en-GB UILanguageFallback = en-GB UserLocale = en-GB
SetupUILanguage
InputLocal = en-GB
2. OfflineServicing
Nothing.
3. Generalize
Nothing.
4. Specialize
Nothing.
5. AuditSystem
Nothing.
6. AuditUser
Nothing.
7. OobeSystem
Nothing.
-=-=-=-=-=-=-=-=-=-=-=-=-=-=-=-=-=-=-=-=-=-=-=-=-=-=-=-
Note: If you want to remove partitions and carry out drive formatting see the following article.
WDS – Unattended file – Removing /Formatting Drive Partitions
3. Sysprep Modules to add for OOBEunattend.xml
-=-=-=-=-=-=-=-=-=-=-=-=-=-=-=-=-=-=-=-=-=-=-=-=-=-=-=-
1. WindowsPE
Nothing.
2. OfflineServicing
Nothing.
3. Generalize
Nothing.
4. Specialize
amd64_Microsoft-Windows-Shell-Setup_6.1.7600.16385_neutral
Computername > * (Note: Generates a random name). CopyProfile> true Registered Organization> Your Organisation Registered Owner> Your Owner ShowWindowsLive> false TimeZone> GMT Standard Time
5. AuditSystem
Nothing.
6. AuditUser
Nothing.
7. OobeSystem
amd64_Microsoft-Windows-International-Core_6.1.7600.16385_neutral
InputLocale = en-GB SystemLocale = en-GB UILanguage = en-GB UserLocale = en-GB
amd64_Microsoft-Windows-Shell-Setup_6.1.7600.16385_neutral
OOBE
HideEULAPage = true HideWirelessSetup = true NetworkLocation = Work ProtectYourPC = 1
UserAccounts
LocalAccounts
LocalAccount
Description = Admin DisplayName = Admin Group = Administrators Name = Admin
Password
Value = password123
-=-=-=-=-=-=-=-=-=-=-=-=-=-=-=-=-=-=-=-=-=-=-=-=-=-=-=-
4. Additional stuff you might want to add to OOBEUnattended.xml
THIS ENABLES THE Local Administrator
4. Specialize
amd64_Microsoft-Windows-Deployment_6.1.7600.16385_neutral
RunSynchronous
RunSynchronousCommand
Order= 1 path = net user administrator /active>yes WillReboot = Never
THIS Automatically Activates the Machine with your VL / MAK Key
4. Specialize
amd64_Microsoft-Windows-Security-SPP-UX_6.1.7600.16385_neutral
SkipAutoActivation> true
7. OobeSystem
amd64_Microsoft-Windows-Shell-Setup_6.1.7600.16385_neutral
AutoLogon
Enabled> true LogonCount>2 Username> administrator
Password> {Administrator Password}
FirstLogonCommands
SynchronousCommand[Order=”1″]
CommandLine = cscript //b c:windowssystem32slmgr.vbs /ipk XXXXX-XXXXX-XXXXX-XXXXX-XXXXX (Windows 7 VL / MAK key) Order 1 RequiresUserInput> false
SynchronousCommand[Order=”2″]
CommandLine = cscript //b c:windowssystem32slmgr.vbs /ato Order 2 RequiresUserInput = false
5. Unless you generate a random computer name you CANNOT JOIN A DOMAIN! for more info see,
WDS – Unattended file – Joining a Domain Automatically
6. If you want to manually specify a computer name you need to delete the line from the unattended file that reads:
Step 4 (Deploy the Image to the Target Machines.).
Step 4 Notes
1.If you are deploying a lot of machines and the network is struggling, consider multicasting.
Related Articles, References, Credits, or External Links
NA