
Migrate to Microsoft Entra Connect KB ID 0001857
Problem
You want to migrate from Microsoft Azure AD Connect to Microsoft Entra ID connect.
Let me let you into a secret, (at time of writing) Entra ID connect and Azure AD connect ARE THE SAME THING, if you go to download Entra ID connect, the file you will download is called AzureADConnect.msi. So what you want to do is, upgrade Azure AD Connect.
If your existing Azure AD connect is running on Window Server 2016 (or newer) you can simply ‘in place upgrade‘ the existing Azure AD connect to version 2 and there’s no need to migrate anything.
If you MUST Migrate, because you are deploying on a new server for example, the process is straight forward.
- Install on New Server and put into Staging Mode.
- Put Old Server into Staging Mode.
- Take New Server out of Staging Mode, (ensure there are no errors/problems).
- Uninstall from Old Server.
Solution: Migrate to Microsoft Entra Connect
So if you simply want to perform an in place upgrade because your OS is Windows Server 2016 (or newer), use the following article.
If you’ve made it this far then you are WANTING to Migrate to Microsoft Entra ID Connect, or as previously mentioned migrate to Azure AD connect on another server!
Migrate to Microsoft Entra Connect Step One: Export Settings
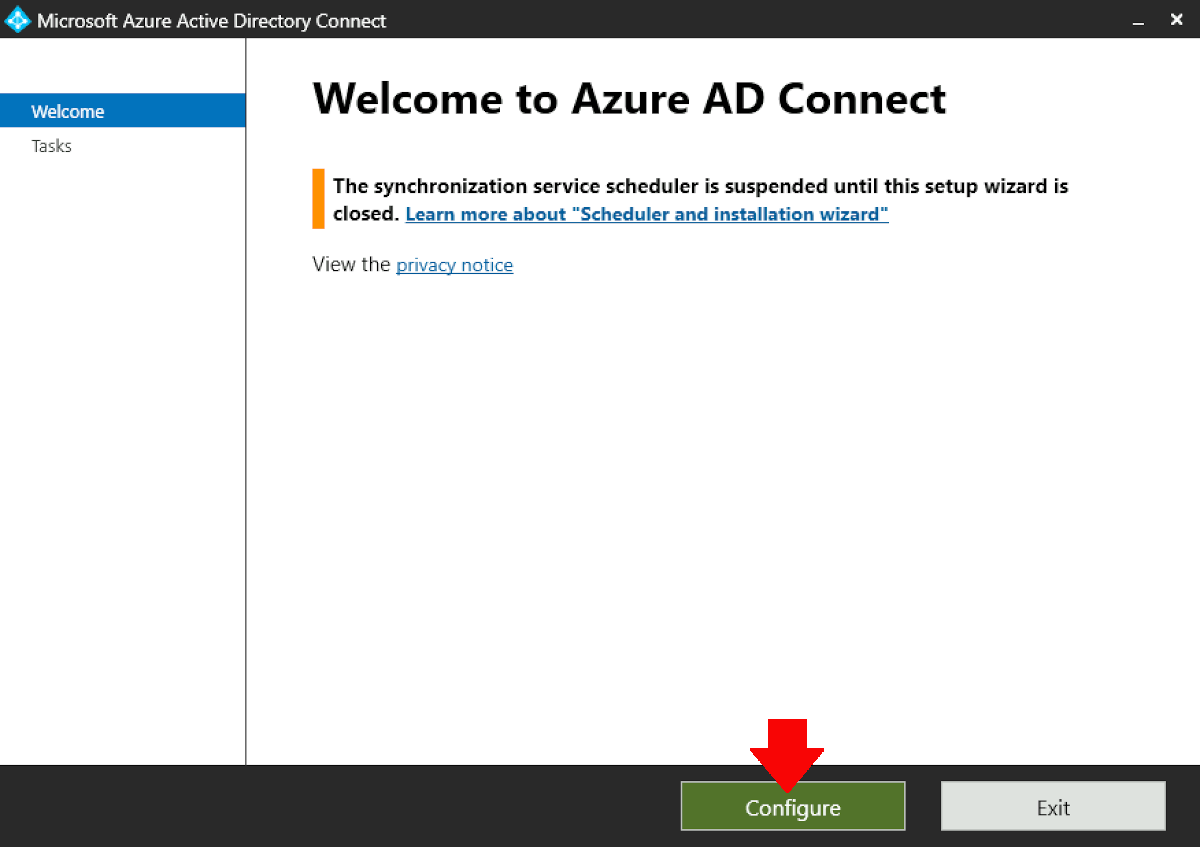
On the Old Server, launch the Azure AD connect shortcut > Configure.
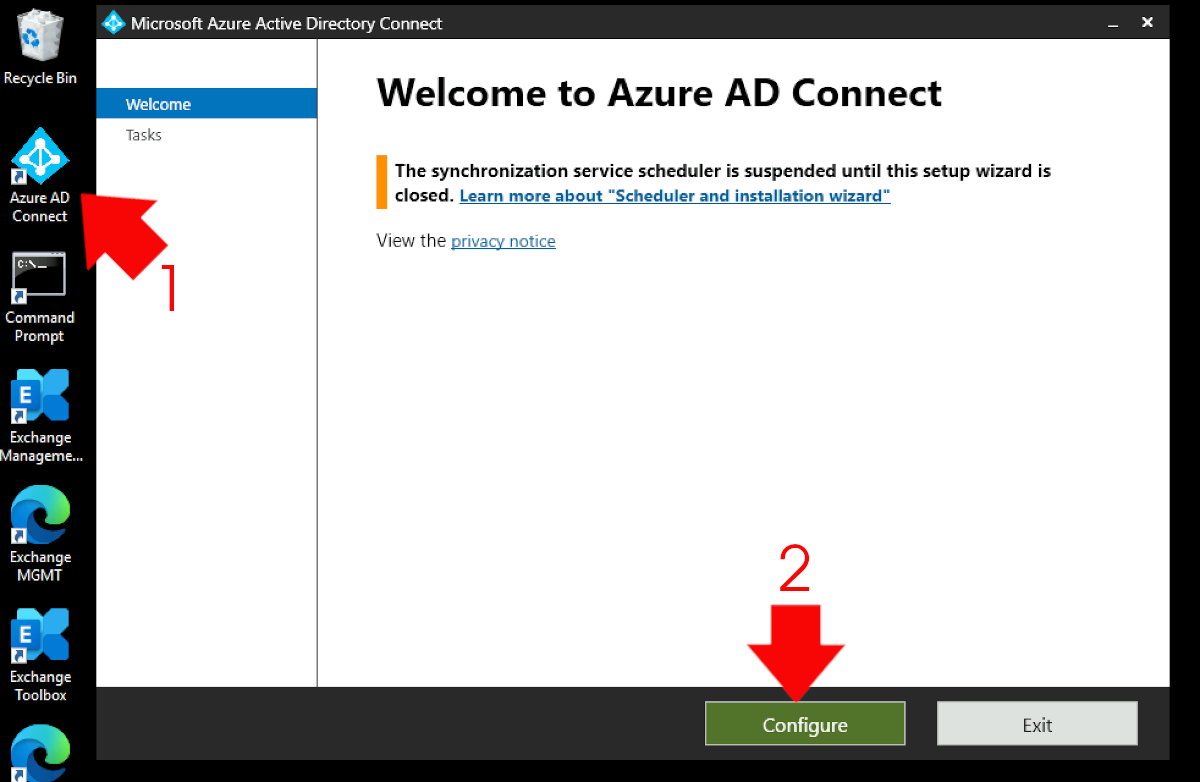
Select ‘View or export current configuration’ > Next.

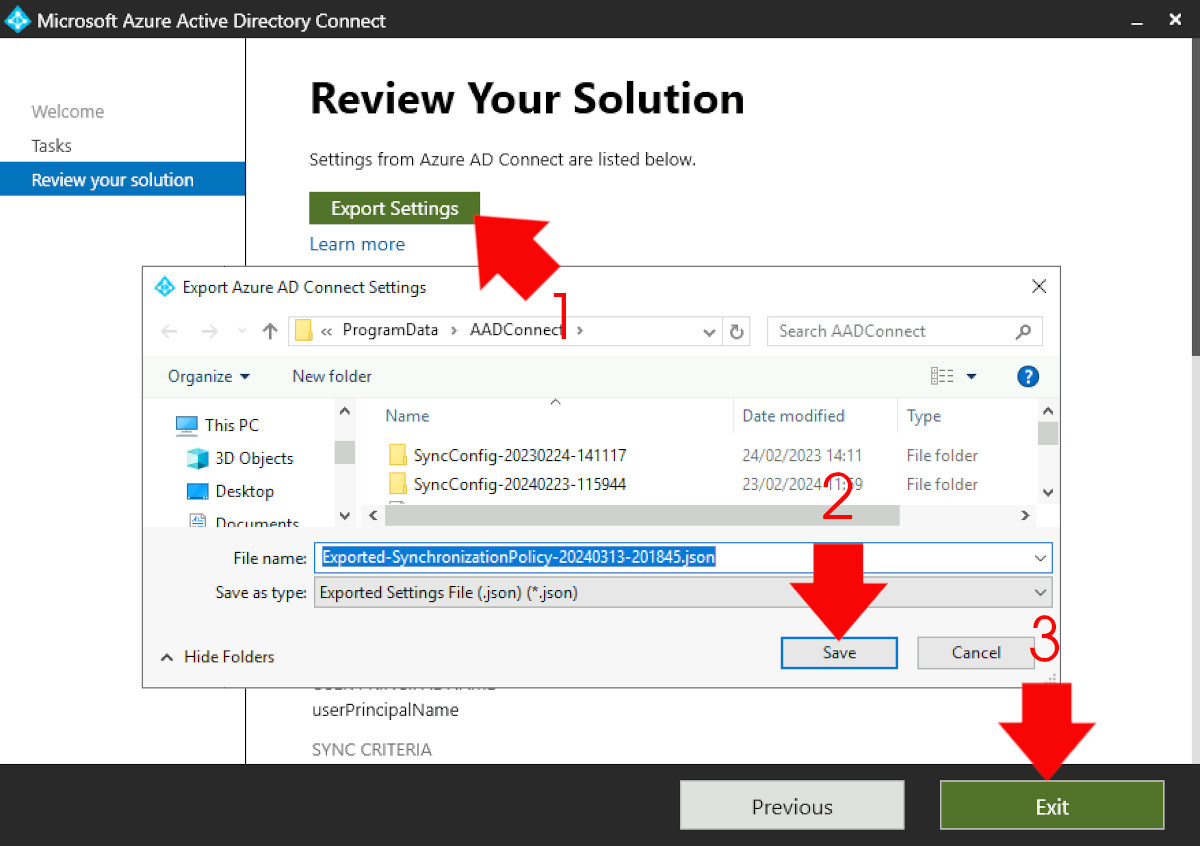
Export Settings > Save them (by default in C:\ProgramData\AADConnect) > Save > Exit.
Migrate to Microsoft Entra Connect Step Two: Import Settings
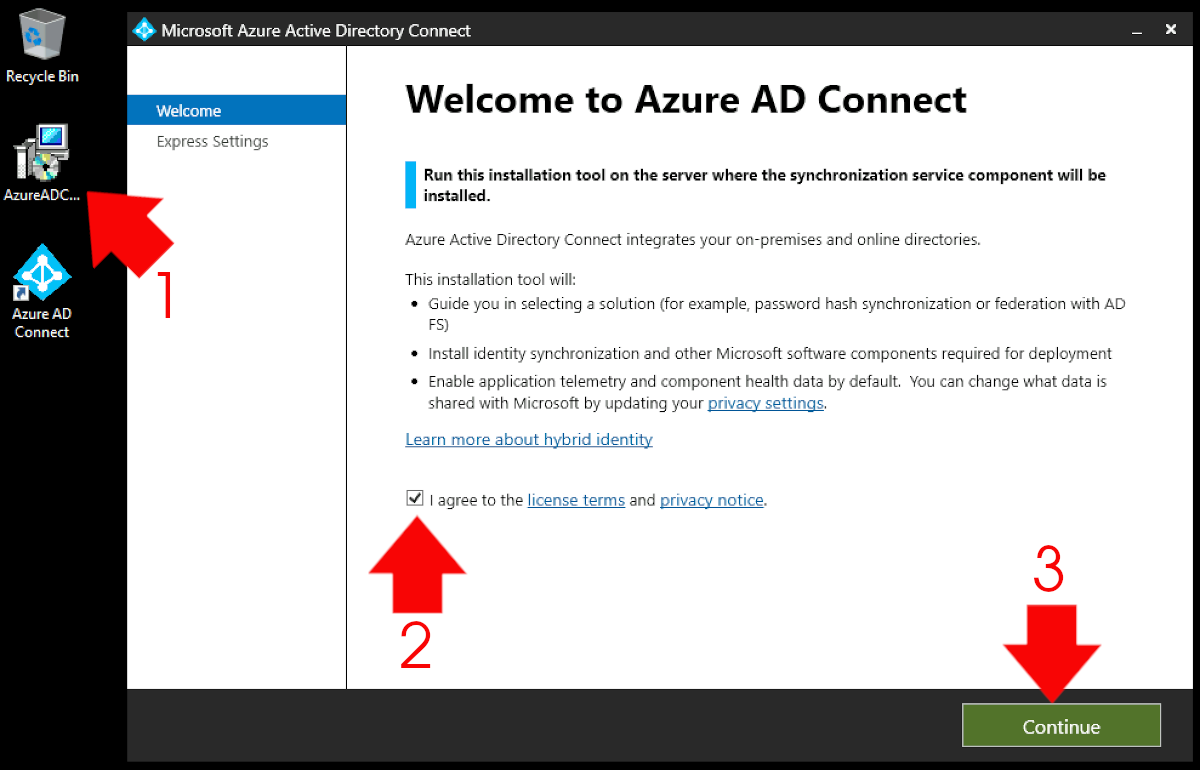
Assuming you’ve done nothing other than download the install package on the new server > Run the installer package > Agree to the EULA > Continue.
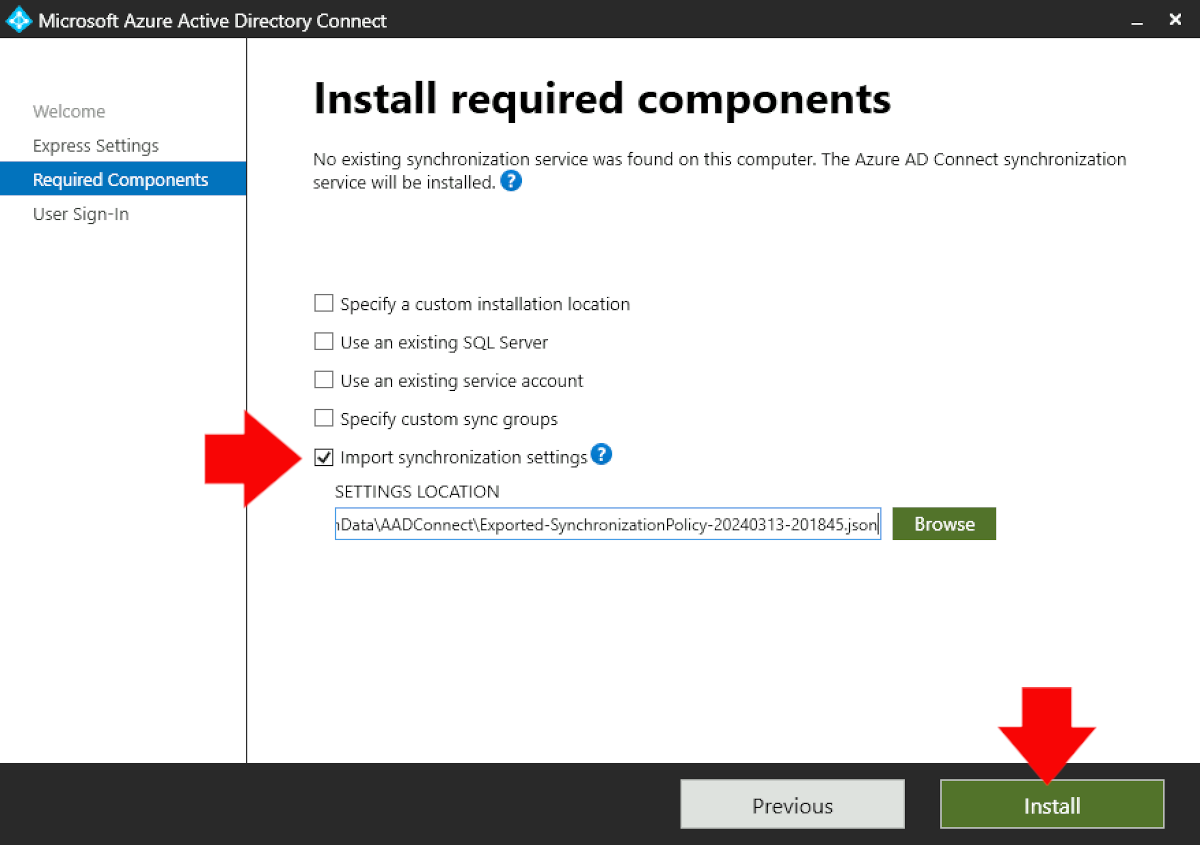
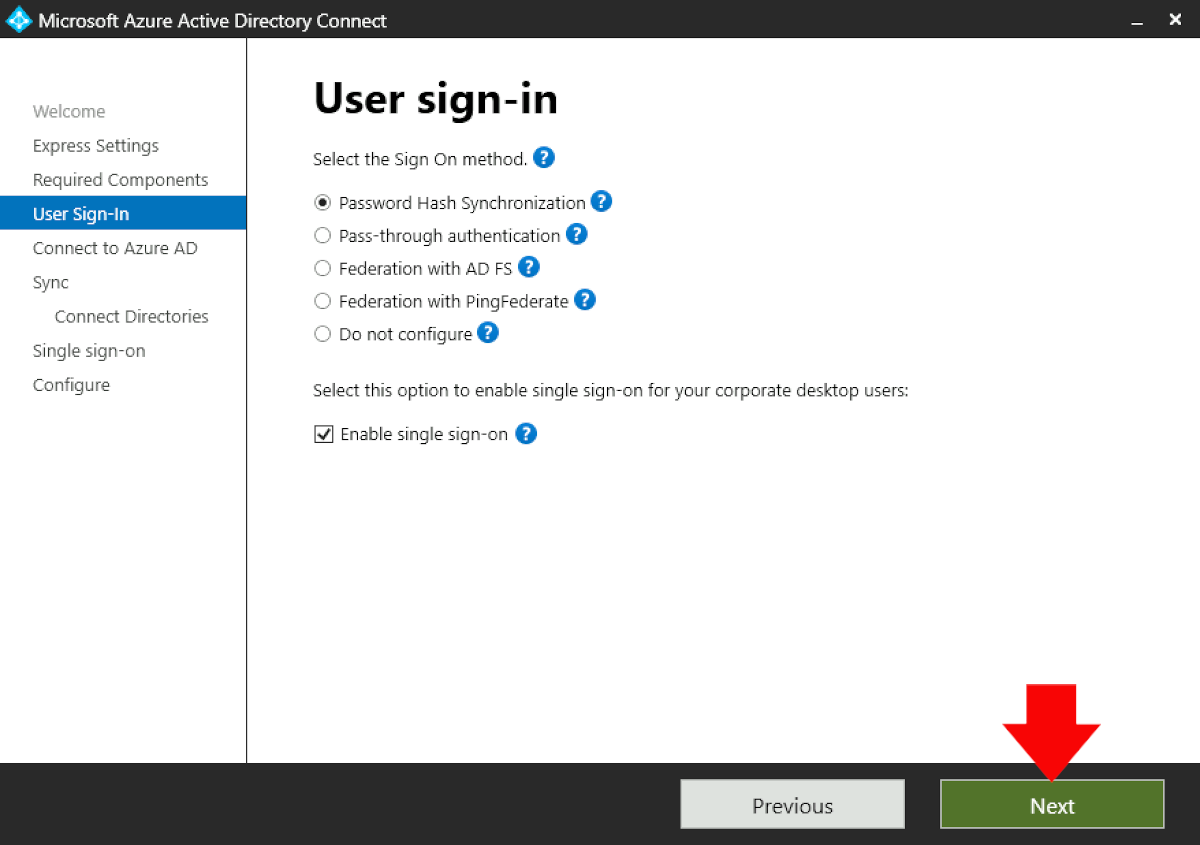
Customise.

Select ‘Import synchronisation settings > In the Location section enter \\old-server-name\c$\ProgramData\AADConnect\filename.json > Install.
From this point forward I will assume you want everything set the same, so other than usernames and passwords accept the defaults > Next.
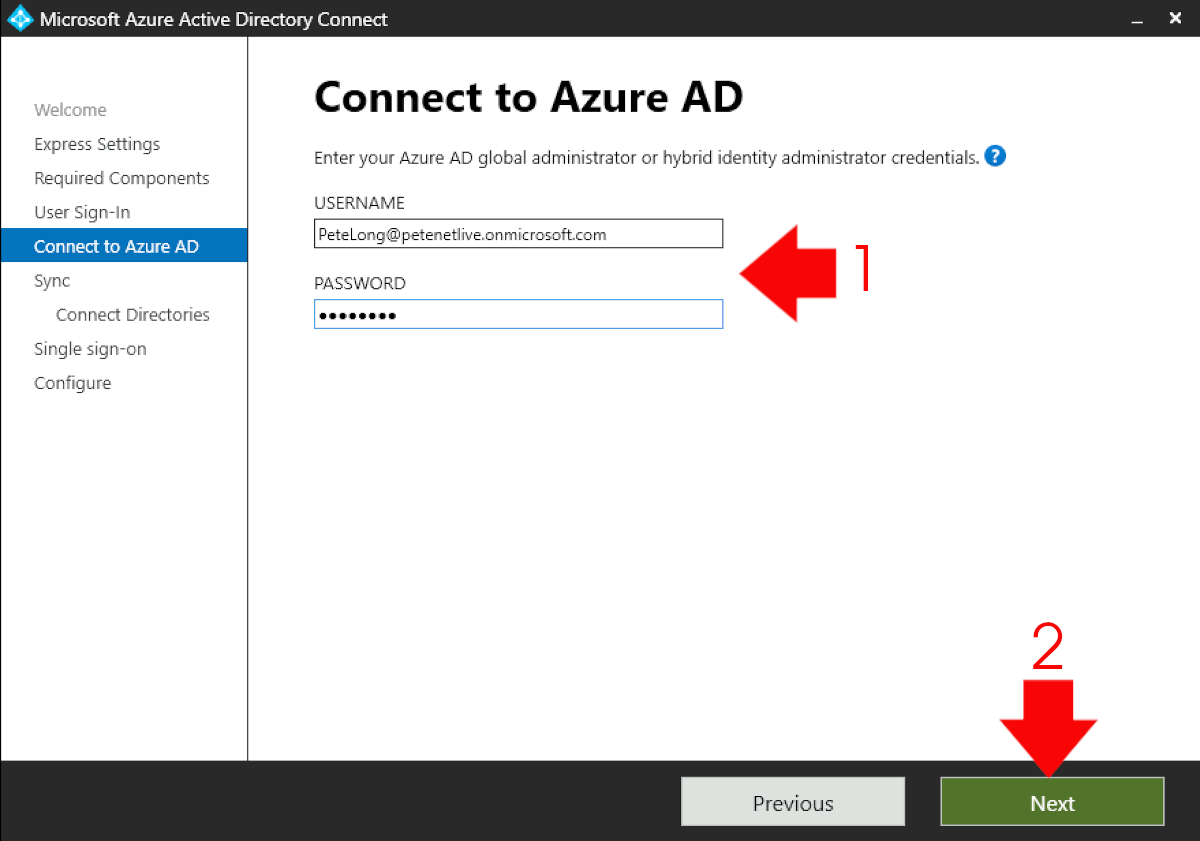
Enter the password to authenticate to M365/Azure AD.
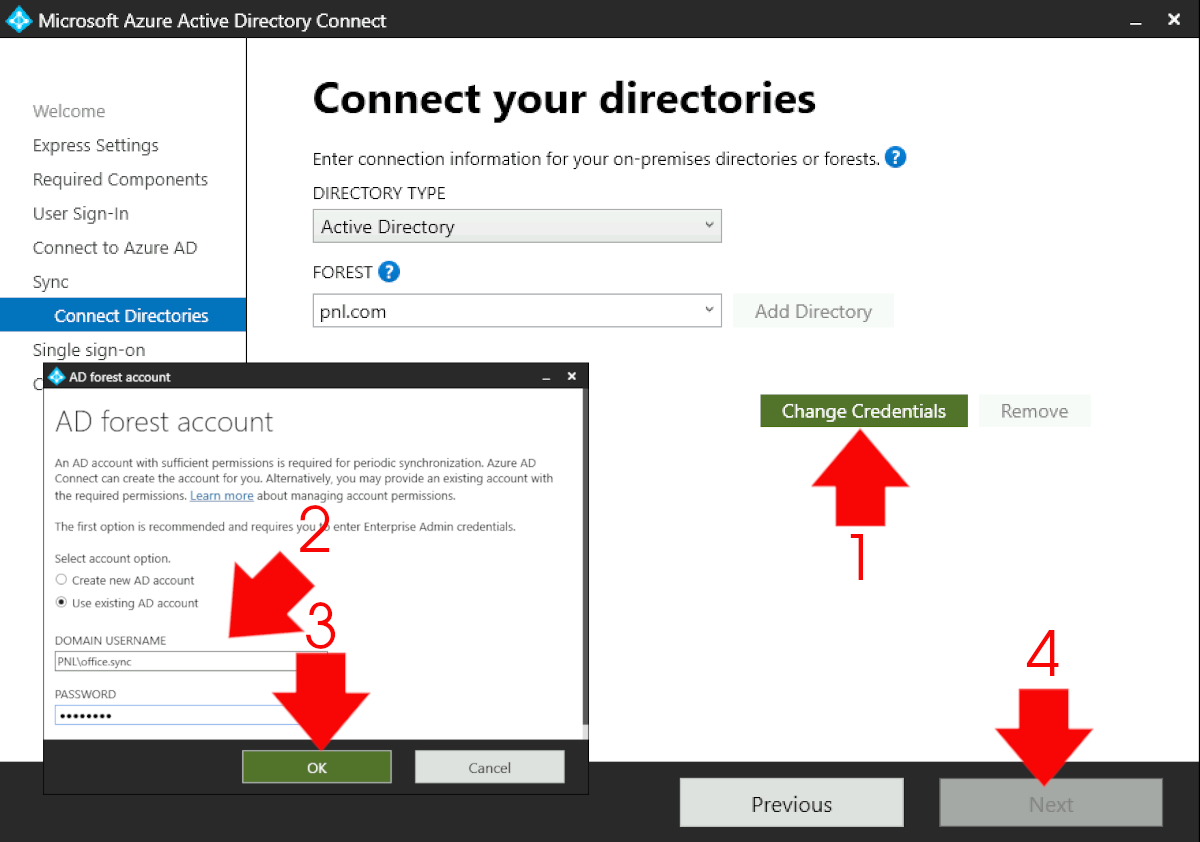
This next screen can be confusing because you can’t click Next, and it’s not apparent why! Next to your domain there should be a green tick, if there’s a red cross you need to select ‘change password’ > Then enter the (local AD account) account you use for synchronisation > Next.
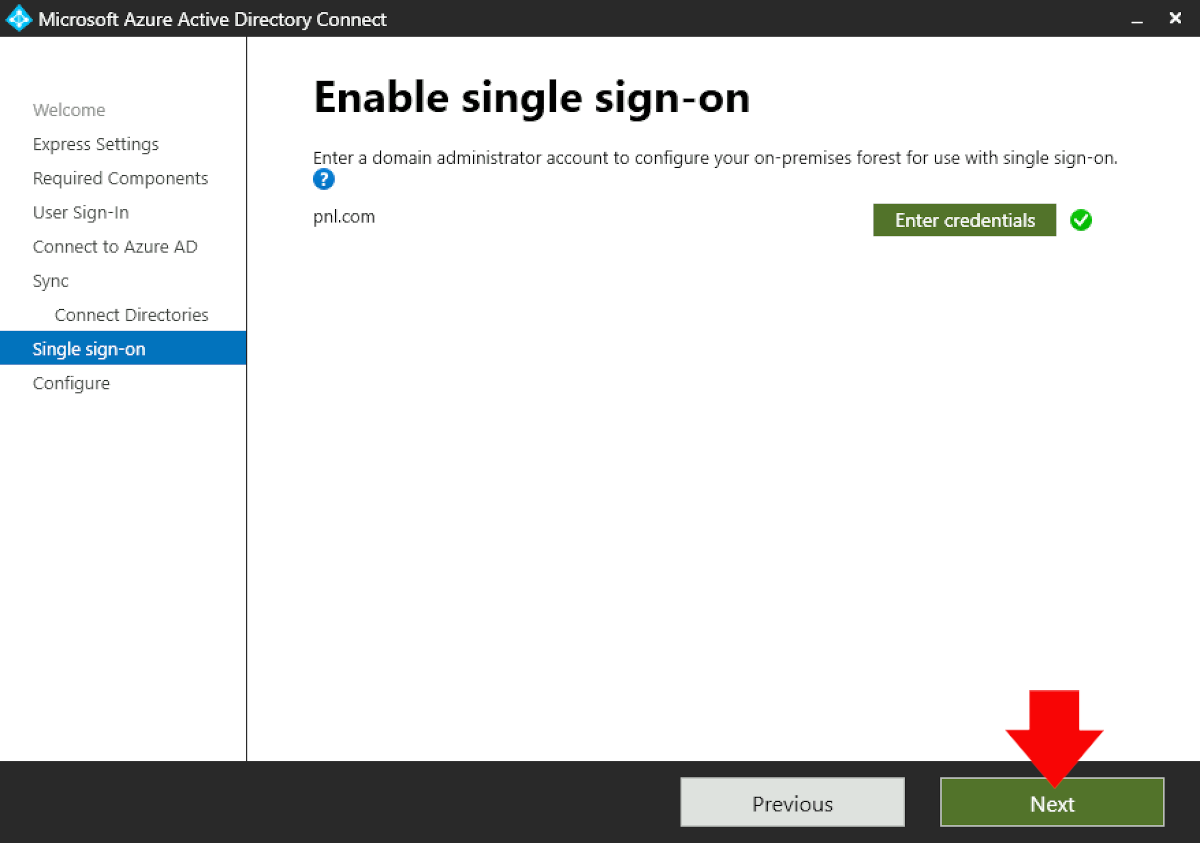
Next.
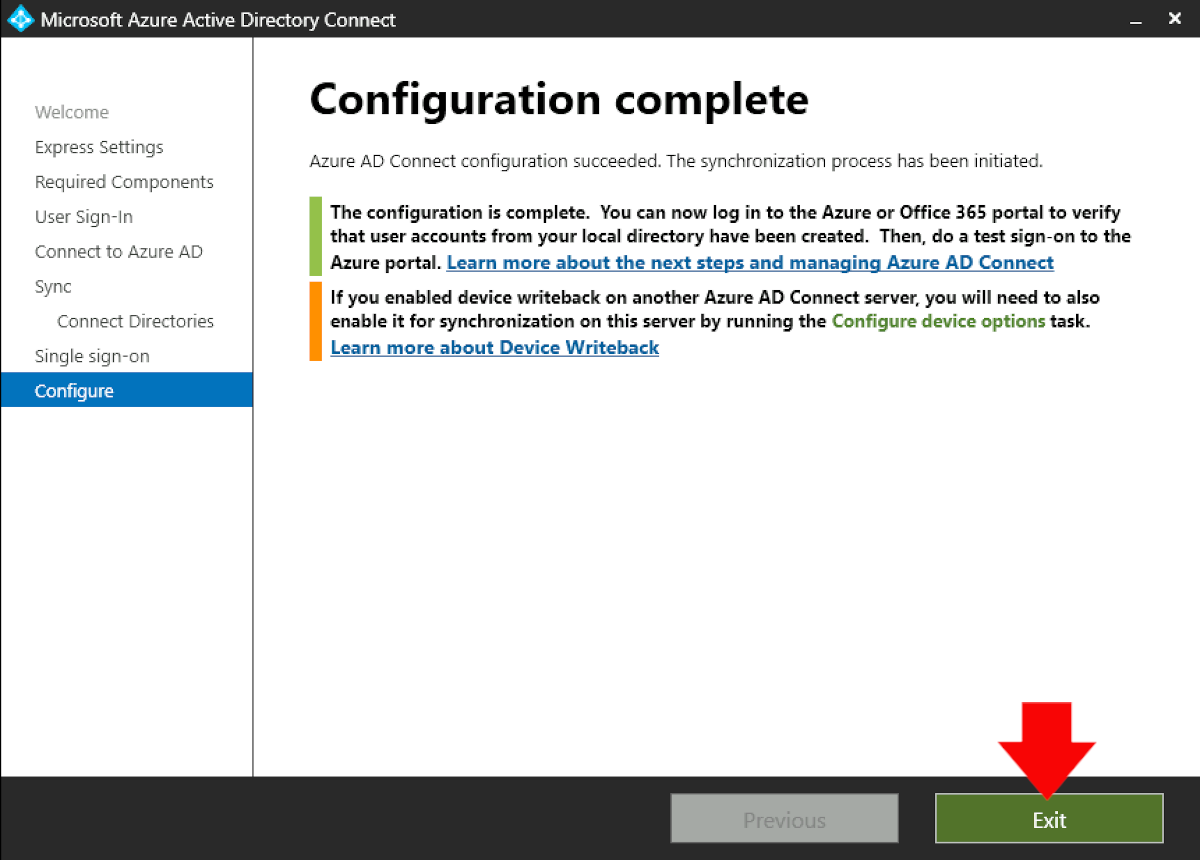
Both options should be ticked by default > Install.
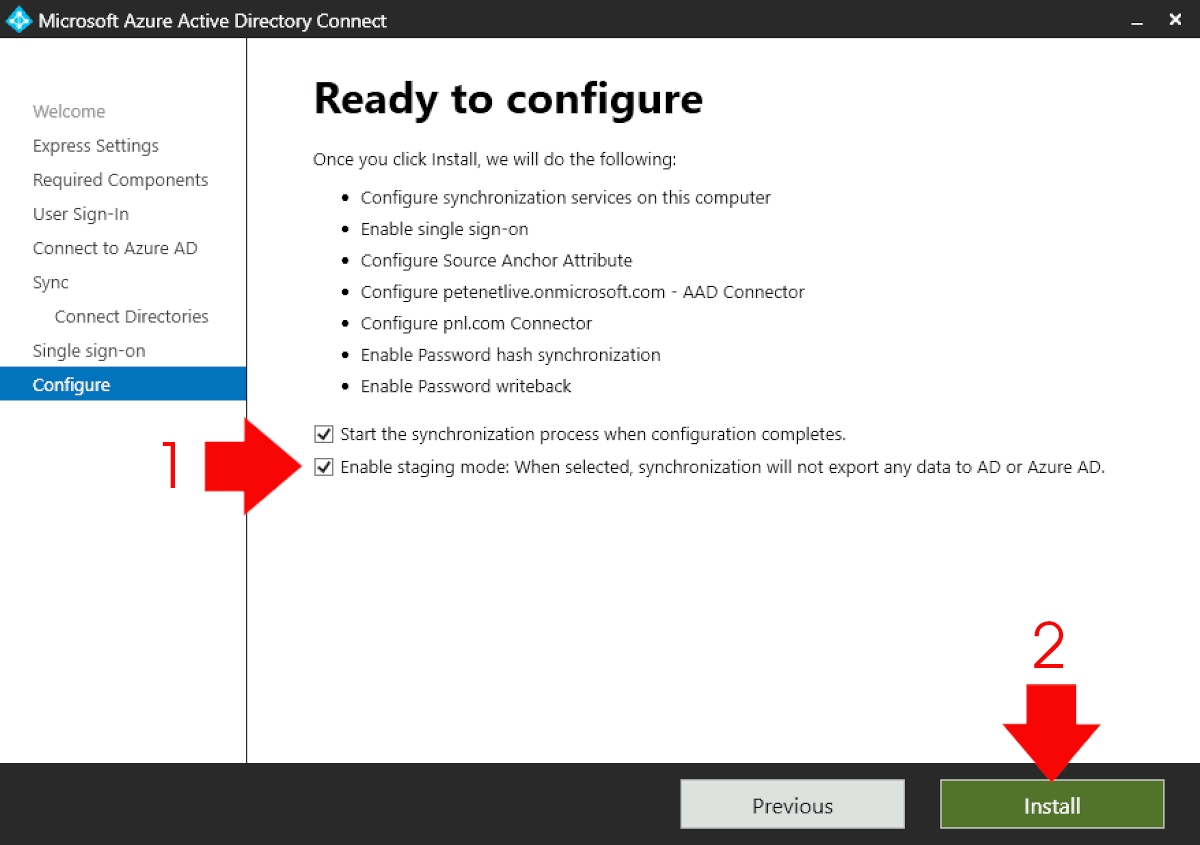
Exit.
Migrate to Microsoft Entra Connect Step Three: Put Old Server Into Staging Mode
I find this much easier to do with PowerShell, but I’ll put the graphical procedure below if you prefer. Issue the following two commands.
$aadSyncSettings=Get-ADSyncGlobalSettings
$aadSyncSettings.parameters
Locate the ‘Microsoft.synchronize.StagingMode‘ section and you will see its value is set to ‘False‘ i.e. staging mode is NOT enabled (or it’s in production mode).
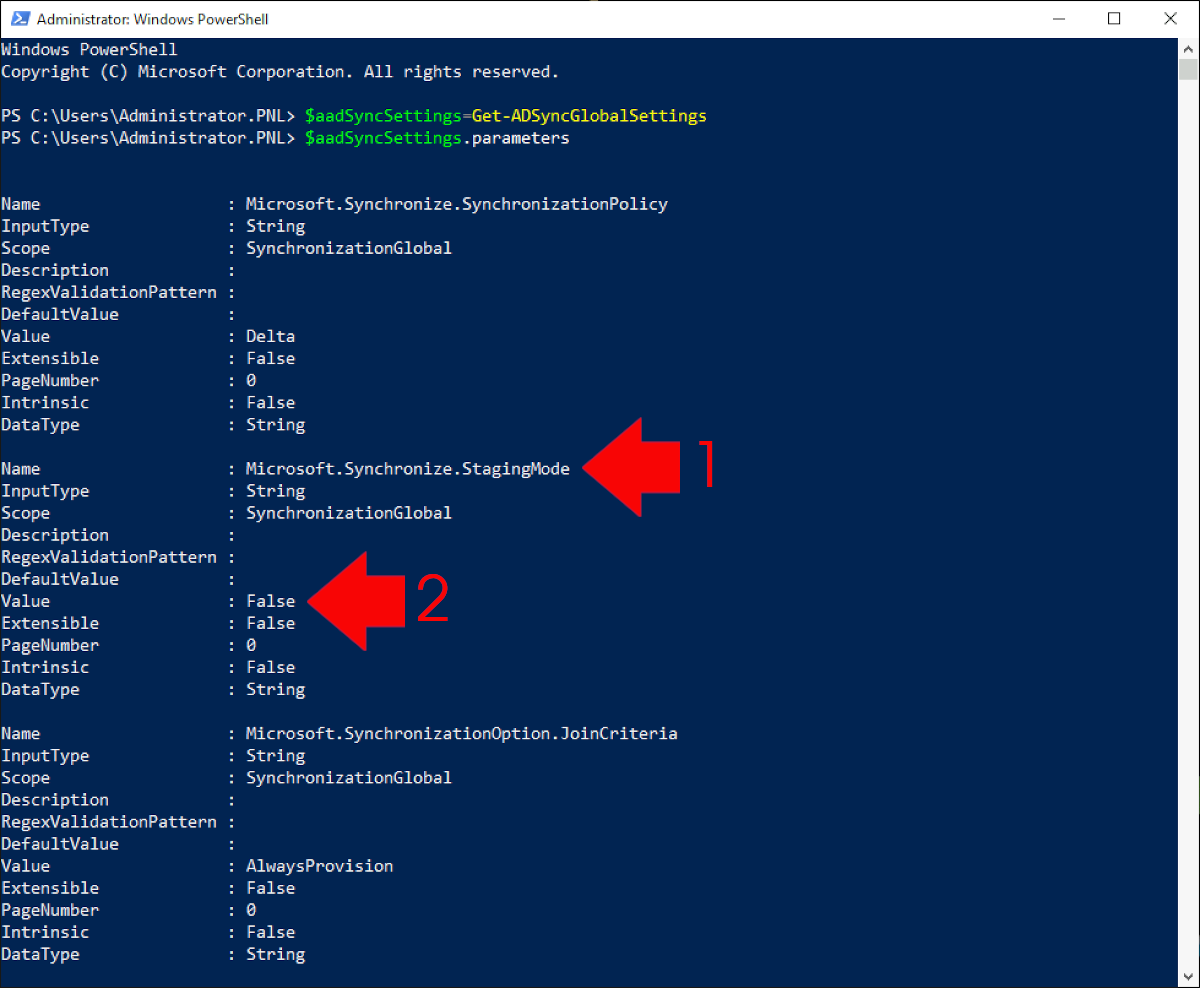
To change the value to ‘True‘ i.e. enable staging mode use the following command.
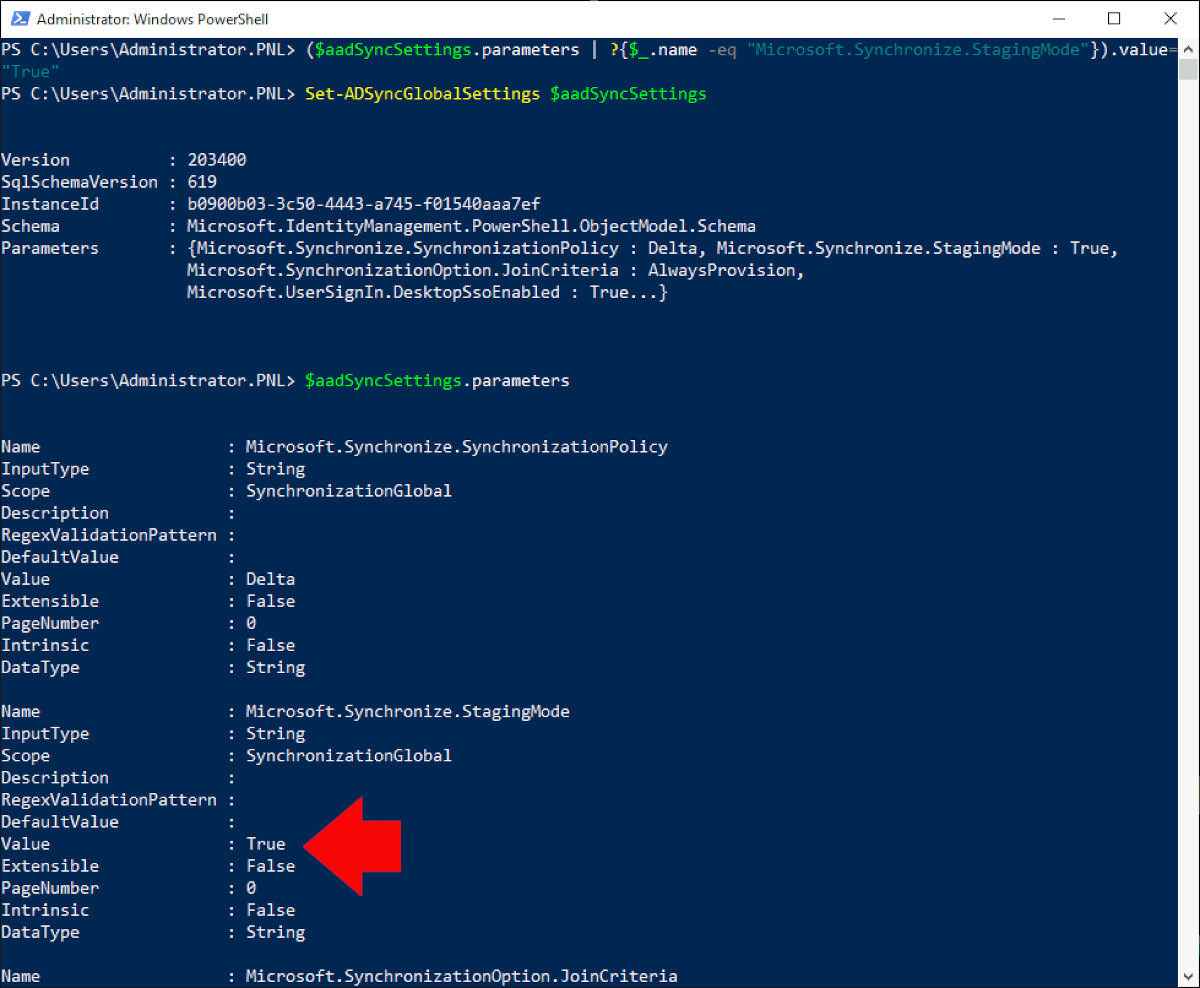
($aadSyncSettings.parameters | ?{$_.name -eq "Microsoft.Synchronize.StagingMode"}).value="True"
Set-ADSyncGlobalSettings $aadSyncSettings
You can then confirm that the staging mode value is set to ‘True’ with the following command.
$aadSyncSettings.parameters
Migrate to Microsoft Entra Connect Step Four: Take the New Server Out of Staging Mode
On the New Server, use the following two commands.
$aadSyncSettings=Get-ADSyncGlobalSettings
($aadSyncSettings.parameters | ?{$_.name -eq "Microsoft.Synchronize.StagingMode"}).value="False"
Set-ADSyncGlobalSettings $aadSyncSettings
You can then confirm that the staging mode value is set to ‘False’ with the following command.
$aadSyncSettings.parameters

Migrate to Microsoft Entra Connect Step Five: Check for Errors
On Premises: You can look in ‘Azure AD Connect Synchronisation Service.’
Microsoft 365: The main Admin console will tell you (in the user management pane).

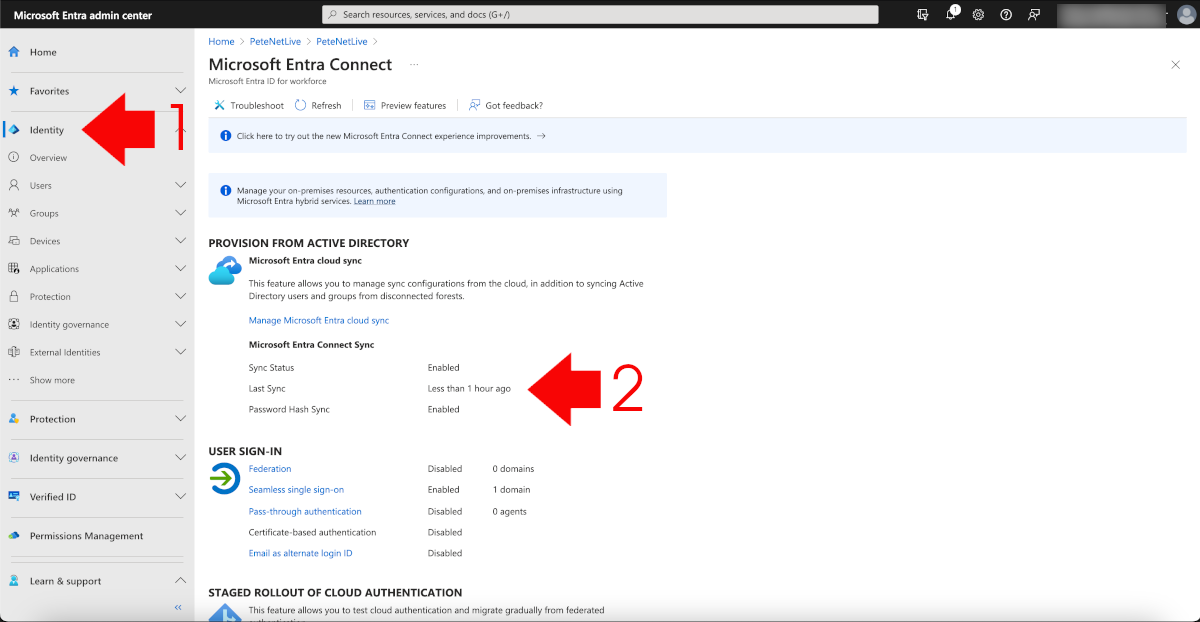
Microsoft Entra Admin Panel: Look under identity > Provision from Active Directory.
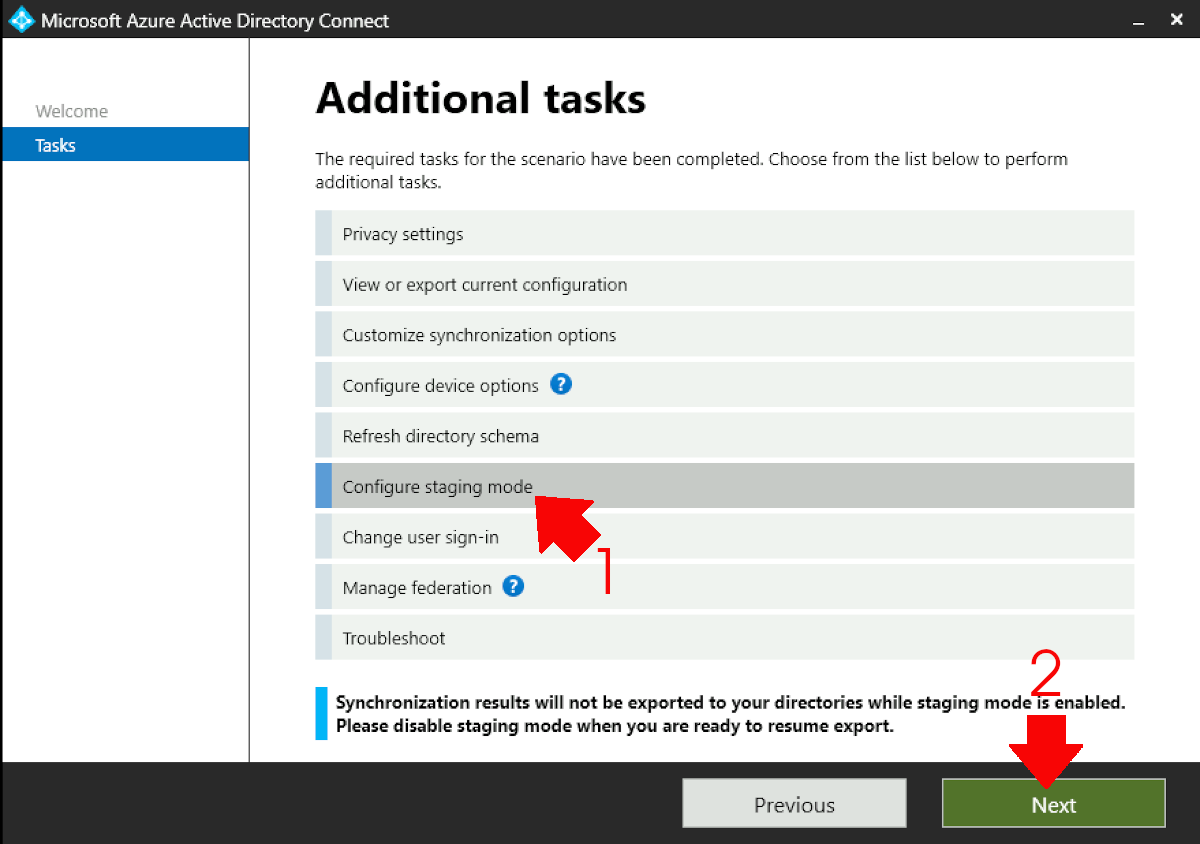
Alternate Steps to Enable Staging Mode (From GUI)
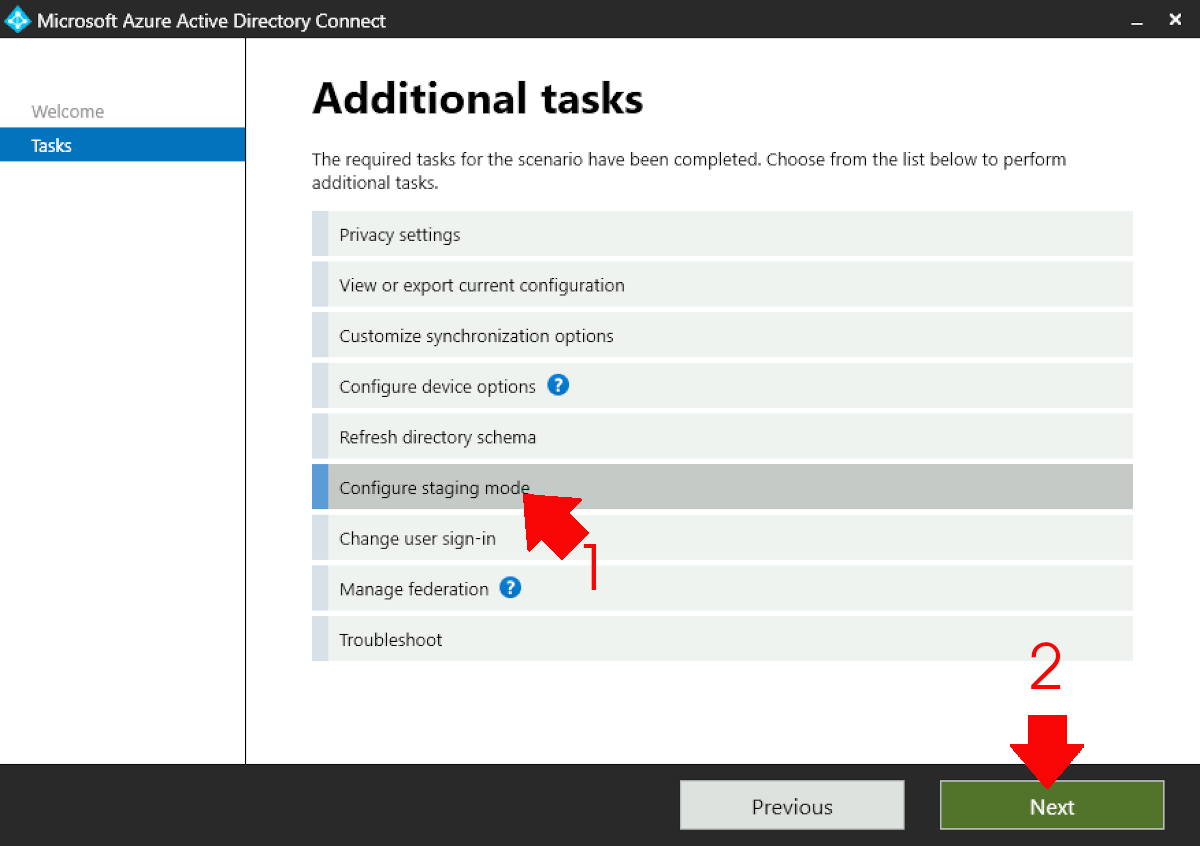
On the Old Server, launch the Azure AD connect shortcut > Configure.

Configure Staging Mode > Next.
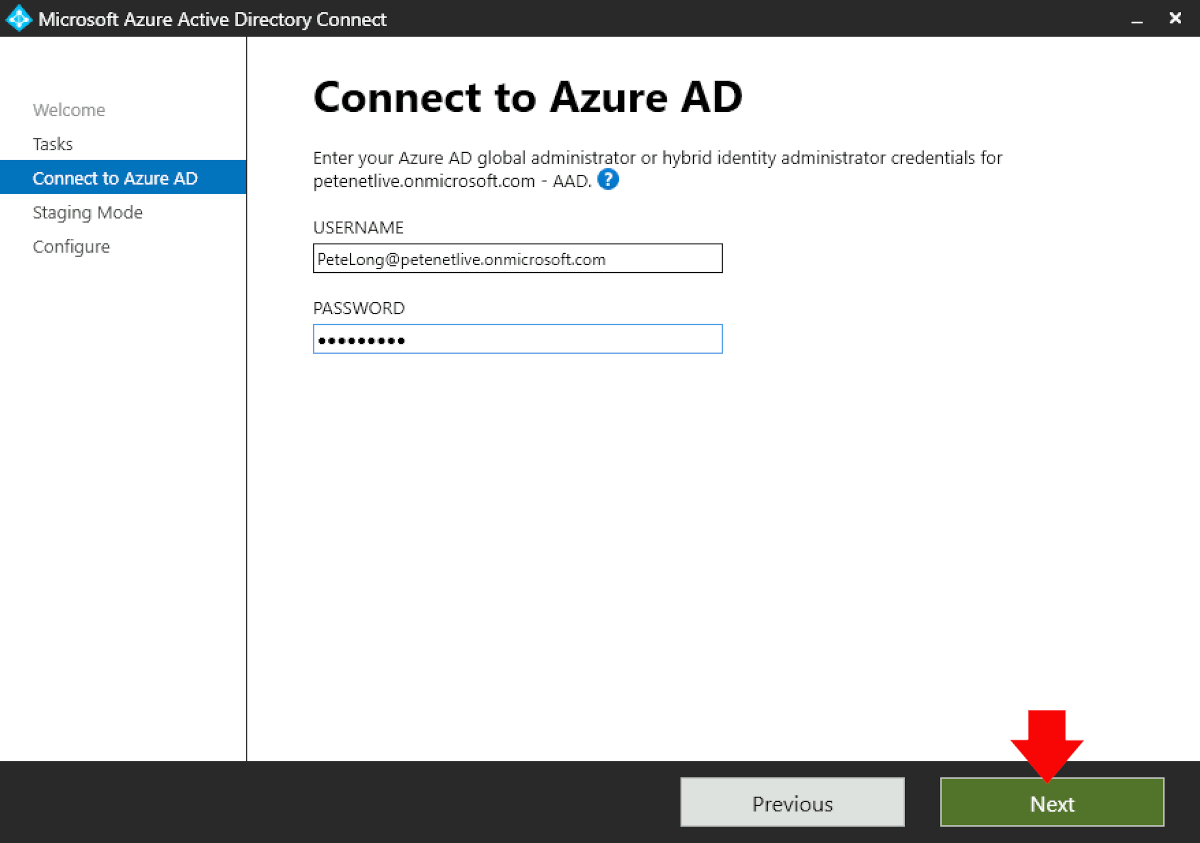
Enter your admin password > Next.
Tick to select ‘Enable Staging Mode‘ > Next.
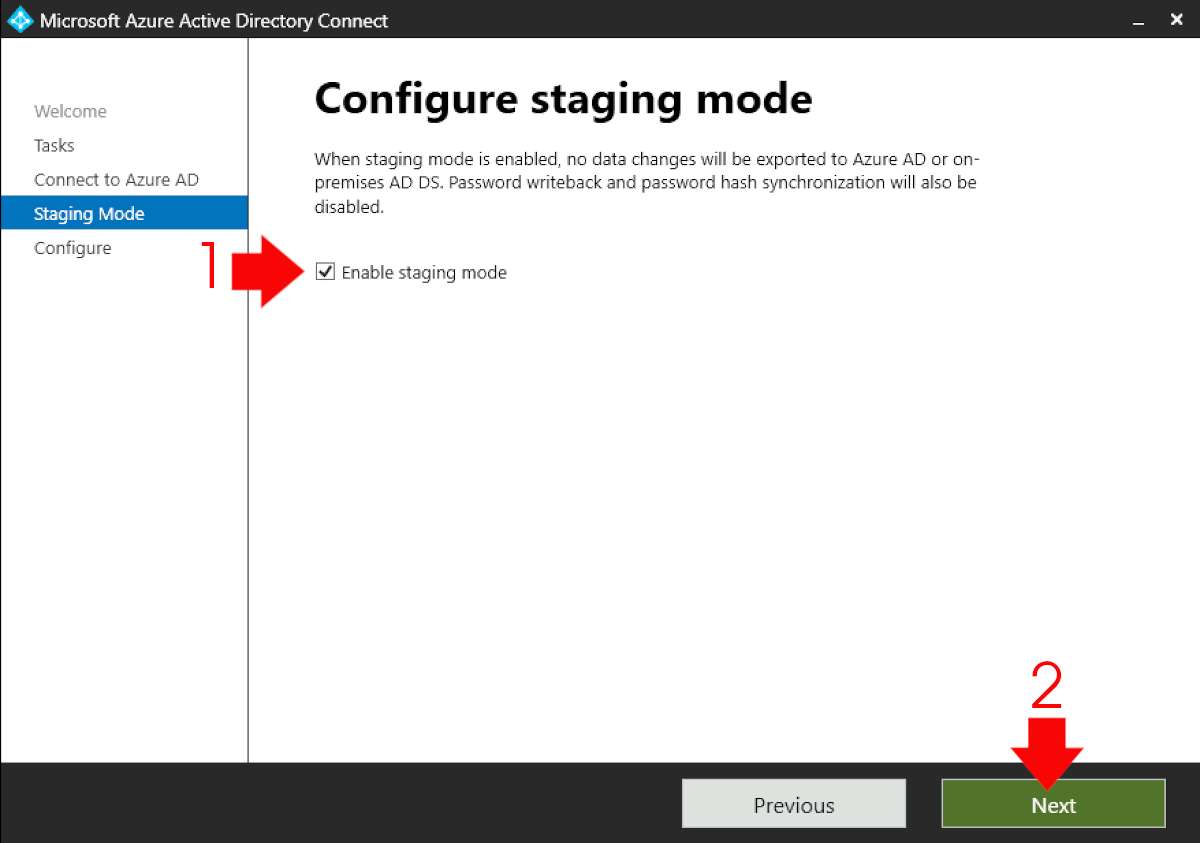
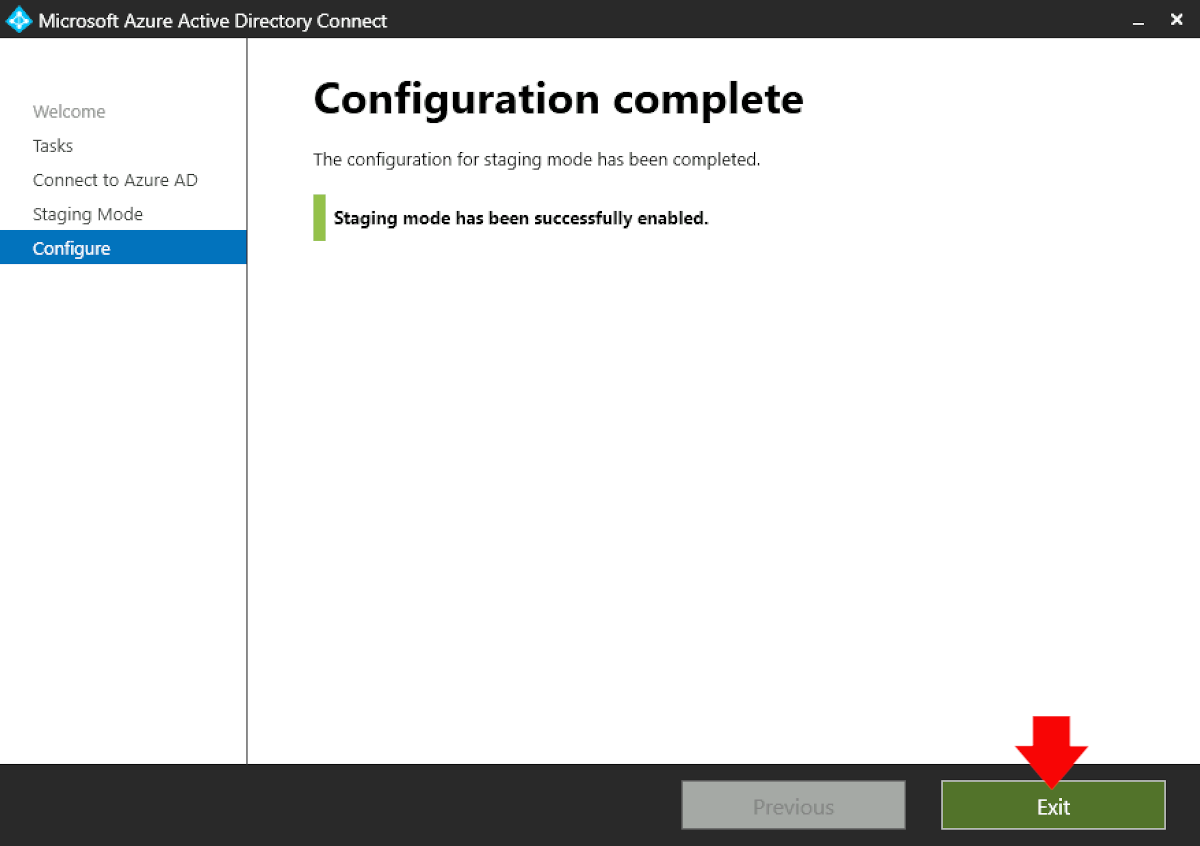
Configure.
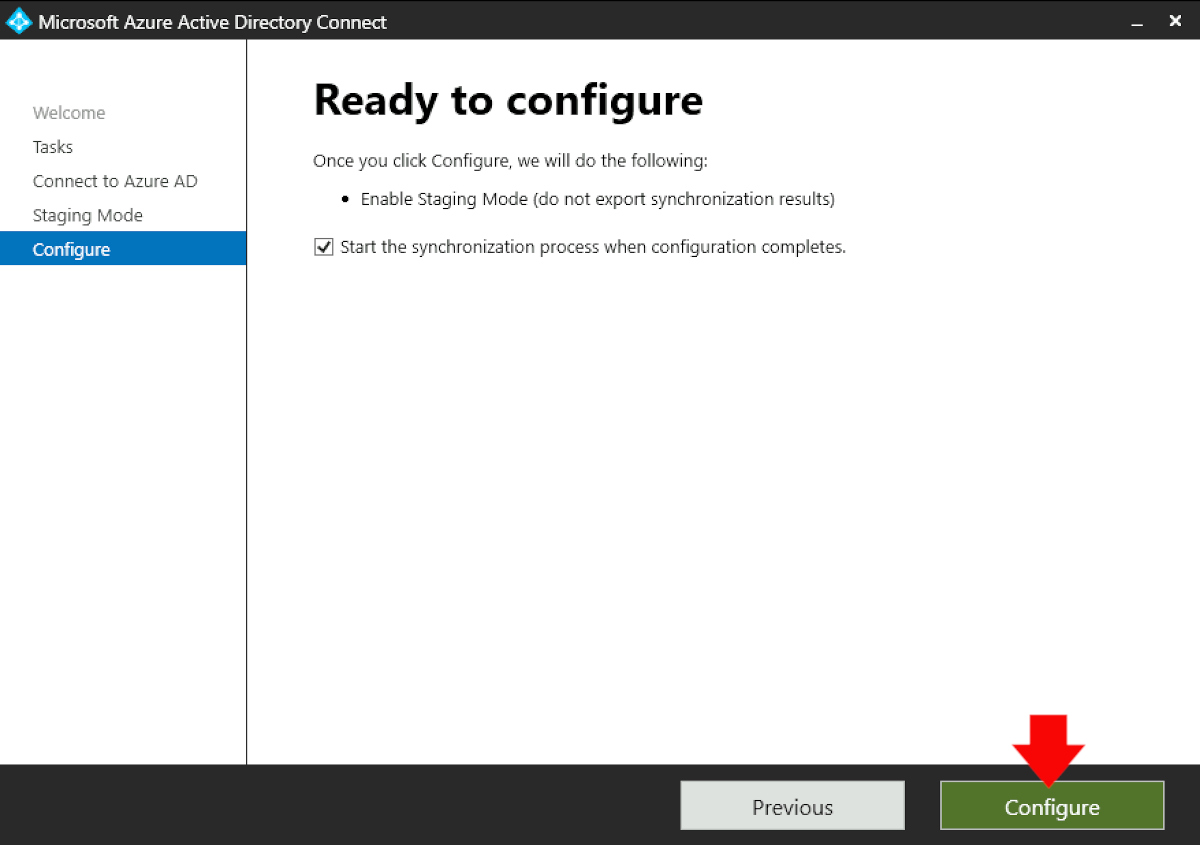
Exit
Alternate Steps to Disable Staging Mode (From GUI)
On the New Server, launch the Azure AD connect shortcut > Configure.
Configure Staging Mode > Next
Enter your admin password > Next.

Untick to deselect ‘Enable Staging Mode‘ > Next.
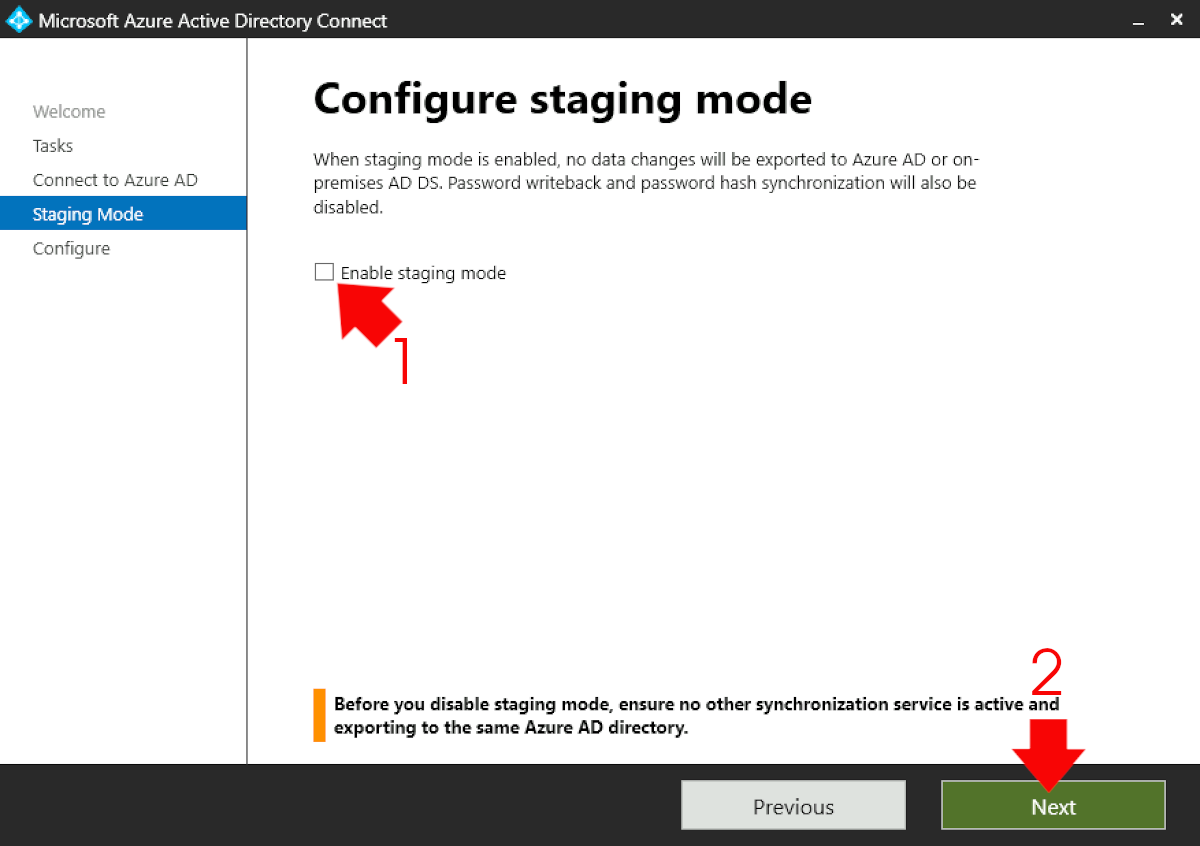
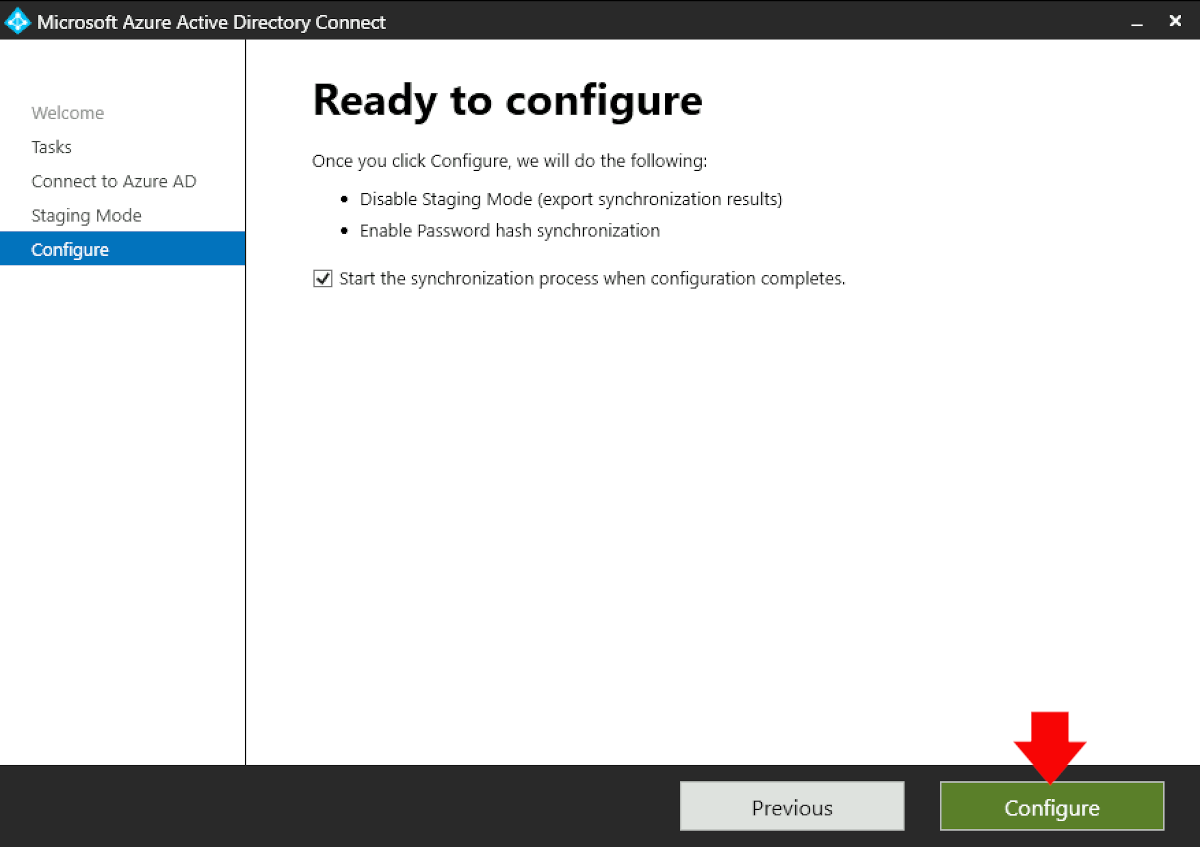
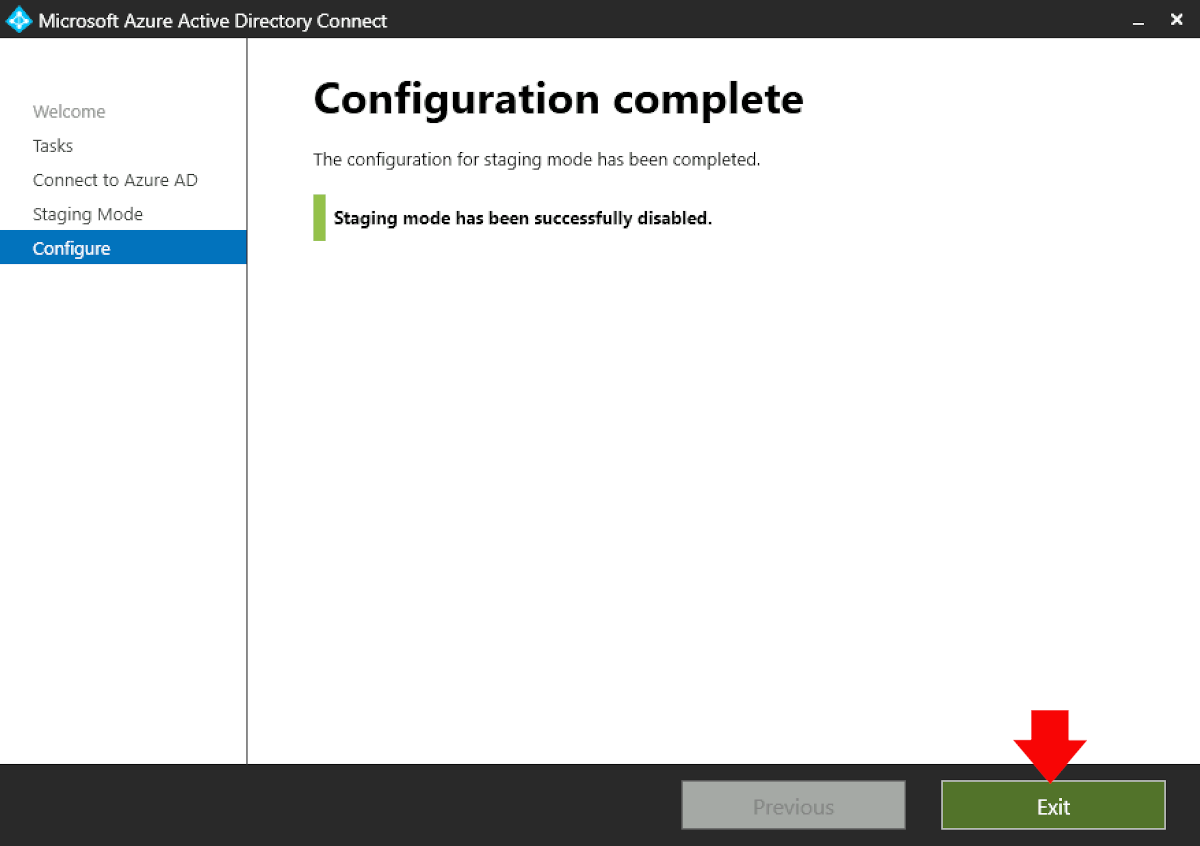
Configure.
Exit
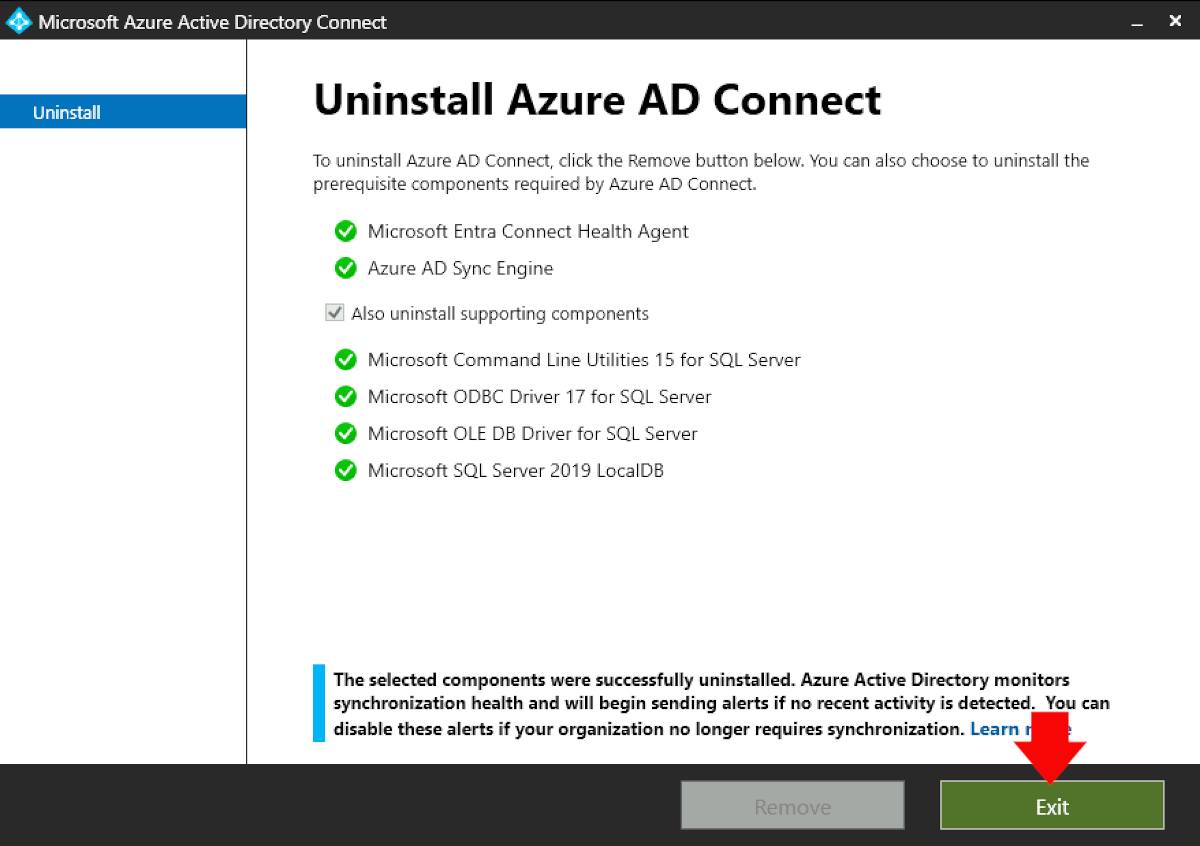
Migrate to Microsoft Entra Connect Step Five: Uninstall Microsoft Azure AD Connect
On the Old Server, search for appwiz.cpl > run it > Select Microsoft Azure AD Connect > Uninstall > Yes > Remove.
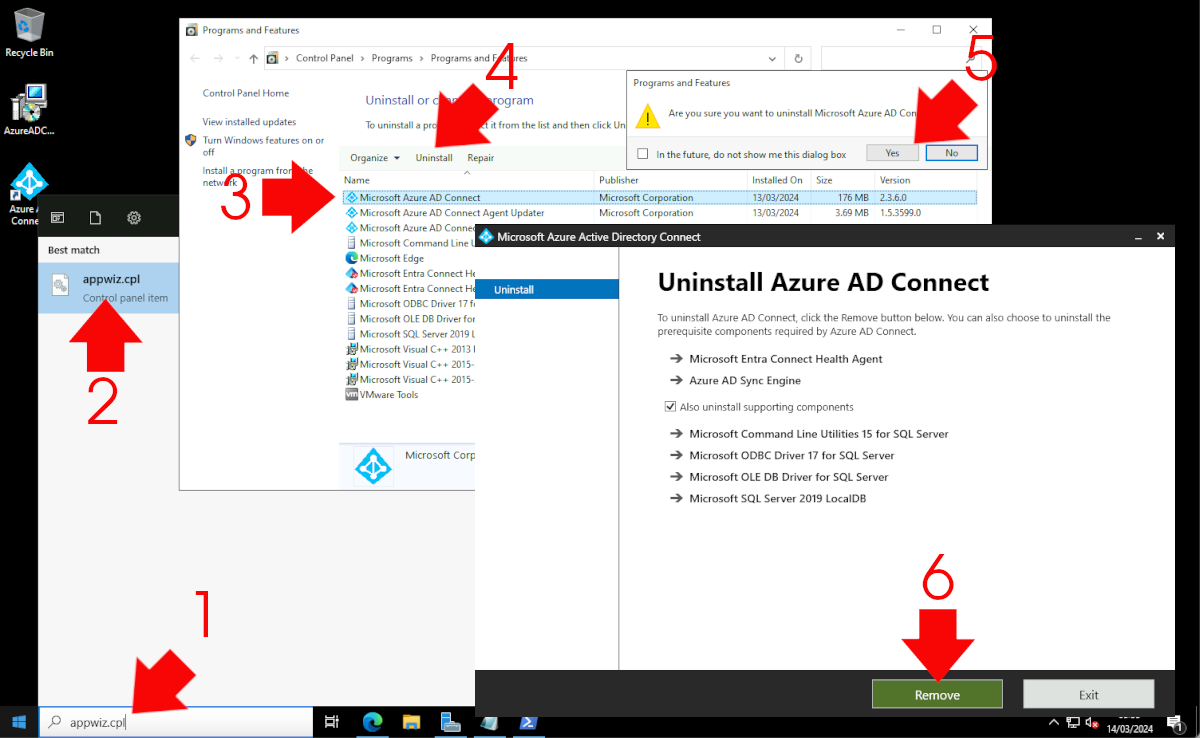
Exit.
Related Articles, References, Credits, or External Links
Locate Your Azure AD Connect Server
Azure AD Connect: Correct Or Remove Duplicate Values
Cannot Recreate Azure AD ‘Local’ AD Connector
01/10/2024
Hi Pete, thank you very much for your articels, the helped me a lot the last years, i love the detailed guides. I have a short questions, i have 2 Windows Server 2016 Entra Connect Server, Primary and Staging Server, automatic Update is configured, but the don’t update. Should i work out the full installation guide in this article, like a new Entra Connect Server, or is possible only download the EntraConnect and install it over the actual Version?
Thanks a lot and best regards
Silvio
07/10/2024
Yuo can certainly install the newer version over the old, one an it will retain its settings, you just need to know the passwords for the sync and admin accounts