
KB ID 0001692
Problem
Given my background I’m usually more comfortable connecting to Azure with a Route Based VPN from a hardware device, like a Cisco ASA. I got an email this afternoon, a client had a server in a private cloud and a server in Azure, they needed to transfer files from the Azure server to the server in the private cloud. Now on further investigation this client had a Cisco vASA so a VPN was the best option for them, (probably).
But what if they didn’t? Or what if they were ‘working from home’ and needed to access their Azure servers that were not otherwise publicly accessible?
Well the Microsoft solution for that is called an ‘Azure Point to Site VPN‘, even though in the current Azure UI they’ve called it ‘User VPN Configuration‘, because ‘Hey! Screw consistency and documentation that goes out of date every time a developer has a bright idea, and updates the UI’ Note: I have a thing about things being changed in GUIs!
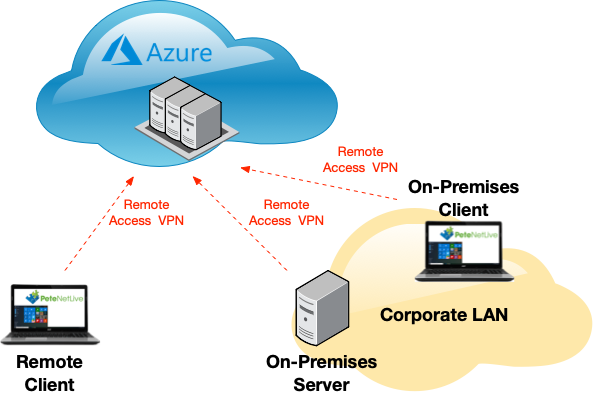
So regardless whether you are on or off the corporate LAN, you can connect to your Azure Virtual Networks.
Azure VPN (Remote Access)
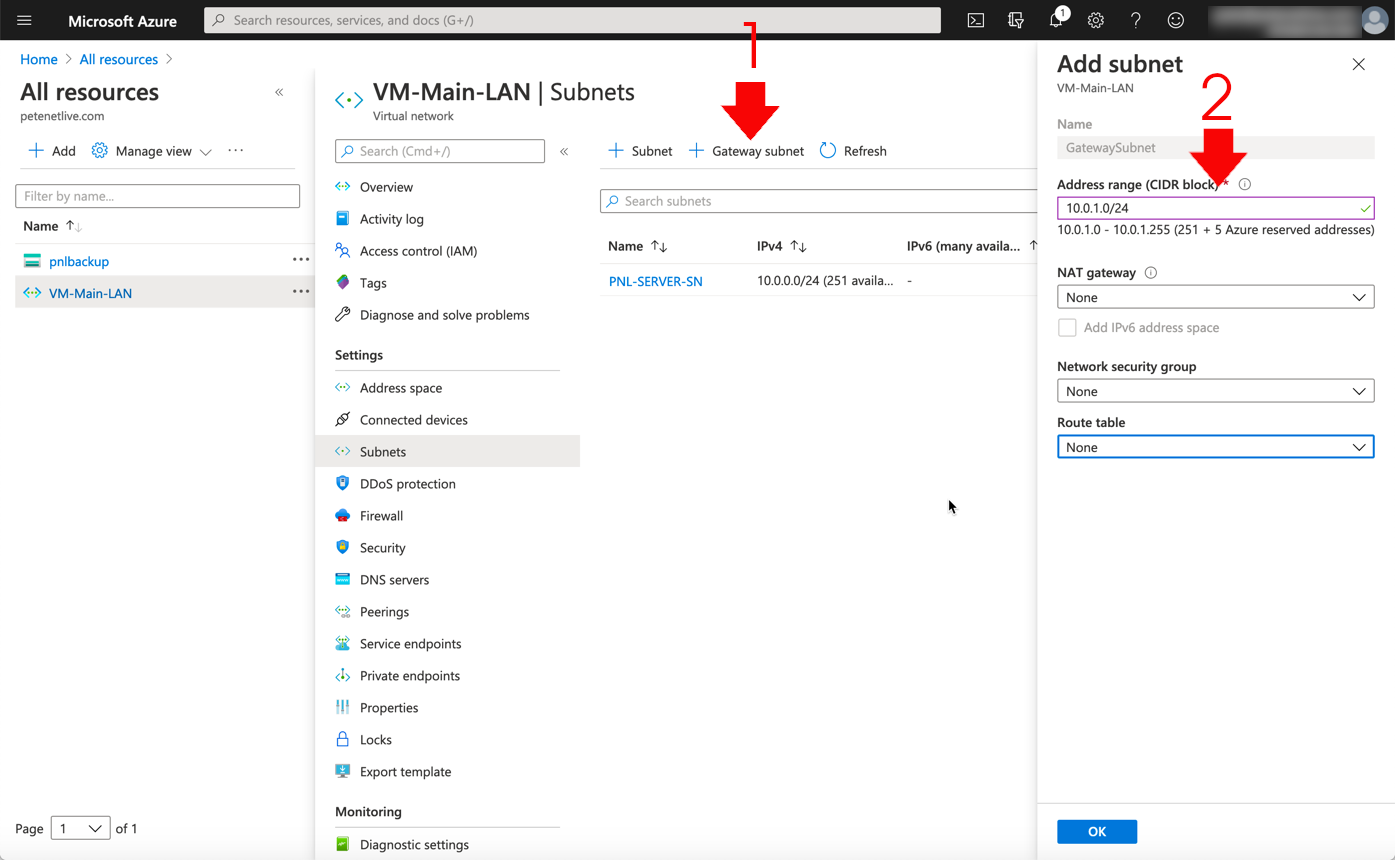
This is not a full Azure tutorial, I’m assuming, as you want to connect to existing Azure resources, you will already have most of this setup already. But, just to quickly run through. You will need a Resource Group, and in that Resource Group you will need a Virtual Network. (Note: I like to delete the ‘default‘ subnet and create one with a sensible name).

So far so good, within your virtual network you will need to create, (if you don’t already have one,) a ‘Gateway Subnet‘. To annoy the other network engineers, I’ve made it a /24, but to be honest a /29 is usually good enough).
Now to terminate a VPN, you need a ‘Virtual Network Gateway‘.
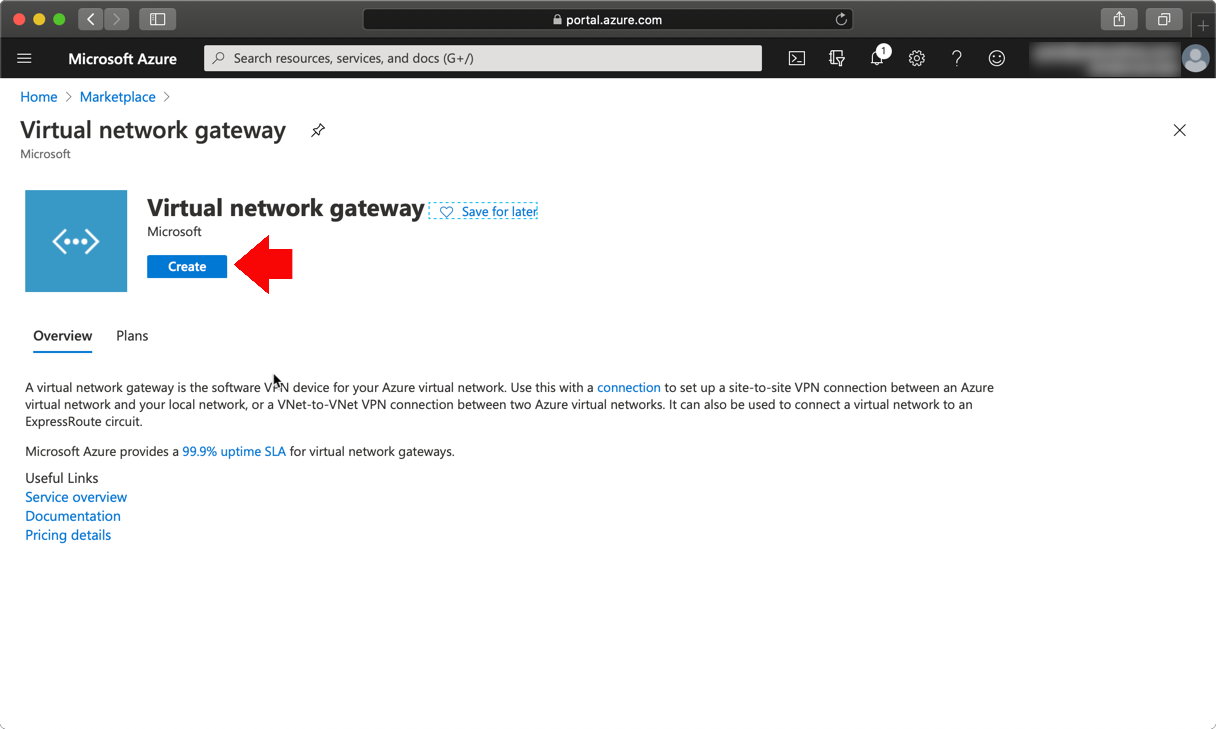
Make sure it’s set for VPN (Route Based) > Connected to your Virtual Network > Either create (or assign) a public IP to it. I told you I’d be quick, however the Gateway will take a few minutes to deploy, (time for a coffee.)

Azure VPN Certificate Requirement
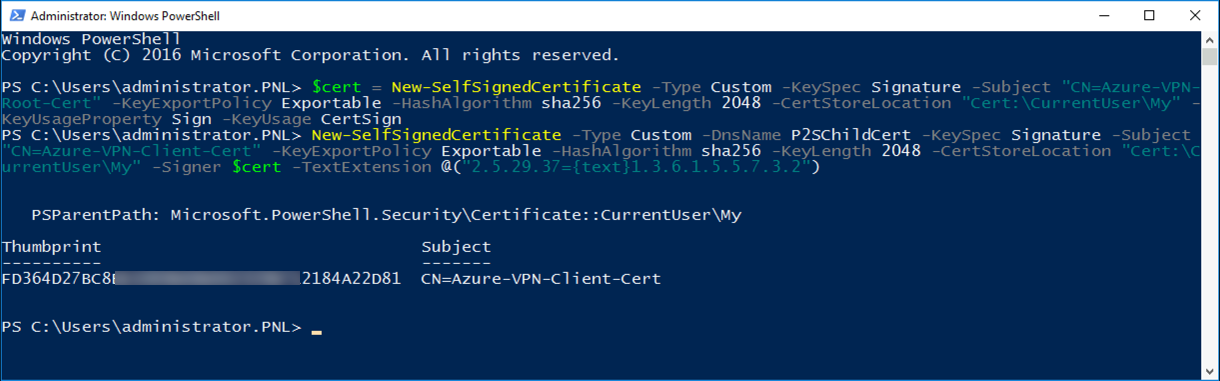
For the purpose of this tutorial I’ll just create some certificates with PowerShell, (a root CA cert, and a client cert signed by that root certificate). This wont scale very well in a production environment. I’d suggest setting up a decent PKI infrastructure, Then using auto-enrolment for your users to get client certificates. However for our run through, execute the following TWO commands;
$cert = New-SelfSignedCertificate -Type Custom -KeySpec Signature -Subject "CN=Azure-VPN-Root-Cert" -KeyExportPolicy Exportable -HashAlgorithm sha256 -KeyLength 2048 -CertStoreLocation "Cert:\CurrentUser\My" -KeyUsageProperty Sign -KeyUsage CertSign

New-SelfSignedCertificate -Type Custom -DnsName Azure-VPN-Client-Cert -KeySpec Signature -Subject "CN=Azure-VPN-Client-Cert" -KeyExportPolicy Exportable -HashAlgorithm sha256 -KeyLength 2048 -CertStoreLocation "Cert:\CurrentUser\My" -Signer $cert -TextExtension @("2.5.29.37={text}1.3.6.1.5.5.7.3.2")
Now launch ‘certmgr‘ and you will see the two certificates. Firstly, export the client certificate.
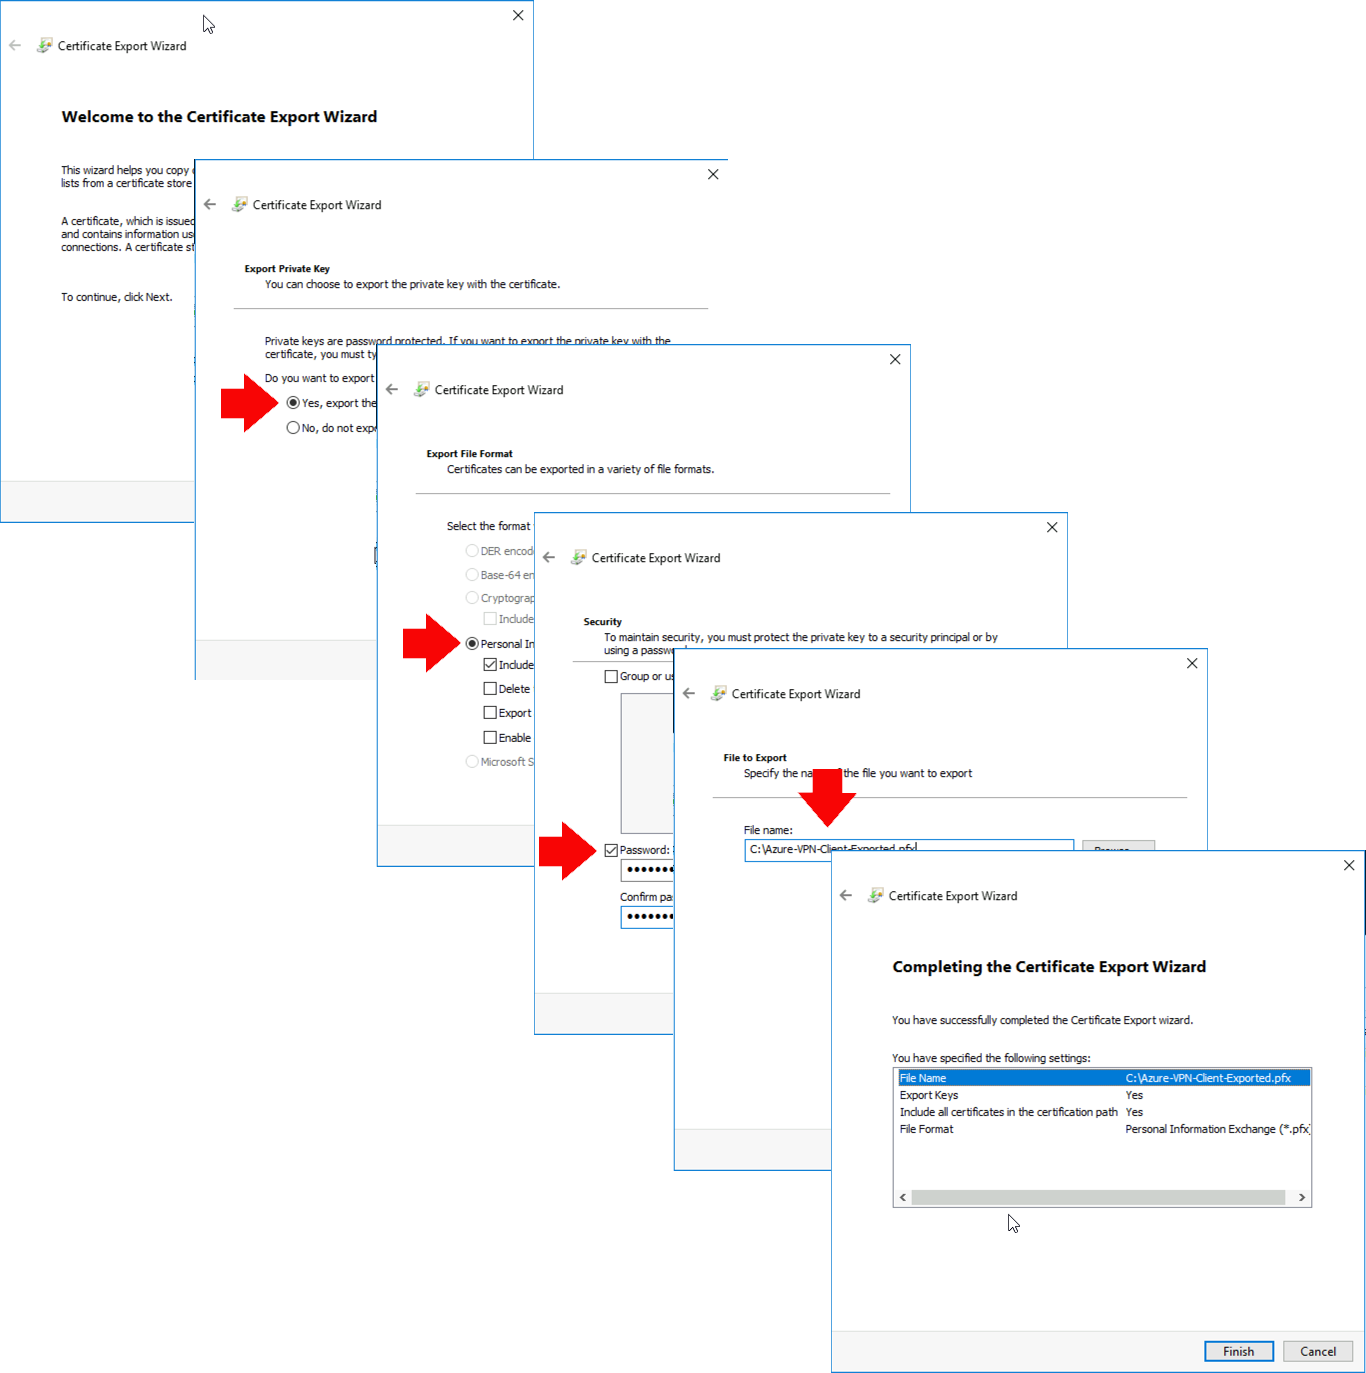
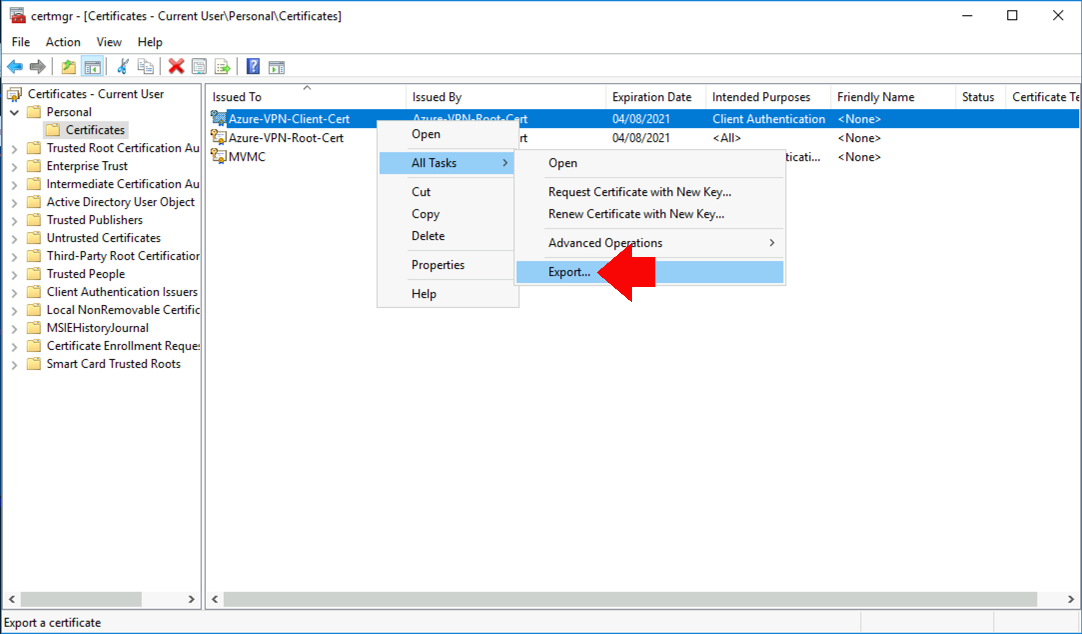 Yes you want to export the private key > You want to Save it as a .PFX file > Create a password for the certificate (MAKE NOTE OF IT!) > Save it somewhere you can get to, (you will need it in a minute).
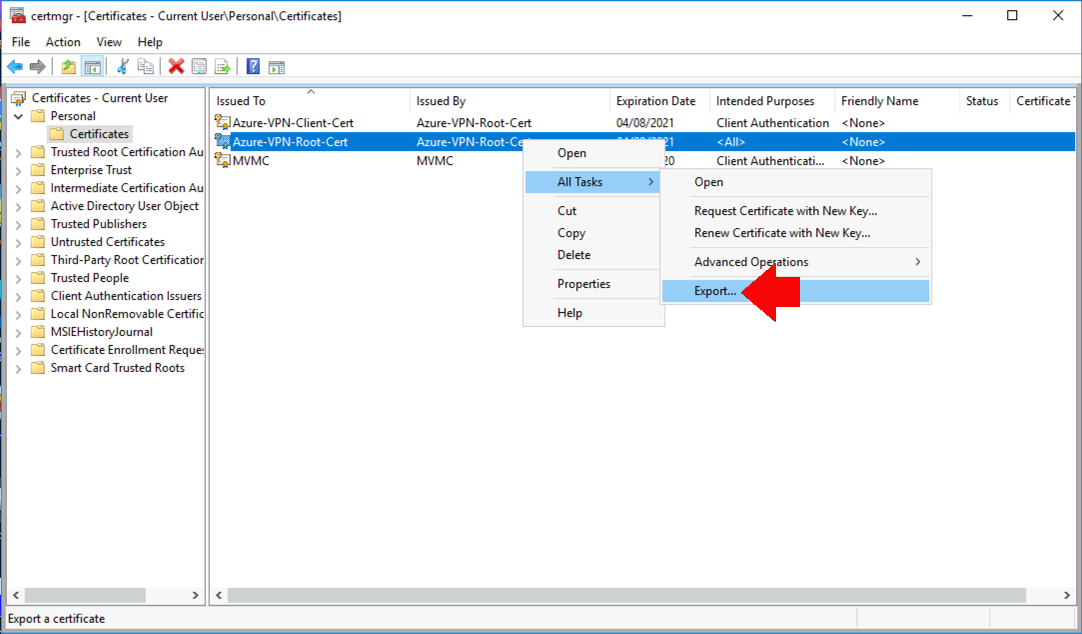
Secondly, export the Root CA certificate.
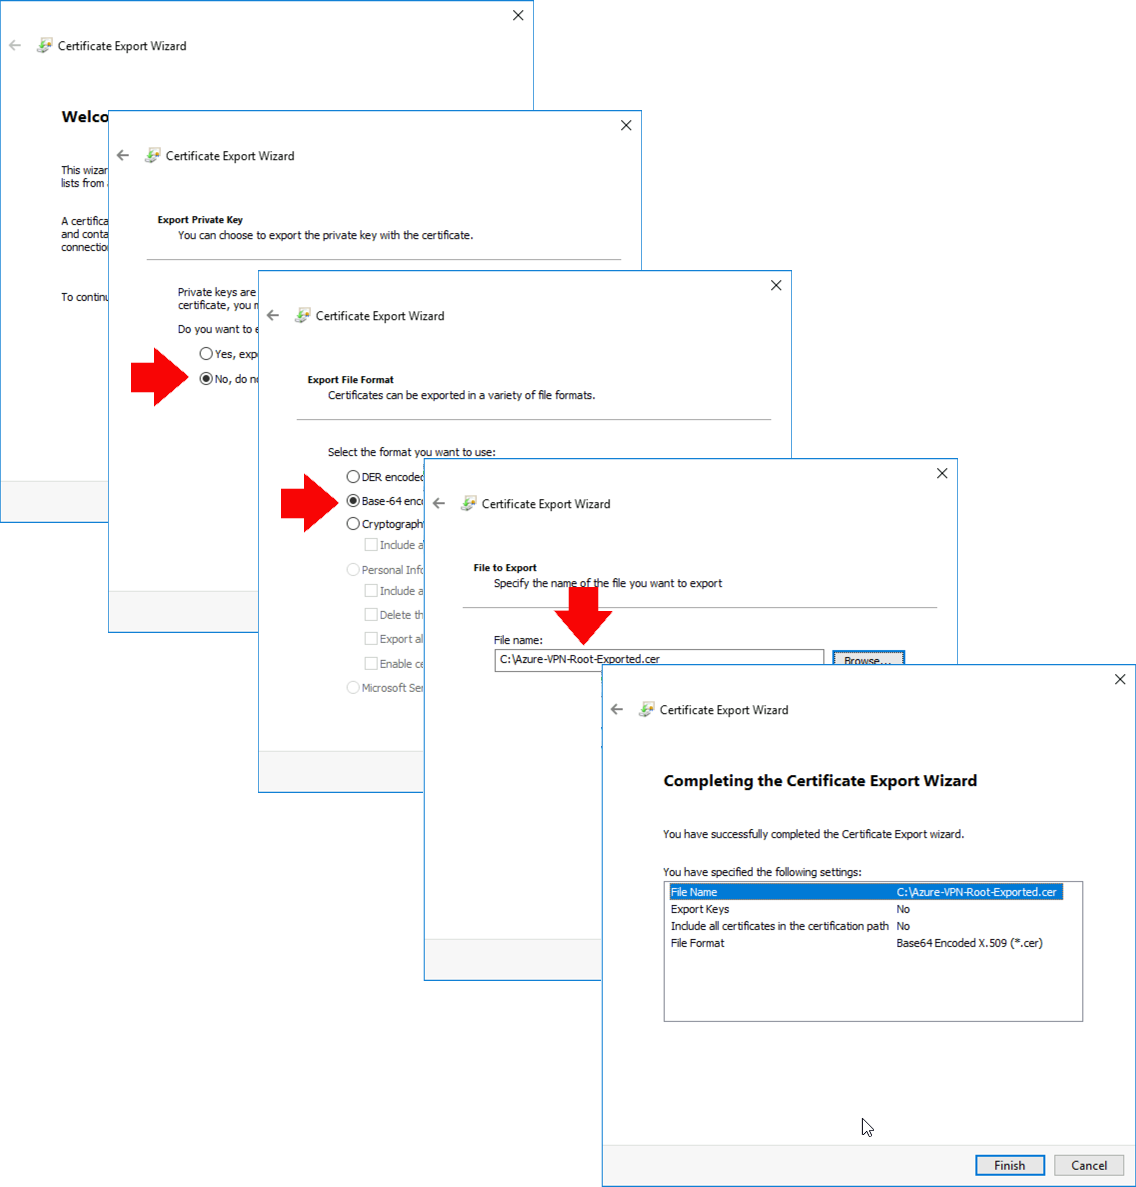
You DON’T export the private key > Save as Base-64 encoded > Again save it somewhere sensible, you will also need it in a minute.
Open the ROOT CA CERT with Notepad, and copy all the text BETWEEN —-BEGIN CERTIFICATE—- and —-END CERTIFICATE—- Note: This is unlike most scenarios, when working with PEM files, where you select everything, (it tripped me up!)

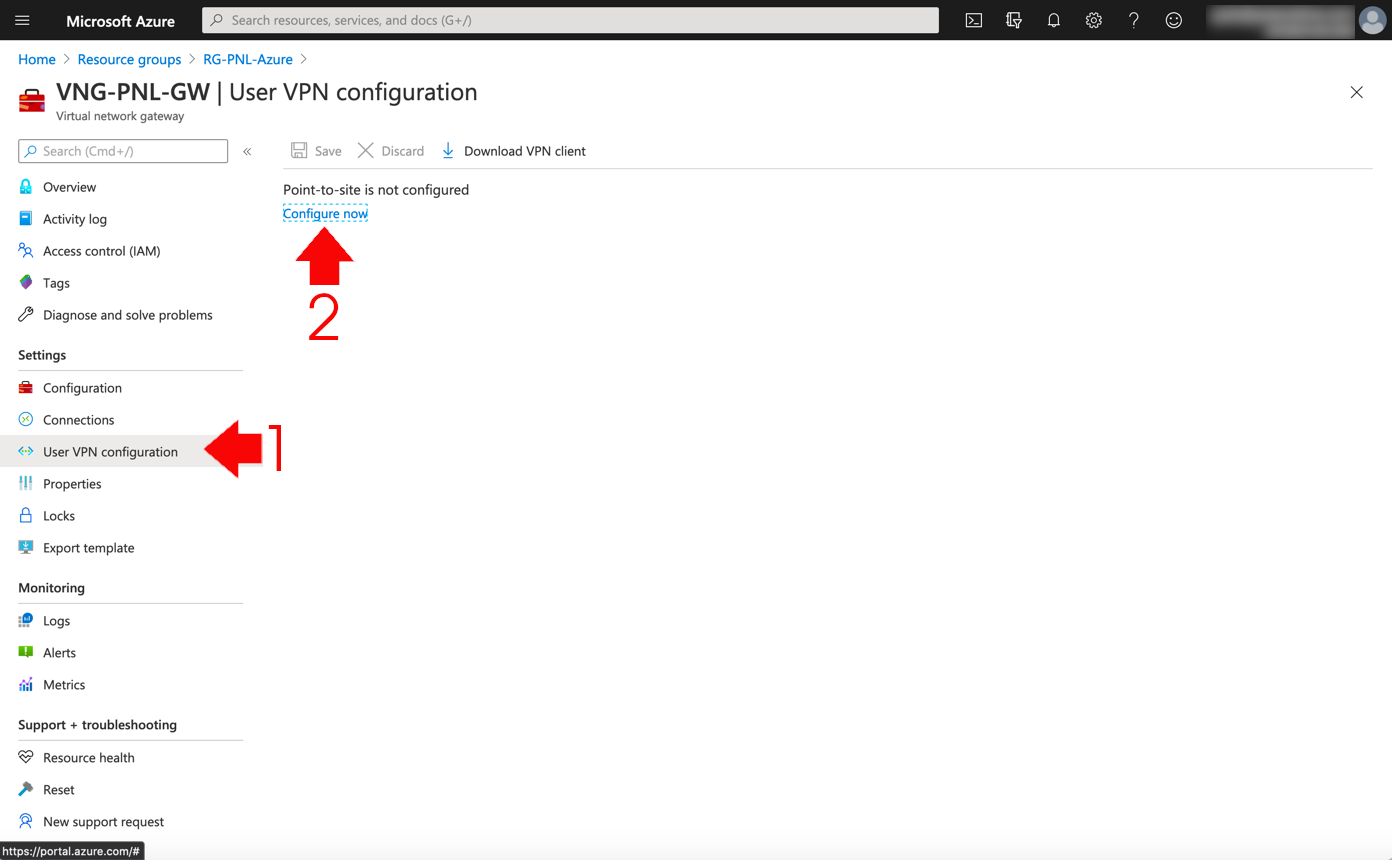
Back in Azure > Select your Virtual Network Gateway > Select ‘User VPN Connection’ (seriously, thanks Microsoft be consistent eh!) > ‘Configure now‘.
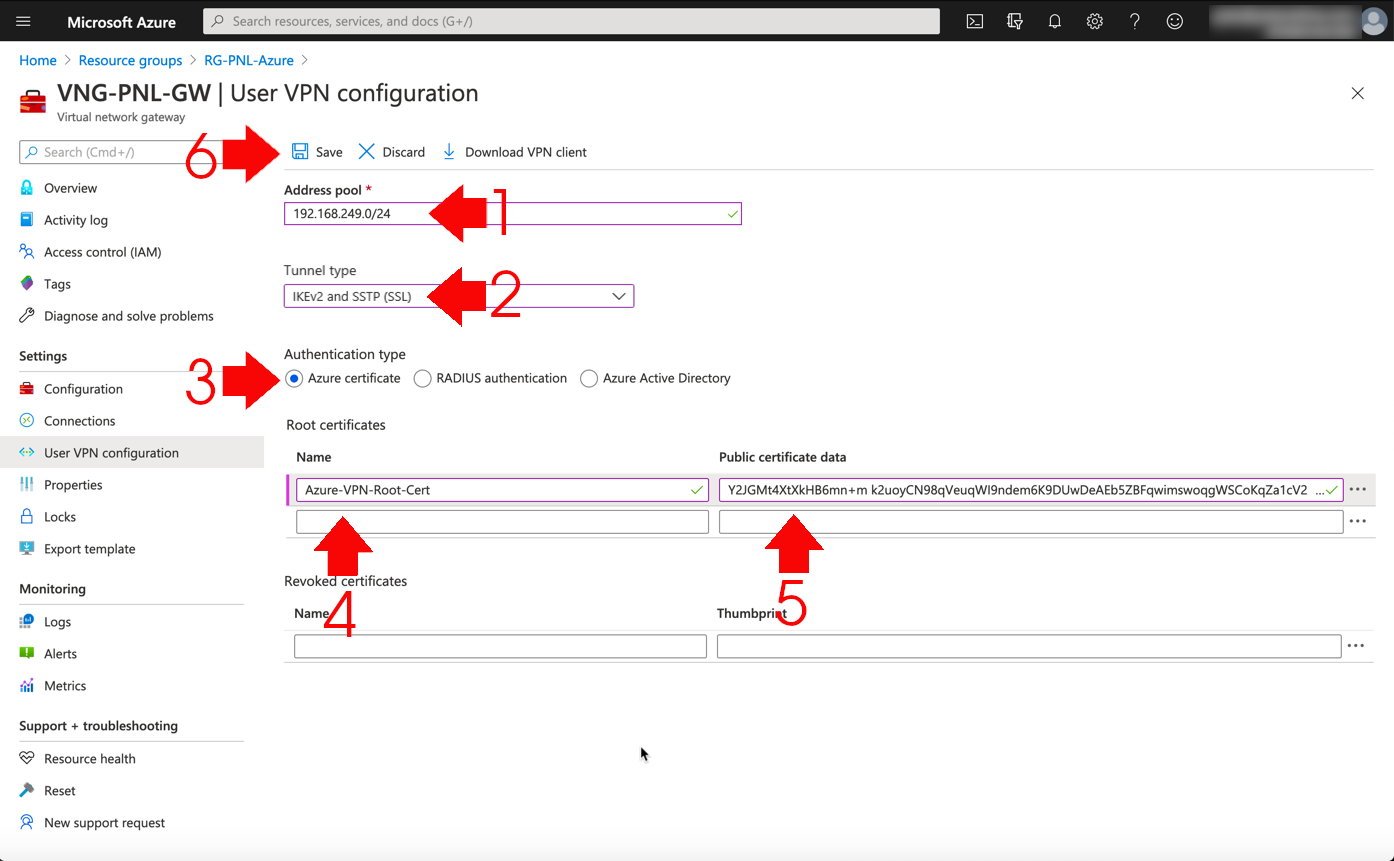
Pick an address pool for your remote clients to use, (make sure it does not overlap with any of your assets, and don’t use 192.168.1.0/24, or 192.168.0.0/24, Note: These will work, but most home networks use these ranges, and let’s not build in potential routing problems before we start!)
Choose IKEv2 and SSTP > Authentication Type = Azure Certificate > Enter your Root CA details, and paste in the PEM text, you copied above > Save > Time for another coffee!
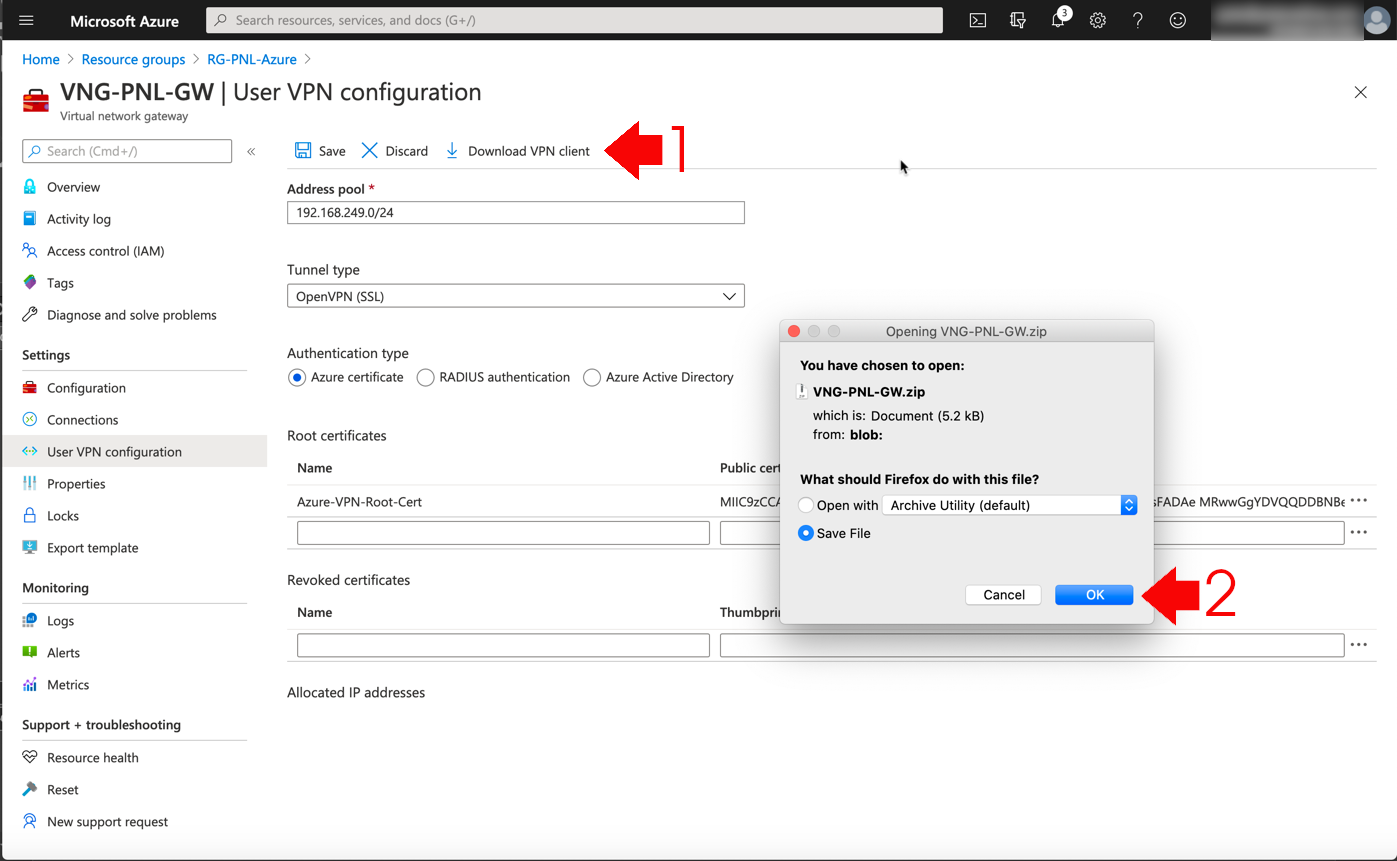
When is stopped deploying, you can download the the VPN client software.
Azure Point to Site (User VPN) Client Configuration
So for your client(s) you will need the Client Certificate, (the one in PFX format,*) and the VPN Client software > Double click the PFX file > Accept ‘Current User‘.
*Note: Unless you deployed user certificates already, and your corporate Root Cert was entered into Azure above.
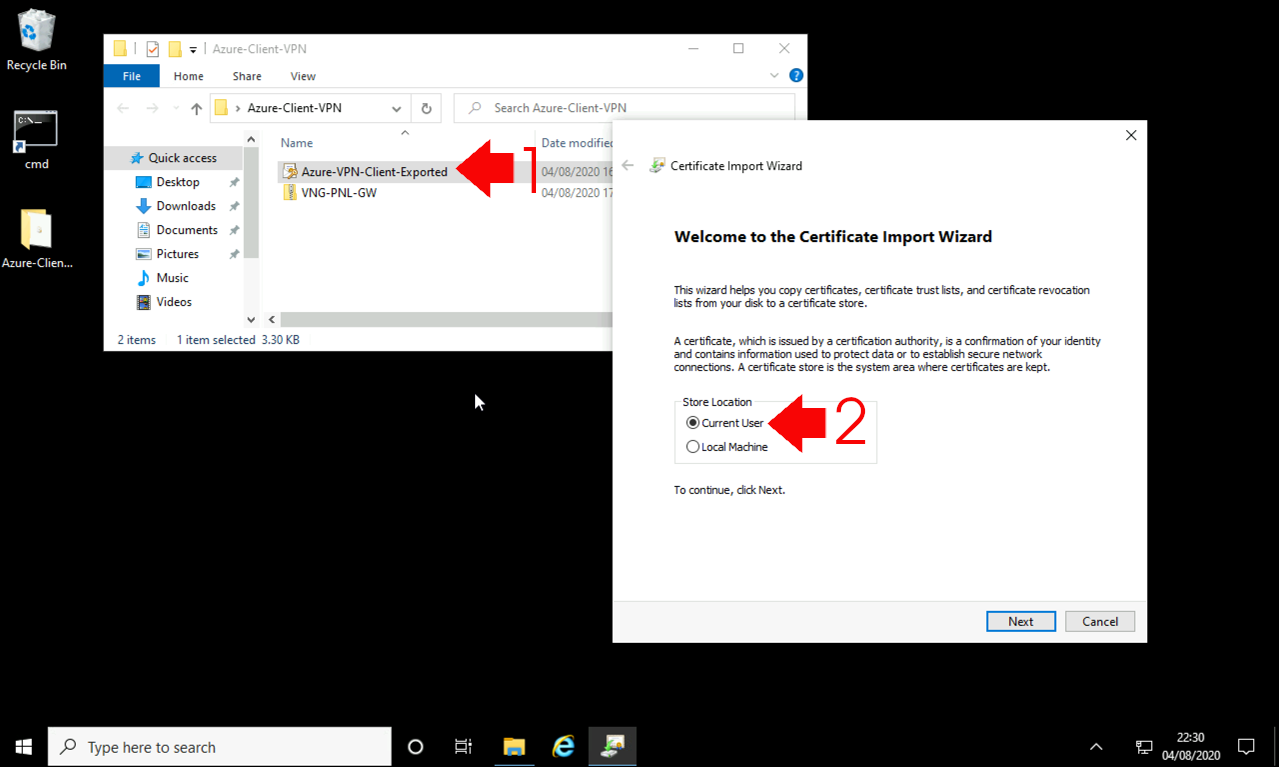
Type in the certificate password you created above > Accept all the defaults.

Yes.

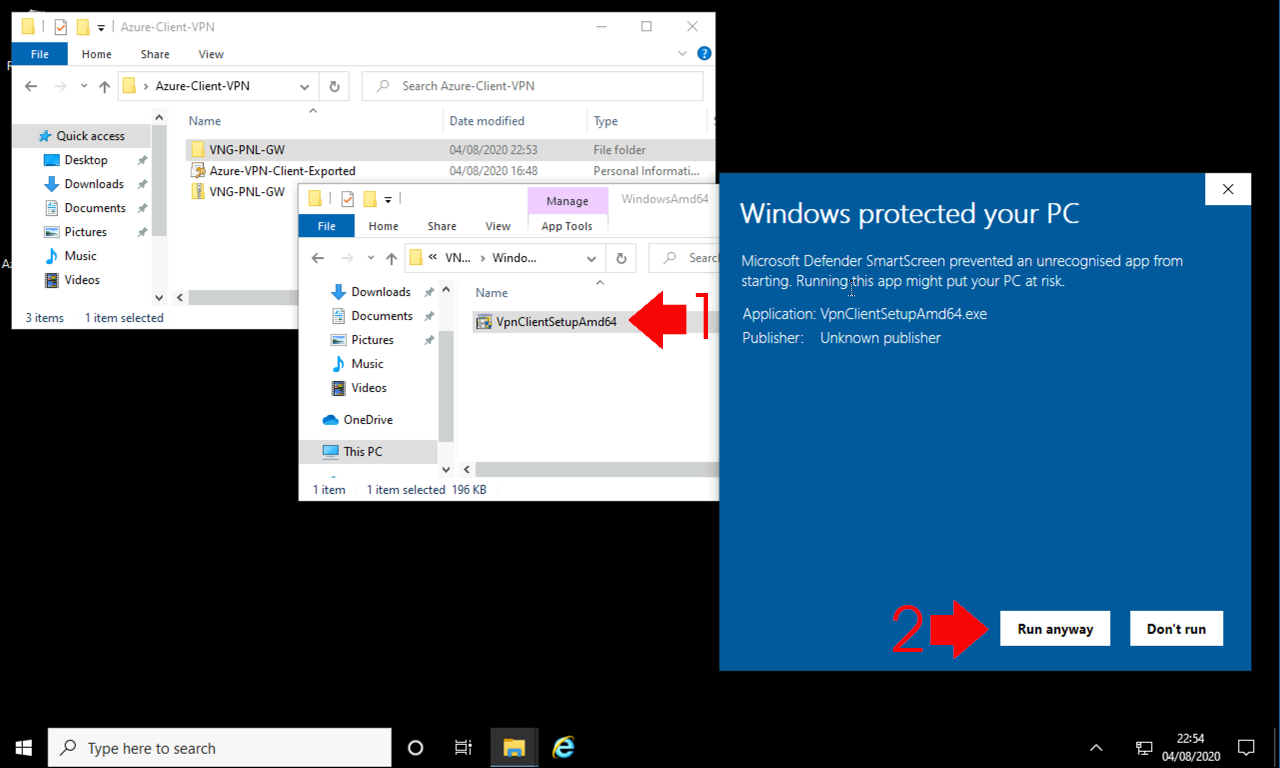
Now install the Client VPN software, you may get some security warnings, accept them and install.
Now you will have a configured VPN connection. I’m a keyboard warrior so I usually run ncpa.cpl to get to my network settings, (because it works on all versions of Windows back to NT4, and ‘developers’ haven’t changed the way it launches 1006 times!)
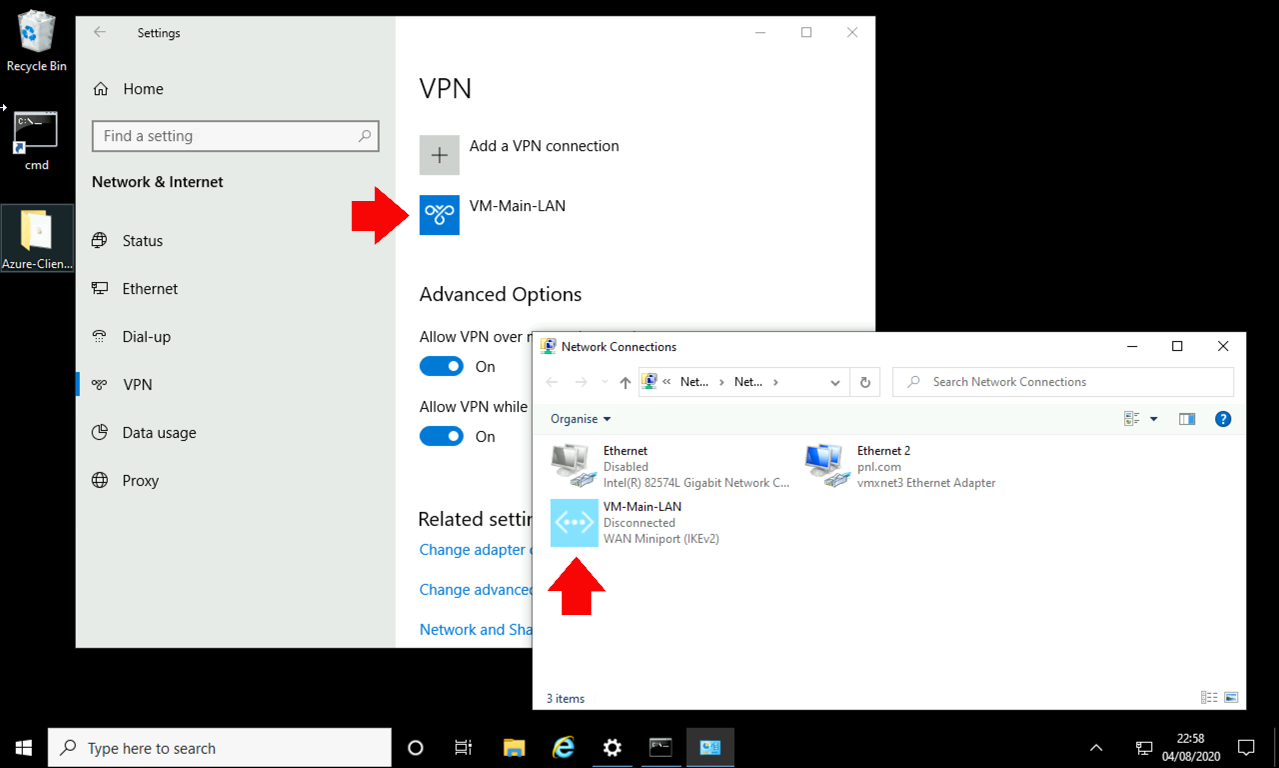
Launch the Connection > Connect > Tick the ‘Do not show…‘ option > Continue > If it works, everything will just disappear and you will be connected.

Related Articles, References, Credits, or External Links
NA