KB ID 0001725
Problem
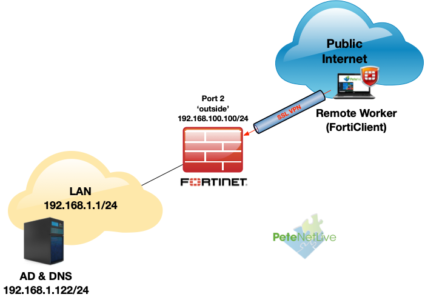
FortiGate Remote Access (SSL–VPN ) is a solution that is a lot easier to setup than on other firewall competitors. Here’s how to setup remote access to a FortiGate firewall device, using the FortiClient software, and Active Directory authentication. This is what my topology looks like;
Note: I’ve changed the FortiGates default management HTTPS port from 443 to 4433 (before I started). This was to let me use the proper HTTPS port of 443 for remote access SSL VPN. I suggest you also do this, as running SSL-VPN over an ‘odd’ port may not work from some locations. See the following article;
FortiGate: Change the HTTPS Management Port
Certificate: I’m also using a self signed certificate on the FortiGate, in a production environment you may want to purchase a publicly signed one!
Step 1: FortiGate LDAPS Prerequisites
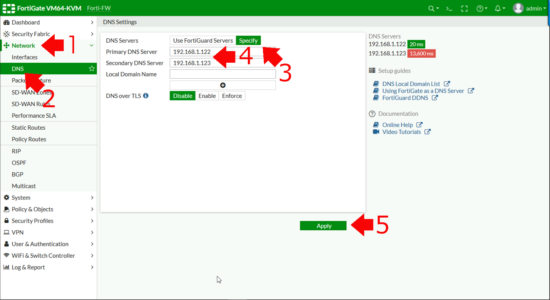
Before we start, we need to make sure your firewall can resolve internal DNS. (Because the Kerberos Certificate name on your Domain Controller(s) gets checked, when doing LDAPS queries, if you DON’T want to do this then disable server identity check when you setup your LDAP server below). Or you can add the IP address to the servers Kerberos certificate as a ‘Subject Alternative Name‘ but thats a bit bobbins IMHO
Network > DNS > Specify > Add in your ‘Internal” DNS servers > Apply.
Certificate Prerequisites
To perform LDAPS the FortiGate needs to trust the certificate(s) that our domain controller(s) use. To enable that you need a copy of the CA Certificate, for the CA that issued them. At this point if you’re confused, you might want to run through the following article;
Get Ready for LDAPS Channel Binding
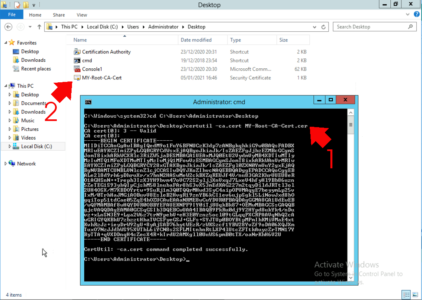
So to get a copy of your CA cert on a Windows CA server use the following command;
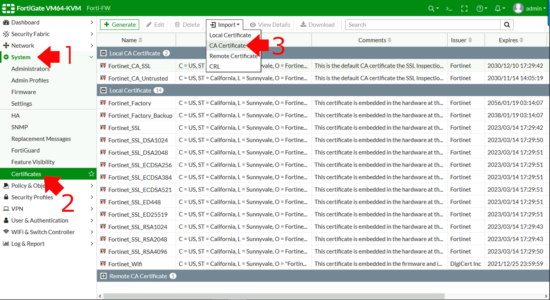
certutil -ca.cert My-Root-CA-Cert.cerTo ‘Import‘ the certificate into the Fortigate > System > Certificates > Import > CA Certificate.
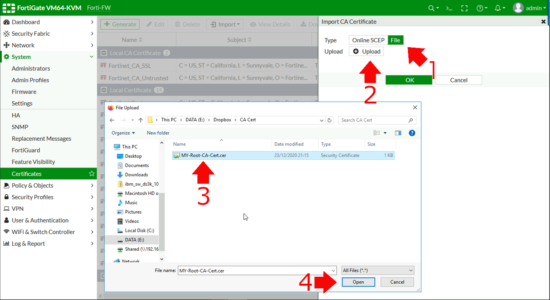
File > Upload > Browse to your CA Certificate > Open > OK.
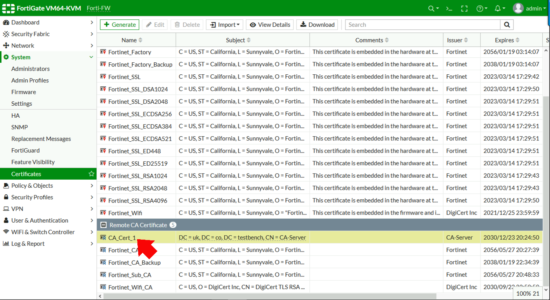
Take note of the certificate name, (CA_Cert_1 in the example below,) you will need this information below.
Step 2: Allow FortiGate LDAPS Authentication (Active Directory)
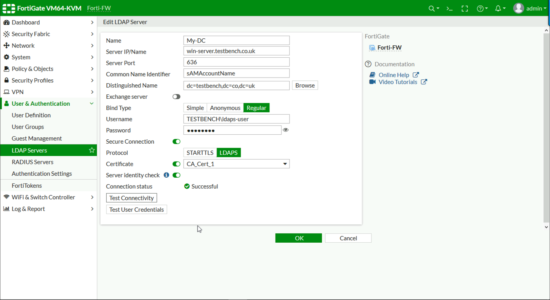
User & Authentication > LDAP Servers > Add.
- Name: Something Sensible!
- Server IP/Name: Use the FQDN of the server (or you need to put the IP on the Kerberos certificate as a SAN!)
- ServerPort: 636 (We’re not using 389 LDAP is NOT secure!)
- Common Name Identifier: sAMAccountName
- Distinguished Name: Enter the DN for either the top level of your domain or an OU that’s got all your users/groups in.
- Bind Type: Regular.
- Username: in DOMAIN\username format Note: A normal domain user account is sufficient it DOES NOT need to be a domain administrator.
- Password: For the above user.
- Secure Connection: LDAPS.
- Certificate: Select YOUR CA Certificate.
- Server Identity Check: Enabled.
Click ‘Test Connectivity‘ It should say successful, then you can check some other domain user credentials as a test > OK.
Domain / Active Directory Setup
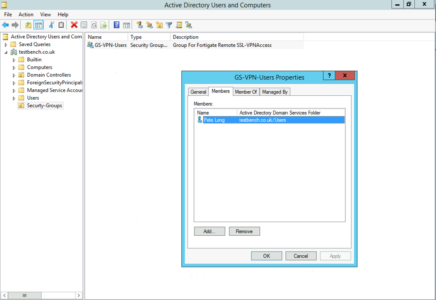
Over in my Active Directory I’ve created a security group called GS-VPN-Users, and put my user object into it.
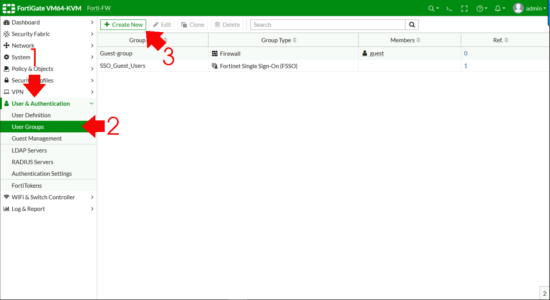
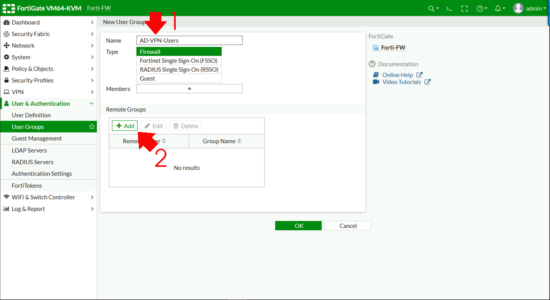
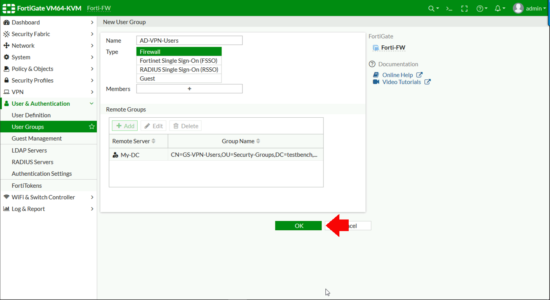
Now I need to create a FIREWALL GROUP and add my ACTIVE DIRECTORY GROUP to that. User & Authentication > User Groups > Create New.
- Name: Something sensible!
- Type: Firewall
Remote Groups > Add.
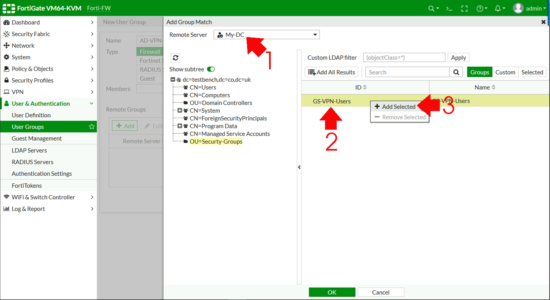
Change the Remote Server drop down list to be your LDAPS Server > Browse to your ACTIVE DIRECTORY GROUP, right click and Add Selected (Cheers, that took me three goes to find FortiNet!) > OK.
All being well you should see your LDAPS server AND the distinguished name of your AD group, (check that’s not missing!) > OK.
Step 3: Setup FortiGate SSL-VPN
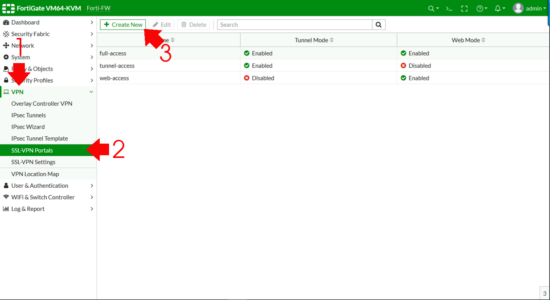
First we need an SSL Portal > VPN > SSL-VPN Portals > Create New.
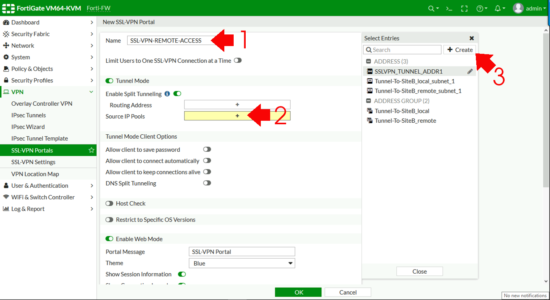
- Name: Something sensible!
- Enable Split Tunnelling: Enabled. (If you don’t do this then remote clients need to come though the FortiGate for web access, I usually enable split tunnel).
- Source IP Pools: Add Then Create.
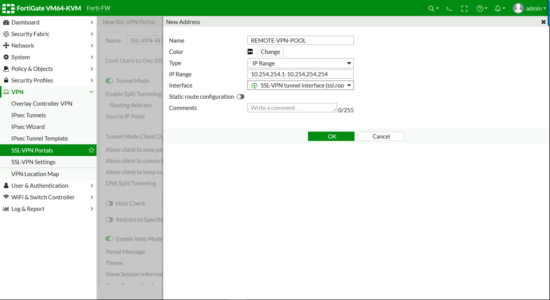
Address.
- Name: Something sensible!
- Type: IP Range
- IP Range: The subnet you want to use. (Note:If you are routing on your LAN, make sure there’s a route back to the FortiGate for this subnet or bad things will happen!)
- Interface: SSL-VPN tunnel interface
OK.
Enter a portal message, (the header on the page once a remote user connects) > Enable FortiClient download > OK.
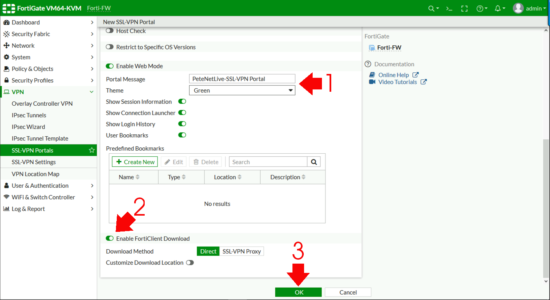
If you see the following error, that’s because on some smaller firewalls, (like the 40F) there can only be one, so you need to edit the one that is there by default.
Maximum number 0f entries has been reached.
FortiGate SSL-VPN Settings
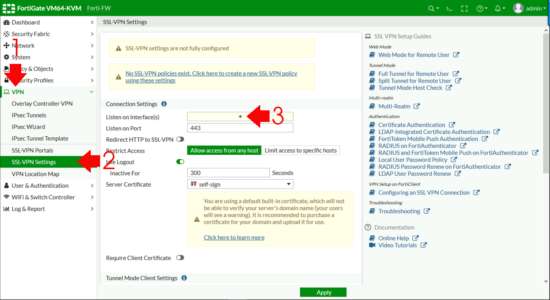
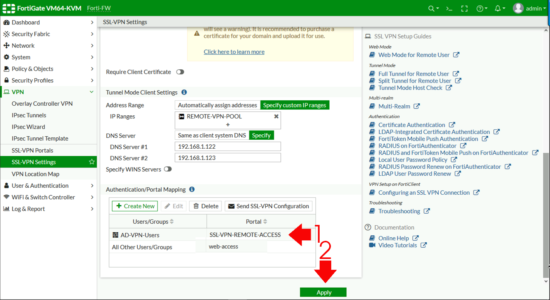
VPN > SSL-VPN Settings > Listen on Interfaces.
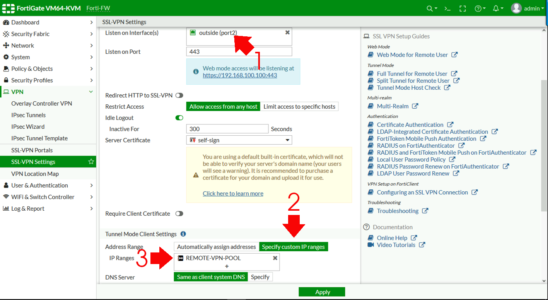
Set to the outside (WAN) interface > Address Range > Specify custom IP Ranges > IP Ranges > Add in the pool you created above.
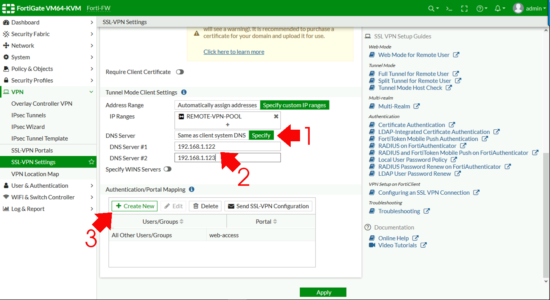
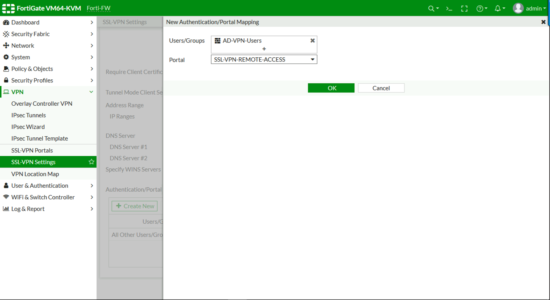
DNS Server > Specify > Add in your internal DNS servers > Authentication Portal Mapping > Create New.
- Users/Groups: Your AD GROUP.
- Portal: Your Portal
OK.
Apply (Note: If it complains ‘All Other User/Group‘ is not configured, set that to web-access (as shown).
FortiGate SSL-VPN Firewall Policy
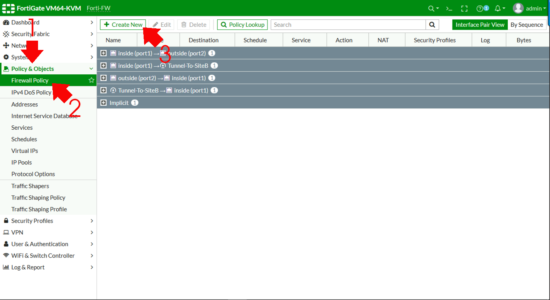
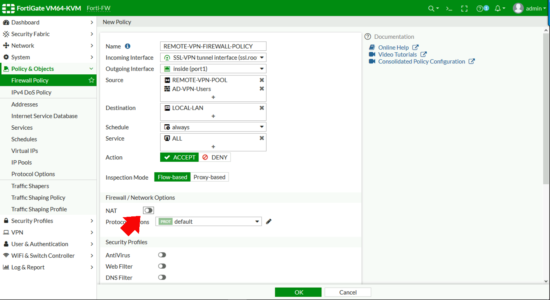
Policy & Objects > Firewall Policy (or IPV4 Policy on older versions) > Create New.
- Name: Something sensible.
- Incoming Interface: SSL-VPN Tunnel Interface.
- Outgoing Interface: Inside (LAN).
- Source: Your remote IP Pool AND your FIREWALL GOUP.
- Destination: Local LAN (remember if you want DMZ access, add that in also)
- Schedule: Always
- Action: Accept
- NAT: Disabled
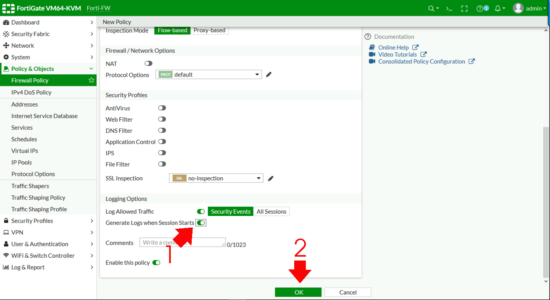
- Generate logs when session starts: Enabled
OK.
Step 4: Test FortiGate SSL-VPN
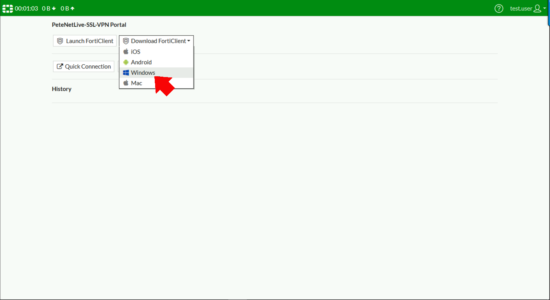
From your remote client, browse to the public IP/FQDN of the firewall and log in, you should see the SSL-VPN portal you created, and have the option to download the FortiClient (VPN) software for your OS version.
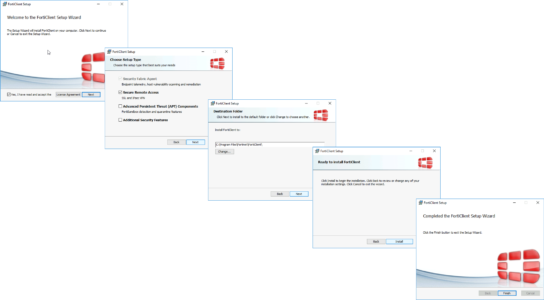
Install the FortiClient (Note: This is only the VPN component not the full FortiClient).
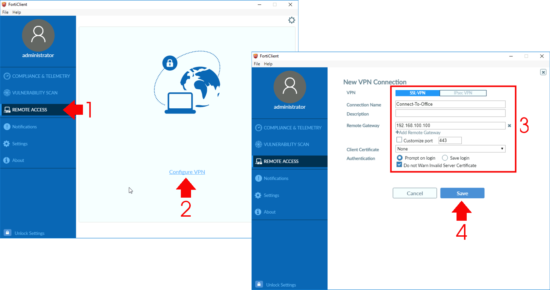
Remote Access > Configure VPN.
- VPN: SSL-VPN.
- Connection Name: Something sensible.
- Remote Gateway: IP or FQDN of the FortiGate.
- Authentication: Prompt on Logon (unless you want it to remember).
- Do not warn invalid Server Certificate: Enabled (Unless you are using a publicly signed certificate on your FortiGate).
Save.
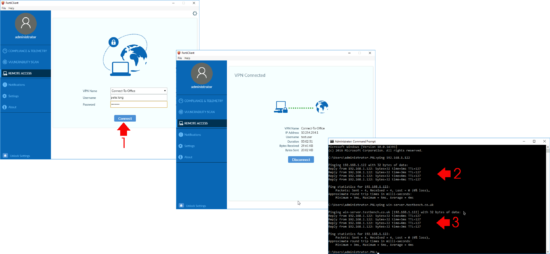
Then test connection, make sure you can ping internal IP addresses and DNS names.
Related Articles, References, Credits, or External Links
NA




06/01/2021
Hey Pete, this is a great summary of the configuration! Much cleaner than the cookbook.
One point I’d make is the management port shouldn’t need to be changed in all cases.
Assuming you don’t need FortiClient support on internal interfaces or management of the firewall on public interfaces you should be fine. This isn’t true for everyone, but worth considering as non-default ports aren’t fun to remember.
07/01/2021
Hi Cody,
Yeah agreed, my background is in supporting multiple customers/businesses remotely, so perhaps I’m a little blinkered in that respect 🙂 But you are correct.
P
07/04/2021
Hi Peter. This article has helped me a lot and managed to configure an LDAPS connection without problems, but I have the following problem. When I want to connect to the vpn ssl through Forticlient, I get the following error message: Unable to logon to the server. Your user name or password may not be configured properly for this connection (-12).
I have confirmed that the credentials that I enter are correct, in fact when I do the connection test on the LDAPS server. the results are successful. Is there anything else that I need to verify?
As additional information, I am enabling this new LDAPS connection in my Firewall, but currently I have LDAP servers (port 389) and users can connect without problems.
07/04/2021
I have seen similar things where LDAPS appears to be working and it wont authenticate – drop to command line on the FortiGate and test the same credentials. You will get a better Idea of whether LDAPS is actually working!
like so https://www.petenetlive.com/kb/article/0001733
12/04/2021
Hi Pete!! Thank you for your reply!
I was reviewing the article and according to your publication, I can confirm that steps 1 and 2 would be correct; The CA certificate was issued by the same LDAPS server and from the firewall console I can ping and get a response by putting the name of the LDAPS server. However, I still have authentication problems when I do it from the console. I get the impression that I should review option number 3, that is, the server’s IP address must be in the certificate as Subject Alternative Name (SAN). I will try to review that and I will be publishing any news here!
Regards!
12/04/2021
Keep me posted……
13/04/2021
Hello Pete.
How do I add the server’s IP address in the certificate as Subject Alternative Name (SAN)?
Excuse my ignorance but in terms of certificates I am just learning some things…
14/04/2021
You should need to create a kerberos certificate template in certificate services, then do a custom request (do a search on my site for LDAPS)
14/04/2021
Hi Pete.
I followed the instructions in this article (https://www.petenetlive.com/kb/article/0001645) and finally I was able to solve the problem and connect through LDAPS!
Thank you!!
14/04/2021
Great news! Glad you got sorted.
16/08/2021
Hi Pete, thanks for this Step by Step. I have set up and almost everything works. I have a issue, joining new computers to the domain through the VPN is not working, also when users are tryng to change their passwords they can’t see the domain. I don’t know if you can guide me to solve this issue.
Thanks.
Best regards
17/08/2021
I’m guessing thats because NetBIOS does not run over the VPN tunnel. Joining a domain over a VPN is not a normal operation, your client machines should be domain members before they get to your users? As for changing passwords, Google “SSL VPN with LDAP user password renew”.
P
01/11/2021
Have you tried this with DUO RADIUS? I am trying to get working but the RADISU group on the Fortigate doesnt seem to kick in when i set up the vpn for that vs an ldap lookup in AD
21/11/2021
I’ve not, but I welcome any feedback.
P