Cisco FPR – Re-image from FTD to ASA Code

KB ID 0001766

Problem

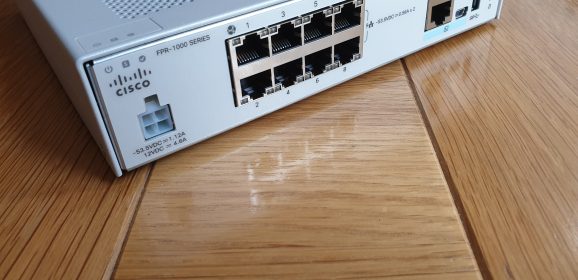
Note: This procedure is to re-image a Cisco Firepower device from FTD to ASA code, (in this example a Cisco FPR 1010). 

Why would you want to do this? Well to be frank FTD is bobbins, so if you have a device running FTD code you might want to ‘convert’ it to ASA code. If you tried to do this with an older firewall (ASA 5500-X) then you needed to go to Cisco TAC and try and get them to give you an activation code for the ASA. But if you are using an FPR device then YOU DON’T NEED TO DO THAT.

You might also want to do this because, (at time of writing) buying a Cisco FPR device running ASA code, the lead times in the UK are eye wateringly long (200-300 days!) But you can buy a chassis running FTD code and then convert that to ASA code with the following procedure.

Solution

Connect to your FPR device with a console cable, and log on as admin (the default password is Admin123, unless you have changed it of course!) Download the latest version of ASA code for your device from Cisco, in my case (at time of writing) that’s cisco-asa-fp1k.9.14.3.15.SPA. Copy that onto a USB drive (WARNING: The drive needs to be formatted with FAT32, the firewall will not recognise or mount the drive unless it is!) Finally insert the USB drive into the firewall, and issue the following commands.

[box]

FTD-1# scope firmware
FTD-1 /firmware # download image usbA:/cisco-asa-fp1k.9.14.3.15.SPA
Please use the command 'show download-task' or 'show download-task detail' to check download progress.
FTD-1 /firmware # show download-task

Download task:
    File Name Protocol Server          Port       Userid          State
    --------- -------- --------------- ---------- --------------- -----
    cisco-asa-fp1k.9.14.3.15.SPA
              Usb A                             0                 Downloading

% Download-task cisco-asa-fp1k.9.14.3.15.SPA : completed successfully.

[/box]

Note: If it says, ‘failed. Download failure – USB drive is not mounted‘ the drive is probably formatted incorrectly. If it says ‘Download-task failed. Failed signature validation‘, then the image is probably corrupt, try again, or use a different version.

Verify the file has downloaded correctly.

[box]

show download-task

Download task:
    File Name Protocol Server          Port       Userid          State
    --------- -------- --------------- ---------- --------------- -----
    cisco-asa-fp1k.9.14.3.15.SPA
              Usb A                             0                 Downloaded

[/box]

Then make sure the package is listed with a show package command.

[box]

FTD-1 /firmware # show package
Name                                          Package-Vers
--------------------------------------------- ------------
cisco-asa-fp1k.9.13.1.2.SPA                   9.13.1.2
cisco-asa-fp1k.9.14.3.15.SPA                  9.14.3.15
cisco-ftd-fp1k.6.6.0-90.SPA                   6.6.0-90

[/box]

Note: You can see (above) there’s an ASA code version from a previous install and it shows the current running FTD code also. To re-image the firewall execute the following commands. (Note: you enter the VERSION NOT THE FILENAME!)

[box]

FTD-1 /firmware # scope auto-install
FTD-1 /firmware/auto-install # install security-pack version 9.14.3.15

The system is currently installed with security software package 6.6.0-90, which has:
   - The platform version: 2.8.1.105
   - The CSP (ftd) version: 6.6.0.90
If you proceed with the upgrade 9.14.3.15, it will do the following:
   - upgrade to the new platform version 2.8.1.172
During the upgrade, the system will be reboot

Do you want to proceed ? (yes/no):yes {Enter}

This operation upgrades firmware and software on Security Platform Components
Here is the checklist of things that are recommended before starting Auto-Install
(1) Review current critical/major faults
(2) Initiate a configuration backup

Do you want to proceed? (yes/no):yes {Enter}

Triggered the install of software package version 9.14.3.15
Install started. This will take several minutes.
For monitoring the upgrade progress, please enter 'show' or 'show detail' command.
FTD-1 /firmware/auto-install #

[/box]

Now go and have a coffee, it will take 20 minutes, and a few reboots before it’s finished. When completed you should see a login prompt, login with admin/Admin123 and reset the password. 

[box]

firepower-1010 login: admin
Password: Admin123
Successful login attempts for user 'admin' : 1
Last failed login: Sun Nov 21 16:55:16 UCT 2021 on ttyS0
There was 1 failed login attempt since the last successful login.
Hello admin. You must change your password.
Enter new password: password123
Confirm new password: password123
Your password was updated successfully.

[/box]

Then connect to the ASA CLI with the connect asa command. Go to enable mode, and set the enable password. Finally, save the config.

[box]

firepower-1010# connect asa
firepower-1010# Verifying signature for cisco-asa.9.14.3.15 ...
Verifying signature for cisco-asa.9.14.3.15 ... success
ciscoasa>
ciscoasa> enable
The enable password is not set.  Please set it now.
Enter  Password: password123
Repeat Password: password123
Note: Save your configuration so that the password can be used for FXOS failsafe access and persists across reboots
("write memory" or "copy running-config startup-config").
ciscoasa# write memory
Building configuration...
Cryptochecksum: a607255a a64f2898 97bb6b40 9a8ff25c

[/box]

You will now be running ASA code with the factory settings (Inside 192.168.1.1/24, Management 192.168.45.1/24 (with DHCP enabled), Outside set to get IP dynamically, and all traffic allowed out).

Remember if you’re a ‘light weight’ and cant use command line, then you will need to install and configure the ASDM 🙂 

Related Articles, References, Credits, or External Links

Reimage Cisco 1010 ASA to FTD

Convert ASA 5500-X To FirePOWER Threat Defence

Which Firepower To Replace Your ASA 5500-X?

KB ID 0001705

Problem

Well  the ASA5516-X was the last one to go end of sale. You may be able to get stock of the remainder of the ASA5500-X series as people clear their shelves, or they may be available as ‘refurb’ stock but they are disappearing.

So you would think that the replacements would be better documented? Well it’s sketchy at best, and when you look a the data sheets for the new FPR range the links on Cisco website go to the wrong place, or give you little or no guidance 🙁

Solution

I’ve put together the following to help, it’s not sanctioned by Cisco, (though I did engage Cisco Partner GVE to assist me. The following table shows FPR models that run ASA code, (not FTD code). I’m not a fan personally of the FTD solution, and I wont be deploying it anywhere for a client. But Standard Asa code keeps my support and network techs happy.

If you disagree with any of my recommendations, please post below, and (providing your objection is valid,) and I’ll update it accordingly.

Related Articles, References, Credits, or External Links

NA

Cisco FTD (and ASA) Creating AnyConnect Profiles

KB ID 0001685

Problem

A few days ago I did an article on Deploying Cisco AnyConnect with the Cisco FTD, there I glossed over the AnyConnect profile section. For a long time now, we have been able to edit the AnyConnect profile from within the firewall (if we are running ASA code!) But for the FTD we need to take a step backwards and go back to using the ‘offline’ AnyConnect profile editor.

Solution

Firstly you need to download the offline profile editor, you will find it on the Cisco AnyConnect Mobility Client download page;

I wont insult your intelligence, the setup is straight forward;

Launch the editor, and the screen you will see is exactly the same as you would normally see while using the profile editor in a Cisco ASA, (when launched from within the ASDM).

Note: I’m not going to go though all the settings, (this post would become immense!) Typically I allow remote (RDP) connections, and set the public FDQN for my AnyConnect profile.

Once you have finished, you can simply save the settings as an XML file.

Import an AnyConnect ‘Profile XML File’ into Cisco ASA

As mentioned above with all ‘modern’ versions of the ASDM/AnyConnect client you can create and edit an AnyConnect profile directly from within the ASDM. But (for completeness) here’s how to import one you created externally, (or exported form another firewall).

Configuration >Remote Access VPN > Network (Client) Access > AnyConnect Client Profile > Import.

Import an AnyConnect ‘Profile XML File’ into Cisco FTD

Objects > AnyConnect Client Profiles > Create AnyConnect Client Profile > Give it a name > Upload.

Browse to, and select the previously created XML file > Open.

Then save and deploy the changes (this takes ages!).

You can now select this ‘profile file’ when setting up AnyConnect, or edit any existing AnyConnect Remote Access VPN configuration, and add this profile to it.

Related Articles, References, Credits, or External Links

Cisco Firepower 1010 Configuration

Cisco FTD Deploy AnyConnect (from FDM)

KB ID 0001682

Problem

In this article I will focus on ‘Remote Access’ VPN, which for Cisco FTD means using the AnyConnect client. Ive spent years deploying this solution for ASA so it’s a product I know well. As with all things Cisco, there are a couple of things that could trip you up. Let’s get them out of the way first.

If you are used to AnyConnect then you probably have the client software. It’s the same software package that’s installed with Cisco ASA. Sometimes just getting access to the download is a trial! Anyway you will need the AnyConnect ‘Package’ files, these typically have a .pkg extension, (Cisco refer to these as Head-End packages). Theres one for macOS, one for Windows, (well another one now for ARM processors, but I’ve not needed it yet), and one for Linux. You will need to download a package for each platform your users will need to connect with.

AnyConnect Licence! After years of getting a few free with a Cisco ASA, I was unhappy to find that’s not the case with Cisco FTD. If you want to use AnyConnect you need to have a licence, and it needs to be in your Smart Licensing Account, (before you enable Remote Access VPN). 

Final Gotcha! Make sure you HAVE NOT enabled HTTPS management on the outside interface of the FTD before you start configuring AnyConnect, or you will get all the way to the end, and it will fall over and you will have to start again (thanks Cisco! How hard would it be to say, if you enable this, I will disable https outside management is this OK?) 

Solution

If you haven’t already done so enable the Remote Access VPN licence > Smart Licence > Fire Configuration > RA VPN  License > Enable > Change to licence type (mines Apex). Have a coffee and recheck everything is licensed OK.

AnyConnect 4 – Plus and Apex Licensing Explained

Remote Access VPN > Configure > Create Connection Profile.

Give the profile a name, a group alias, and group URL > I’m using the FTD as my AAA Identity source (so my username and passwords are held on the firewall) that’s fine for small deployments, but in production you should think about deploying an AAA solution (called a Special Identities Realm in FTD). Scroll down.

I typically create a new network object for my remote clients to use, you can select your internal DHCP server to send out addresses if you wish > Next.

I’m using Cisco Umbrella DNS servers, (or the DNS servers formally known as OpenDNS) > I’m setting a ‘welcome banner’ but you dont need to, (some people find them annoying!) > Scroll down.

Split tunnelling: As always Cisco assume you want to tunnel everything, in most cases that’s NOT the requirement (BUT it IS the most secure!) I setup split tunnelling by Excluding my internal networks > Next.

Client Profiles: If you have one you can set it here, if you want to create one, see the following article;

Cisco FTD (and ASA) Creating AnyConnect Profiles

Select the certificate the FTD will present (don’t choose the web one it will error!) > Select the interface your client will connect to (typically outside) > Enter the FQDN of the device > I allow bypass for VPN traffic, if you want to scan remote traffic with firepower etc DON’T select this > Enable NAT Exemption (select the internal interface) > Internal Networks: Then add in the internal network, I’ve already got an object for that, (you may need to create one.) > Scroll down.

Here you upload your .pkg files (I mentioned above) when you have finished > Next.

Review the settings > Finish.

Cisco FTD Create User (via FDM)

You will need a username and password to authenticate (skip this as you are not using the FTD’s internal user database.) Objects > Users > Add > Supply a username and password > OK

Pending Changes > Deploy Now.

Go and have a coffee again, keep clicking pending changes until it looks like this. (Quite why it takes so long, I have no idea?) It’s even more fun, if you made a mistake, because it will just error and fall over, so you have to find the error (if you can) > then remove the pending change and start all over again. Cheers Cisco!

Finally go to an external client and give it a try, if your clients don’t have the client software installed simply ‘browse’ to the FTD to get it.

Related Articles, References, Credits, or External Links

Cisco Firepower 1010 Configuration

Cisco FTD Site to Site VPN

KB ID 0001681

Problem

While working out how to create a VPN on the Cisco FTD (Firepower 1010), I thought I might as well set it up to the Cisco ASA that I have in the Data Center on my test network. This is what I’m connecting;


Create Site to Site VPN On Cisco FTD (using FDM)

Using a web browser connect to the devices FDM > Site to Site VPN > View Configuration.

Create Site-to-site-connection.

  • Connection profile name: Something sensible like VPN-To-HQ or VPN-To-Datacentre.
  • Local VPN Access Interface: outside.
  • Local Network: Crete new network.

  • Name: This will be your local LAN so give it a recognisable name.
  • Type: Network
  • Network: Your local (behind the FTD) network i.e. 10.254.254.0/24
  • OK.

  • Remote IP Address: The public IP address of the other device (in my case the Cisco ASA).
  • Remote Network: Add
  • Crete new network

  • Name: This will be the remote sites LAN so give it a recognisable name.
  • Type: Network
  • Network: The remote (behind the ASA) network i.e. 192.168.100.0/24
  • OK.


Check the settings are correct > Next.

I’m using IKEv2 (if your ASA is older than version 8.4 you will need to use IKEv1) > IKE Version 2 Globally Applied > Edit.

Create new IKE Policy.


  • Priority: 1
  • Name: S2S-IKEv2-Policy
  • Encryption: DES Really! (Why is that the default?) Remove DES and replace with AES256

I leave the rest of the settings as they are some people might not like Sha1 if you want to change it to sha254 for example then do so, but remember to change it on the IKEv2 policy on the ASA also. Also DON’T CONFUSE PRF with PFS, we will get the chance to set PFS later. > OK.

IPsec Proposal > Edit.

Add in AES-SHA > OK. 

Enter (and confirm) the local and remote Pre-Shared Key (I usually set these the same, but they don’t have to be). Scroll down.

  • Nat Exempt: inside
  • Diffie Helman Group for Perfect Forward Secrecy (PFS): Leave disabled.
  • Next

Review the settings > Finish.

FTD VPN One Way VPN Traffic Warning!

At this point if you configure the ASA, the tunnel will come up, and if you’re behind the FTD everything will work. But If you’re behind the ASA and you want to talk to anything behind the FTD, it wont work. This confused me for a while, I could ping from my house to my servers at the DC but they could not ping me!

Resolution: What you need to do is (on the FTD) ALLOW traffic ‘inbound’ on the outside interface, for the subnet behind the ASA. (Yes that’s bobbins I know, it should do that for you, but at the moment it does not).

Policies > Access Control > Add.

  • Title: Allow-VPN-Traffic
  • Source Zone: outside_zone
  • Source Networks: The Network behind the ASA
  • Source Ports: ANY
  • Destination Zone: inside_zone
  • Destination Networks: ANY
  • Destination Ports/Protocols: ANY
  • OK

Pending changes > Deploy Now.

It can take a while to deploy, I recheck pending changes, and wait until it says it’s finished.

Create ASA Config for VPN to Cisco FTD

I’ve covered Cisco ASA IKEv2 VPN configs elsewhere, so I’ll just post the config here and you can change the details (in red) and copy and paste it into your ASA.

[box]

object network OBJ-SITE-A
 subnet 192.168.100.0 255.255.255.0
object network OBJ-SITE-B
 subnet 10.254.254.0 255.255.255.0
!
access-list VPN-INTERESTING-TRAFFIC extended permit ip object OBJ-SITE-A object OBJ-SITE-B
!
nat (inside,outside) source static OBJ-SITE-A OBJ-SITE-A destination static OBJ-SITE-B OBJ-SITE-B no-proxy-arp route-lookup
!
crypto ipsec ikev2 ipsec-proposal VPN-TRANSFORM
 protocol esp encryption aes-256
 protocol esp integrity sha-1
!
crypto map CRYPTO-MAP 1 match address VPN-INTERESTING-TRAFFIC
crypto map CRYPTO-MAP 1 set peer 2.2.2.2
crypto map CRYPTO-MAP 1 set ikev2 ipsec-proposal VPN-TRANSFORM
crypto map CRYPTO-MAP interface outside
!
crypto ikev2 policy 10
 encryption aes-256
 integrity sha
 group 14
 prf sha
 lifetime seconds 86400
crypto ikev2 enable outside
!
tunnel-group 2.2.2.2 type ipsec-l2l
tunnel-group 2.2.2.2 ipsec-attributes
 ikev2 remote-authentication pre-shared-key cisco123
 ikev2 local-authentication pre-shared-key cisco123
!

[/box]

Troubleshooting and debugging FTD VPN

All the traditional command line tools we used to use for VPN troubleshooting are available to you, you will need to SSH into the ‘Management Port’ before you can use them though! Or you can simply do the debugging and troubleshooting on the ASA!

Troubleshoot phase 1 (IKE)

[box]

show crypto isa
debug crypto ikev2 protocol

[/box]

Troubleshoot phase 2 (IPSec)

[box]

show crypto ipsec sa
debug crypto ipsec 255

[/box]

Related Articles, References, Credits, or External Links

NA