Cisco: Getting a SKU (Product ID) From a Serial Number

KB ID 0001674

Problem

I had a situation a couple of weeks ago where I had the serial numbers for a bunch of Cisco switches, I needed to get some extended cover for them, but what I didn’t have were the Cisco SKU (Stock Keeping Unit) codes.

Solution

You will need to have a Cisco CCO login, once you have that go here > Add devices.

Give the device a name, (it does not matter what) > Paste in the serial number > Add.

Boom, there’s your SKU (Product ID)

Repeat as required.

Related Articles, References, Credits, or External Links

NA

AnyConnect – ‘VPN establishment capability for a remote user..

KB ID 0000546 

Problem

If you connect to to a client via RDP then try and run the AnyConnect client, you will see one of these errors;

VPN establishment capability for a remote user is disabled. A VPN connection will not be established


VPN establishment capability from a Remote Desktop is disabled. A VPN connection will not be established

This, behaviour is default, and despite me trawling the internet to find a solution (most posts quote changing the local AnyConnectProfile.tmpl  file, this file does not exist using Version 3 (I was using v 3.0.4235).

Update: With Early versions of AnyConnect version 4 it does not tell you what’s wrong, the VPN appears to connect and then disconnect quickly. If you have debugging on the firewall you will see the following;

Profile settings do not allow VPN initiation from a remote desktop.

Note: This is fixed in version 4.8 and you will se the error at the top of the page.

Solution

To solve this problem we need to create an AnyConnect profile, load the profile into the firewall, then associate that profile with your AnyConnect group policy. With modern versions of AnyConnect you can do that in the ASDM. With older versions you need to use the stand alone profile editor (see below)

Edit AnyConnect Profile With ASDM

Connect to the ADSM > Configuration > Remote Access VPN > Network Client remote Access > AnyConnect Client Profile.

Give the profile a name  > Select a group policy to apply it to > OK.

AllowRemoteUsers: Lets remote users bring up the VPN, if this forces routing to disconnect you, it will auto terminate the VPN.

SingleLocalLogon: Allows multiple remote logons but only one local logon.

OR (older versions)


Apply the changes, and then save to the running configuration.


Edit AnyConnect Profile With Stand-Alone Profile Editor

1. First download the AnyConnect Profile Editor from Cisco. (Note: You will need a valid CCO account and a registered support agreement/SmartNet).

Update: The AnyConnect Profile Editor is now built into the ADSM, it becomes available once you have enabled any AnyConnect image. Once you have a profile created you can skip straight to  step 3, and skip all the other steps.

If you cannot download the software here’s a profile (I’ve already created) you can use. If you are going to use this, jump to step 5.

2. Once you have installed the profile editor, launch the “VPN Profile Editor”.

3. The setting we want is listed under Windows VPN Establishment, and needs setting to “AllowRemoteUsers”, In addition I’m going to set Windows Logon Enforcement to “SingleLocalLogon”.

AllowRemoteUsers: Lets remote users bring up the VPN, if this forces routing to disconnect you, it will auto terminate the VPN.

SingleLocalLogon: Allows multiple remote logons but only one local logon.

4. Save the profile somewhere you can locate it quickly.

5. Connect to the firewalls ASDM > Tools > File Management > File Transfer > Between Local PC and Flash.

6. Browse your local PC for the profile you created earlier > Hit the “Right Arrow” to upload it > This can take a few minutes, depending on your proximity to the firewall.

7. Make sure the file uploads correctly > Close.

8. To associate this profile with your AnyConnect//SSL Group Policy, click Configuration > Remote Access VPN > Network (Client) Access > Group Policies > Locate the policy in use for your AnyConnect clients > Edit > Advanced > SSL VPN Client > Locate the “Client Profile to Download” section and uncheck the inherit button.

9. Click New > Browse Flash > Locate the profile you uploaded earlier.

10. OK > OK > Apply > Save the changes by clicking File > Save running configuration to flash.

11. Then reconnect with your AnyConnect Mobility Client software.

Related Articles, References, Credits, or External Links

Install and Configure Cisco ASA5500 AnyConnect SSL VPN 

Cisco Firepower 1010 Configuration

KB ID 0001673

Background

This page will be used as a central repository and ‘index’ for configuration on the Cisco Firepower 1010 series firewall. I intend to add to it as I test the capabilities and work out any problems whilst trialing/deploying and operating this platform.

Config Documents

VPN Firepower 1000 series running ASA Code.

General

Cisco Firepower 1010 Licensing

Reimage Cisco 1010 ASA to FTD

VPN

EZVPN

Is not supported on this platform, it cannot be configured as an EZVPN client.

Site to Site VPN (as per older 5500-x and 5500 series)

Cisco ASA Site To Site VPN IKEv2 “Using CLI”

Cisco ASA Site To Site VPN IKEv1 “Using CLI” (Only normally required, if the other end does not support IKEv2)

Cisco ASA Site to Site VPN ‘Using ASDM’

Remote Access VPN

Cisco ASA AnyConnect VPN ‘Using CLI’

Cisco ASA AnyConnect VPN ‘Using ASDM’

Cisco ASA – L2TP over IPSEC VPN ‘Using CLI or ASDM’ (Using Windows 10 Built in VPN client)

Port Forwarding and NAT

Cisco ASA Port Forwarding ‘Using CLI or ASDM’

Cisco ASA Port Forwarding To A Different Port

Cisco ASA Port Forwarding a ‘Range of Ports’

Cisco ASA Static (One to One) NAT Translation


VPN Firepower 1000 series running FTD Code.

General

Cisco Firepower 1010 (FTD) Initial Setup

Cisco FTD: AMP/URL Filtering/Threat Detection and AVC

VPN

Site to Site VPN 

Cisco FTD Site to Site VPN

Remote Access VPN 

Cisco FTD Remote Access VPN (AnyConnect)

Cisco FTD (and ASA) Creating AnyConnect Profiles


I will continue to add to this page but please be patient. (I’m juggling two jobs, and have a personal life!)

Related Articles, References, Credits, or External Links

NA

macOS: FaceTime HD Camera Not Working In Microsoft Teams?

KB ID 0001671

Problem

My firm are in the middle of moving from Skype to Teams, so more and more online meetings are being done with Teams. I have had some problems trying to get my camera to work?

Solution

Firstly you need to ‘Allow’ Teams to use the camera; Click the ‘Apple’ icon > System preferences > Security and privacy > Privacy > Camera > Tick to enable ‘Microsoft Teams’ (Note: You may need to click the padlock at the bottom, before you can change any settings).

If you have Teams running, you will need to restart it, then if you can see the camera ‘feed’ in Settings > Devices, (as below) you should be good to go.

Cannot See Camera Input in Teams

If there’s still no input, then it’s probably because another application has control of the Camera. (Remember I said above, we are migrating from Skype!) Well look in Skype and boom its working there, so Teams can’t use it!

I don’t need my camera in Skype, so I can simply ‘Block’ Skype from using it;

But if you want to use the Camara in BOTH/MORE applications, simply close the other applications that may have stolen the camera and restart the one you want to use it.

Related Articles, References, Credits, or External Links

NA

vSphere: Get ESX Server Serial Numbers

KB ID 0001670

Problem

A few weeks ago I needed to sort out some extended warranty for a customers servers. To do that  I needed the serial numbers of those servers, (a mixture of IBM/Lenovo and Dell Servers).

As I didn’t fancy a drive to two different datacenters, I wanted to try and get them programatically.

Solution

After some searching I came across a post by one of my old EE buddies LucD with exactly what I needed. I’m assuming you have PowerCLI setup before beginning.

Connect to your Virtual infrastructure;

[box]

Connect-VIServer {vCenter-server-FQDN}

[/box]

Then, (assuming you have a folder called C:\Temp that you can write to).

[box]

Get-VMHost | Select Name, @{N='Serial';E={(Get-EsxCli -VMHost $_).hardware.platform.get().SerialNumber}} | Export-Csv c:\temp\serial.csv -NoTypeInformation -UseCulture

[/box]

Then  open your C:\Temp\SerialNumber.csv file, and there’s your serial numbers.


Related Articles, References, Credits, or External Links

NA

Microsoft Teams: Custom Background Images

KB ID 0001669

Problem

With the current lockdown and everyone working from home, I’m using Teams a lot. I use one of the images that I use here at PNL as one of the background images that ‘appear’ behind me when I’m using the webcam in Teams. I was asked today how I did that, so I thought I’d write it up here.

Solution

I’m using Teams on my MacBook but the procedure it pretty much the same in Windows, if you can’t see the options I’m mentioning, you might want to simply update your copy of Microsoft Teams.

Firstly: You need to actually be in a call before you can change your background! On your options bar, (if you cant see it, click on the Teams window). Click the elippses (3 dots) and select ‘Show Background Effects‘. 

You can then simply select one of the Microsoft Included backgrounds, and apply them, (theres a long list scroll down!)

Adding Your Own Custom Image To Teams Backgrounds

This is pretty easy, but you will find that the image will be ‘flipped horizontally’ when other users see it like so;

So if it’s a landscape or an office backdrop that’s probably not going to bother you, but if you have text on the image, it will be back to front, or like me it just makes your OCD itch! Then simply use your favourite graphics editing software to flip the image before you put it in the correct folder.

Where to Save your Teams Custom Backgrounds

For macOS: In finder > Go > Got to Folder > ~/Library/Application Support/Microsoft/Teams/Backgrounds/Uploads

For Windows Clients: In Windows explorer > %AppData%\Microsoft\Teams\Backgrounds\Uploads

Don’t forget to restart Teams before they will appear.

Related Articles, References, Credits, or External Links

NA

Cisco ASA: Mixing TCP and UDP in Object-Groups

KB ID 0001668

Problem

I like object-groups, they can make your firewall configs a lot smaller/neater and if you need to add a host, network, range, or port, then you can simply add the new requirement to an existing group. But what if you want to allow both UDP and TCP ports, you can create a service group for TCP and add the ports and a service group for UDP and add the ports, and add them into your ACL where you would expect ports to be, (at the end of the ACL,) like so;

[box]

!
object-group service Obj-TCP-Ports tcp
 port-object eq www
 port-object eq https
object-group service Obj-UDP-Ports udp
 port-object eq 8080
 port-object eq 8088
!
access-list inbound extended permit tcp any host 192.168.1.10 object-group Obj-TCP-Ports
access-list inbound extended permit udp any host 192.168.1.10 object-group Obj-UDP-Ports
!

[/box]

But that still means creating a group for TCP and UDP right? Well no, you can mix them you just need to move the object-group in the ACL.

Solution

First create a Service group like this;

[box]

!
object-group service OBJ-Service-Ports
service-object tcp eq www
service-object tcp eq https
service-object udp eq 8080
service-object udp eq 8088
![/box]

Note: What this actually does is create ‘destination port’ objects, if you didn’t already know, if you are connecting to a web server on port 443 (https) for example, the source port can be any port number, it’s the destination port number that is 443. (If you’ve ever worked on a Symantec/SEF/Velociraptor firewall this would be more important).

Then place that service group in the ACL where you would normally specify the PROTOCOL like so;

[box]

!
access-list inbound permit object-group OBJ-Service-Ports any host 192.168.1.10
![/box]

Much simpler!

Related Articles, References, Credits, or External Links

NA

macOS: ASDM Developer Cannot Be Verified

KB ID 0001667

Problem

When trying to connect to a Firepower 1010 ASDM I was met with this;

“Cisco ASDM-IDM.app” cannot be opened because the developer cannot be verified.
macOS cannot verify that this ap is free from malware

Solution

If you’ve spent much time using macOS then this is quite common, Open System Preferences > Security and Privacy > General tab > You will see a warning about the Cisco ASDM-IDM > Click ‘Open Anyway‘.

If you are prompted again simply click ‘Open‘.

Related Articles, References, Credits, or External Links

NA

Firepower 1010 Review

KB ID 0001666

What Is It?

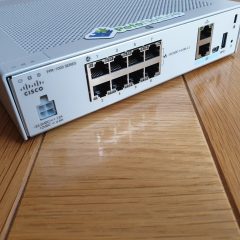
I’ve been trying to get my hands on one of these for a while. So thanks to my employer for sending me one to take a look at. The Firepower 1010 appliance is aimed at Small Office / Home Office, and possibly Small Remote Branch offices. But like its predecessors it will probably get put in EVERYWHERE because it’s ‘cheap’, (Note: for cheap, read possibly under-specced* and the wrong size!)

*Seriously, I’ve deployed a LOT of 5506-X (and 5508-X) firewalls, and then clients enabled every inspection, IDS/AMP/Web Filtering etc. Then complained that their internet connection was then terrible, ‘Why is my new firewall slower than the old one!’ So look at the throughput for these things, with inspection enabled before deciding to buy the cheapest one!

A Brief History

The Firepower 1010, will end up being the replacement for the ASA5506-X, which in turn was the replacements for the ASA5505

Left to Right: ASA 5505, ASA 5506-X, Firepower 1010

The 5505, was brilliant, I still see them everywhere, tucked in the bottom of comms cabinets, and balanced on top of other things in Data Centers. I know of 5505s that I installed new over 15 years ago that are still chugging away. It had built in PoE, a 7 port switch, (you need one port for the WAN.) The only thing that ever let the 5505 down, was, the earlier versions didn’t have enough RAM to update past version 8.3. It replaced the earlier PIX 501 and the PIX506E (I do have both of these models also tucked away somewhere, I was just too lazy to dig them out).

The 5506-X was, (to be honest), a massive let down,  it shipped with 8 Ports on it, but those ports were independent, so you needed to buy a switch as well, and it didn’t have PoE. Cisco tried to ‘Fix’ the switch problem by introducing the BVI interface with version 9.7. the problem with that was, it was ‘horrifically terrible in the extreme‘. If you wanted to do anything even vaguely ‘firewall-ish’ with your firewall, the config would extend in size with a ratio like it was getting multiplied by the Fibonacci numbers. 🙁 The final nail in its coffin was, if you updated it past version 9.10 the FirePOWER module was disabled, (Regardless of the fact you had bought licences for it or not).

So Now the Firepower 1010

Is it FirePOWER or Firepower? : Good question, the rule was, if it was in an ASA it was FirePOWER if it was a dedicated device it was Firepower. But as the Firepower 1010 can run ASA code, it breaks the rules! So I’ll stick with Firepower for the new ones.

It runs ASA Code? : Yes Cisco firewall techs of the world rejoice! The Firepower 1010 model comes in two flavours;

  • FPR1010-ASA-K9: Good old Cisco ASA code, with an ASDM!
  • FPR1010-NGFW-K9: Runs the FTD (Firepower Threat Management) code.

I’ve written briefly about FTD on the Cisco ASA, I wasn’t really a fan, but I know we live in a ‘point and click’ society now, so maybe this version will win out in the end, but I hope not.

Oh Bugger! I’ve Ordered the wrong one! No problem, you can swap between versions, but you will need to ‘re-image’ the device completely (losing all settings).

What Do You Get With the Firepower 1010?

Out of the box you get the unit itself, a ‘Power Brick’ (with an annoying ‘Clover Leaf’ / ‘Mickey Mouse Ears’ / ‘IEC C5’ connector.) So if like me you get one with a Euro (2 pin) plug in the box and you live in the UK unless you have one spare you will have a problem. Luckily I’ve got most things at home, but if you unbox this in a Data Centre at 11 o’clock at night, good luck finding one of those Power Cables! You also get a USB console cable. There’s a quick setup card, mine was in French and Spanish, but the picture was self explanatory. Theres a licence envelope in there as well, on inspection, it’s just instructions on how to setup a ‘Smart’ License account.

It’s Fan-less: Like the 5506-X it’s fan-less (that’s why its covered in holes). So IT”S NOT SUPPOSED TO GO IN A RACK! If you want a rack mountable firewall buy a Firepower 1120.

But You Can Get Rack Mounting Kits For It? : I know, but then the world is full of people who sell the wrong stuff. If you put this thing in a rack, and impede airflow though it, it’s more likely to break, (lecture over).

It’s a Proper Switch! Yep even better than the 5505, it’s got proper switchports with proper switch commands! By default all Ports from GigabitEthernet 1/2 to 1/8 are in VLAN 1. Gigabit Ethernet 1/1 is a routed (no switchport) port.

PoE:  The unit has PoE on ports GigabitEthernet 1/7 and GigabitEthernet 1/8 (only).

Throughput: Cisco state with NGFW inspection ‘or’ IDS turned on 650Mbps (notice they don’t say ‘and’!)

AnyConnect: Comes with 75 ‘Premium’ Licences, (without extra licensing!)

Licensing: Smart License model only, so no more ‘classic’ licences, and activation-keys any more.

Failover? here’s a GOTCHA for failover you need to add an additional licence to BOTH units, (on the 1010 only) and they are not cheap! But if you want enterprise solutions, then buy enterprise class firewalls guys!

  1. Power:  Much better than the 5506-x and the terrible 5505 power connector, you could probably swing on this and it wont come out. Just a pity about the IEC C5  connector on the power brick.
  2. 8 x Gigabit Ethernet ports: Normally GigabitEthernet 1/1 will be for the WAN, GigabitEthernet 1/2 though 1/8 will be for the LAN (with 1/7 and 1/8 being PoE).
  3. Management Port.
  4. Console Port (RJ45).
  5. Console Port (Mini USB).
  6. USB port (useful for upgrades, and backups).
  7. Kensington Lock: Seriously? I’ve not seen one of these since about 2005, does anyone still use them?
  8. Reset Button: Depress for 3 seconds reverts the firewall to its factory settings, (and preserves the config apparently).
  9. Status Lights, (another reason not to put things on top of it!) Though you will notice there’s some on the back also.

Firepower 1010 Initial Setup (ASA Version)

It takes ages to boot! Like its predecessors the WAN Port will be set to get an IP address via DHCP, and the internal ports have DHCP enabled (192.168.1.0/24). The  Management Port also has DHCP enabled 192.168.45.0/24) So be careful before connecting it to a live network. ASDM is enabled to the entire inside and management networks. 

The only thing I can see different from its predecessor, (apart form the fact its got a working switch setup that isn’t terrible,) is the DNS servers are set to Ciscos, I’m assuming this is so that licensing and updates will ‘just work’ though some people will want to change this.

Annoyingly ICMP inspection is still disabled by default, and ESMTP inspection is enabled by default (If you have an Exchange server turn that off!)

All traffic is set to translate to the outside interfaces IP address (This is actually PAT translation, that’s why I didn’t say NATTED to the outside interfaces IP address).

Next Step: Cisco Firepower 1010 Licensing

Related Articles, References, Credits, or External Links

NA