
KB ID 0001546
Problem
I’ve used WAP (Web Application Proxy) to present Remote Desktop Services before, but never for Microsoft Exchange. It came up as a possible requirement for a client this week, so I thought I’ll work it out on the bench. here’s the topology;
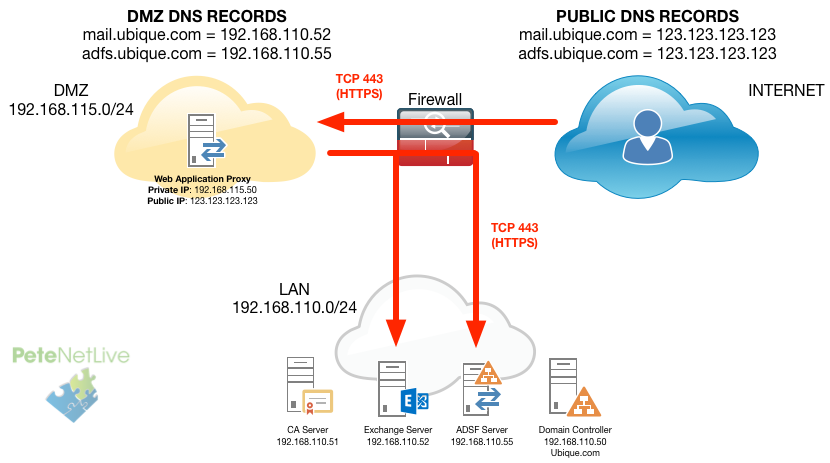
Exchange: Exchange 2019 Standard
Server OS: Server 2019 Datacenter
Solution – Step 1 Deploy ADFS
If you are going to use ‘self signed’ certificates then before you deploy ADFS, (Active Directory Federation Services,) you will want to Deploy Certificate Services. Here I’m going to use a self signed wildcard certificate. In production however, I would suggest you use a wildcard certificate signed by a public CA authority. (Click the Certificate link above).
To deploy ADFS simply follow the steps in this article;
Deploy Active Directory Federation Services
Solution – Step 2 Configure ADFS for OWA and ECP
There are a few ‘Web’ Services that Exchange provides, Outlook Web App, and Exchange Control Panel (Exchange Administration Centre), are ‘tied’ together and need to be presented in the same way, so we will cover them first.
IMPORTANT: You need to change OWA and ECP together, BE AWARE that means your Exchange Administration panel will be secured by ADFS, (and ADFS ONLY!) So you may need to change the way you do Exchange administration, (or leave one Exchange server without ADFS secured ECP for internal management).
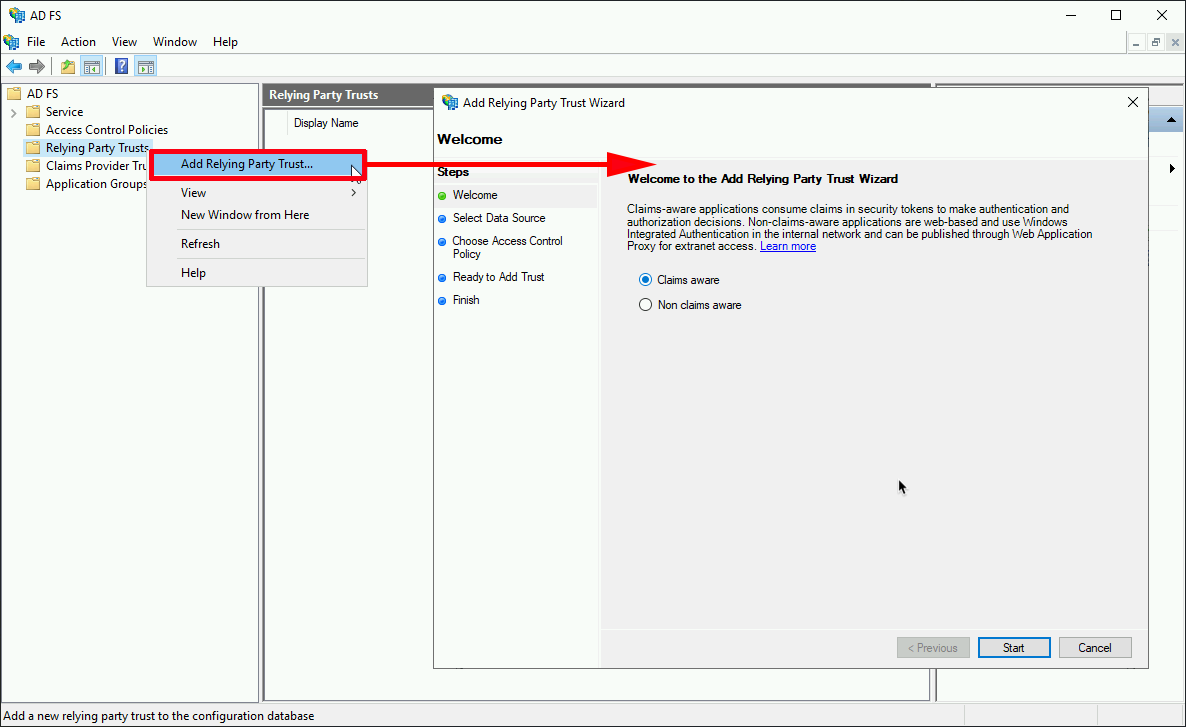
So you create the ‘trusts’ for OWA and ECP in ADFS, then the WAP server will use those ‘trusts’. CARRY OUT THE FOLLOWING PROCEDURE TWICE, once for OWA, and once for ECP.
Open the ADFS management console > Relying Party Trusts > Add Relying Part Trust > (With ‘claims aware’ selected) > Next.
Enter data about the relying party manually > Next.

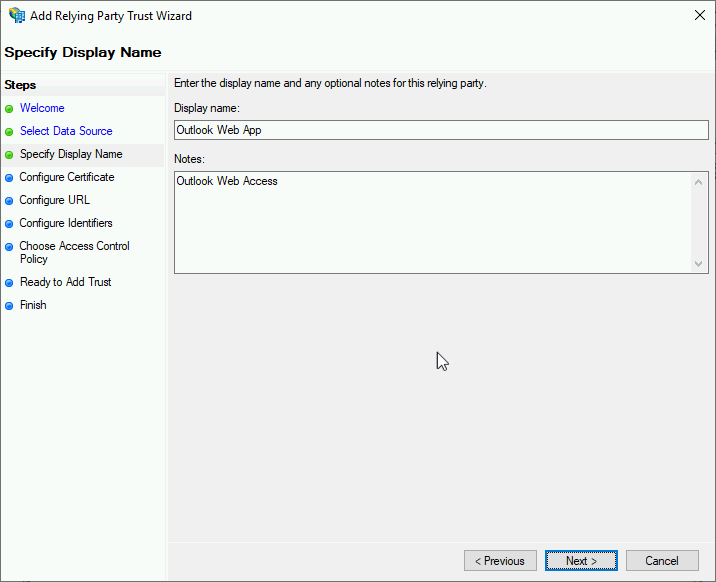
Give the trust a name e.g. ‘Outlook Web App’ > Next.
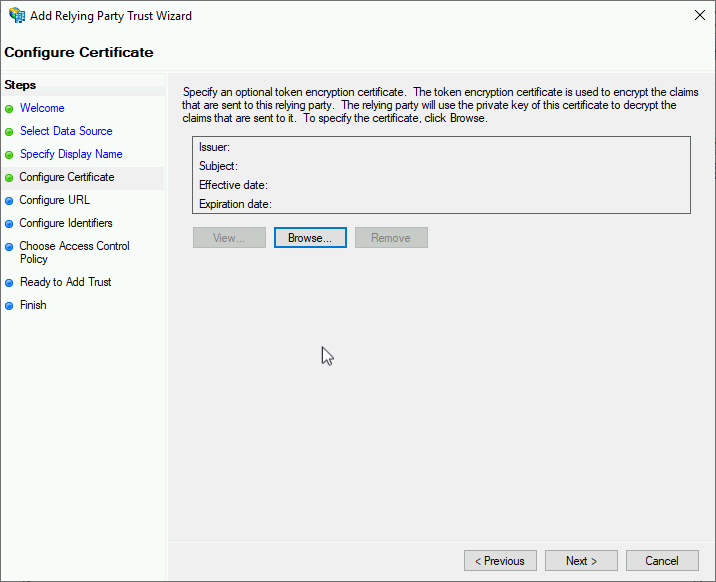
Next
Enter the ORL for OWA (with a trailing slash) e.g. https://mail.domainname.com/owa/
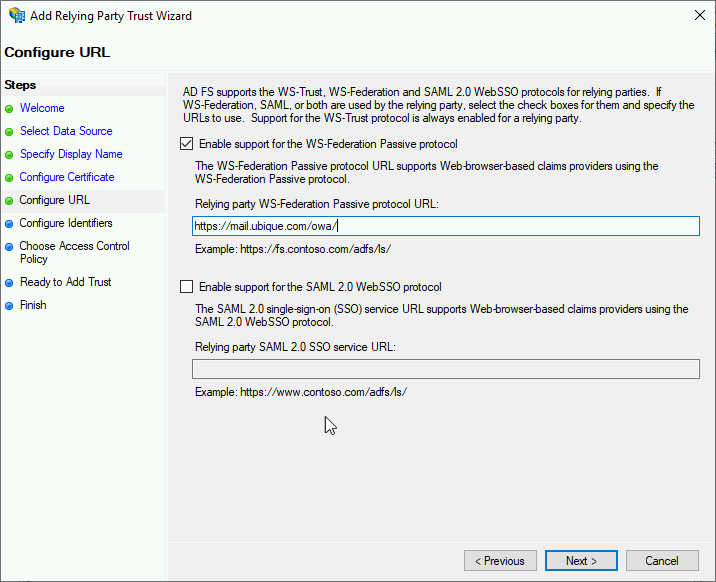
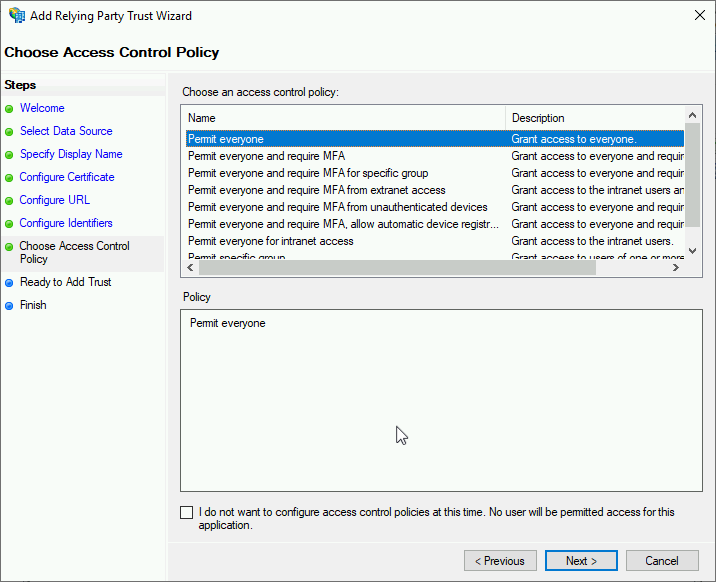
Permit everyone > Next.
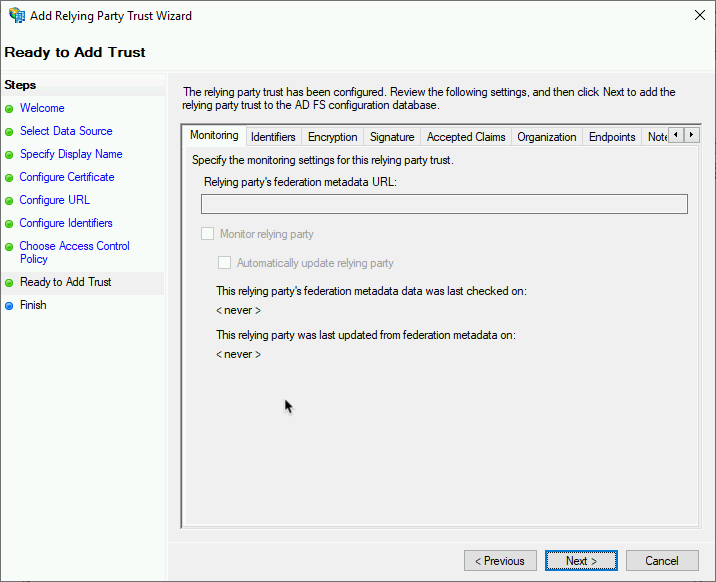
Next
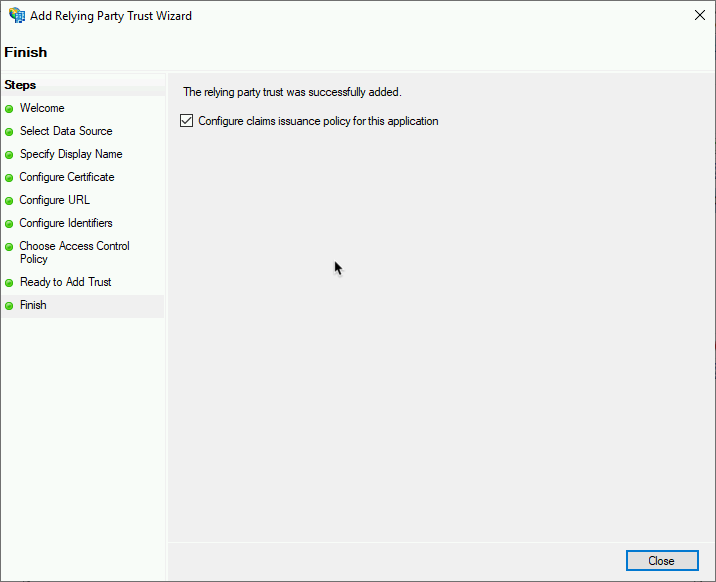
Close.
NOW REPEAT THE ABOVE PROCEDURE FOR ECP (https://mail.domain.com/ecp/)
ADFS Create “Claims Issuance Policies”
Why are you doing this? This allows you to connect to the WAP server and enter your username and password ONCE. To enable you to only supply usernames and passwords once, you need two things, 1) Claims Issuance Policies, that can query AD and collect your UPN and check your password, and 2) Exchange set to allow ADFS authentication, (instead of the usual basic, and ‘forms based’ authentication is uses for OWA and ECP out of the box).
AGAIN CARRY THIS PROCEDURE OUT TWICE, ONCE FOR OWA AND ONCE FOR ECP
From ADFS Management > Relying Party Trusts > Select your OWA Trust > Edit Claim Issuance Policy > Add Rule.
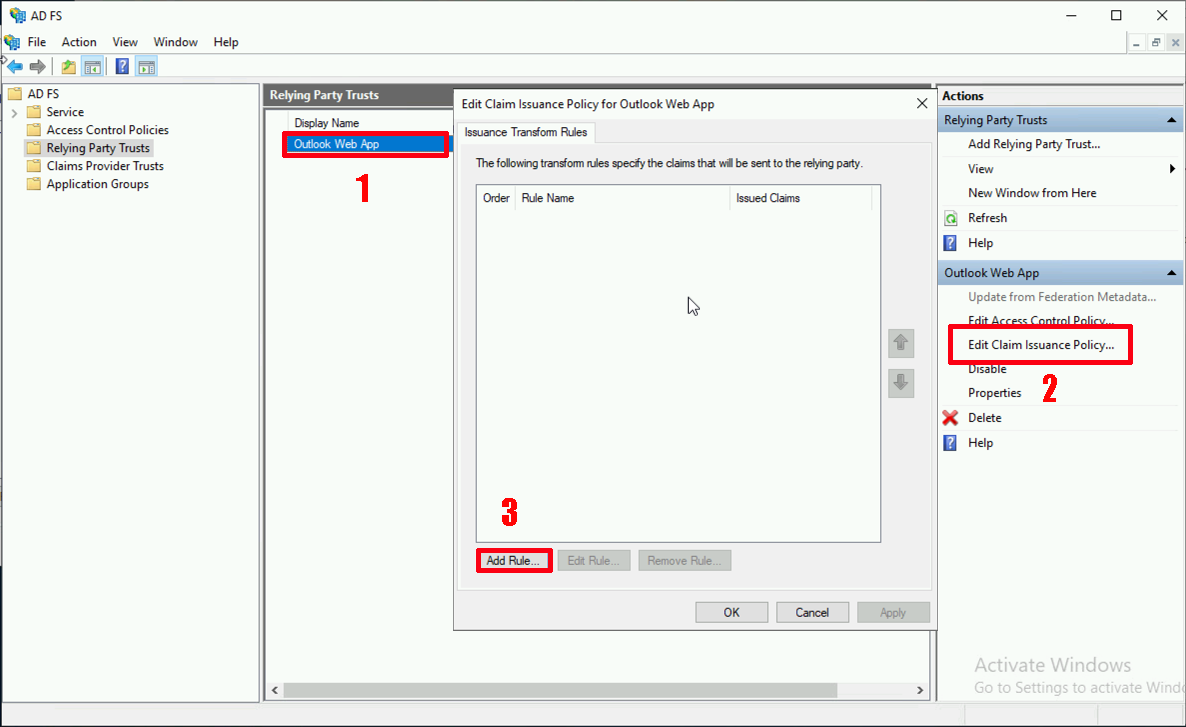
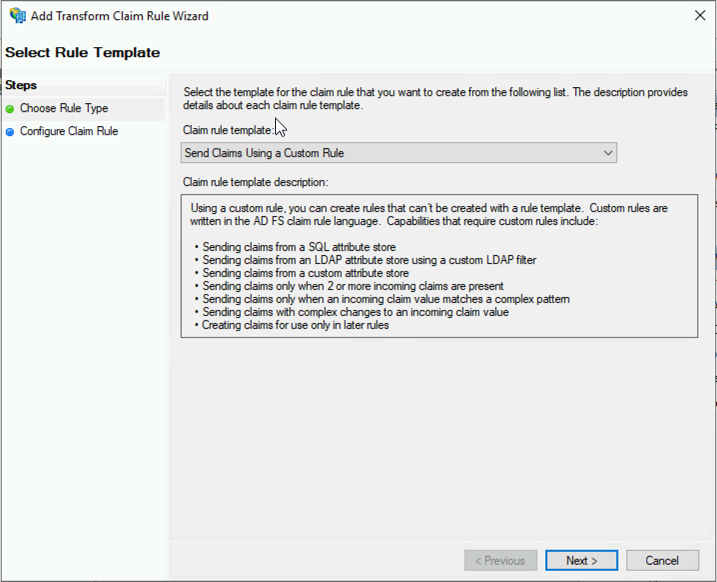
Select ‘Send claims using a custom rule’ > Next.
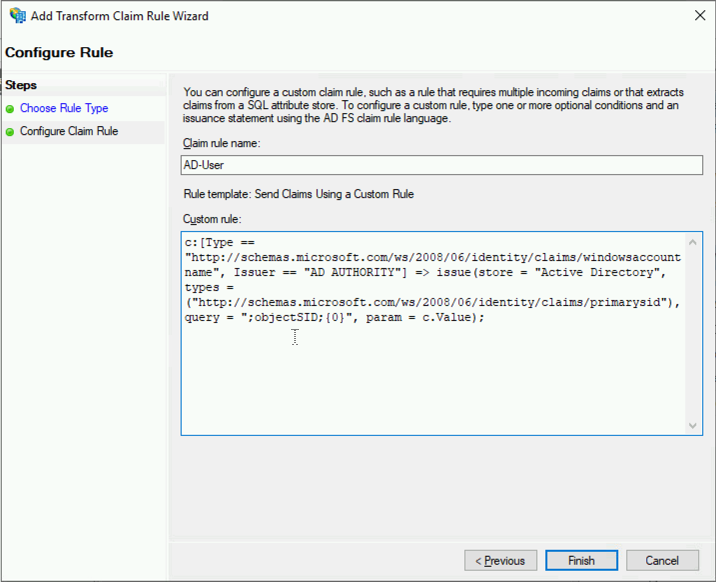
Client Rule Name: AD-User
Custom Rule:
c:[Type == "http://schemas.microsoft.com/ws/2008/06/identity/claims/windowsaccountname", Issuer == "AD AUTHORITY"] => issue(store = "Active Directory", types = ("http://schemas.microsoft.com/ws/2008/06/identity/claims/primarysid"), query = ";objectSID;{0}", param = c.Value);Click ‘Finish’.
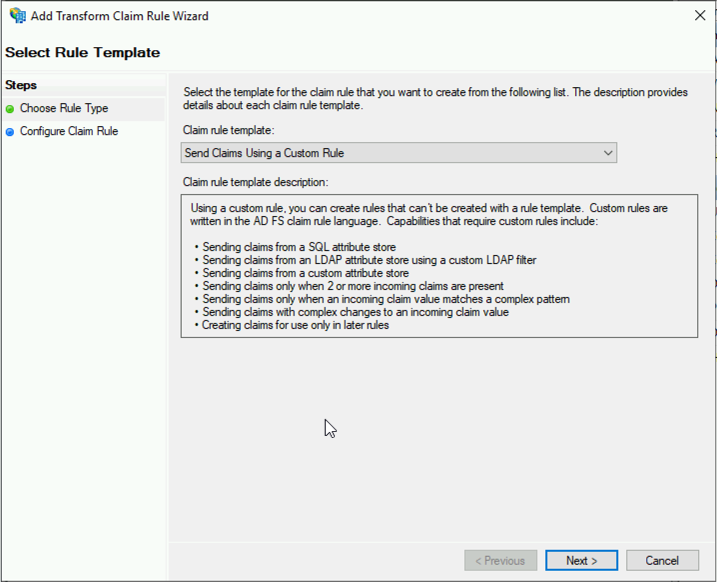
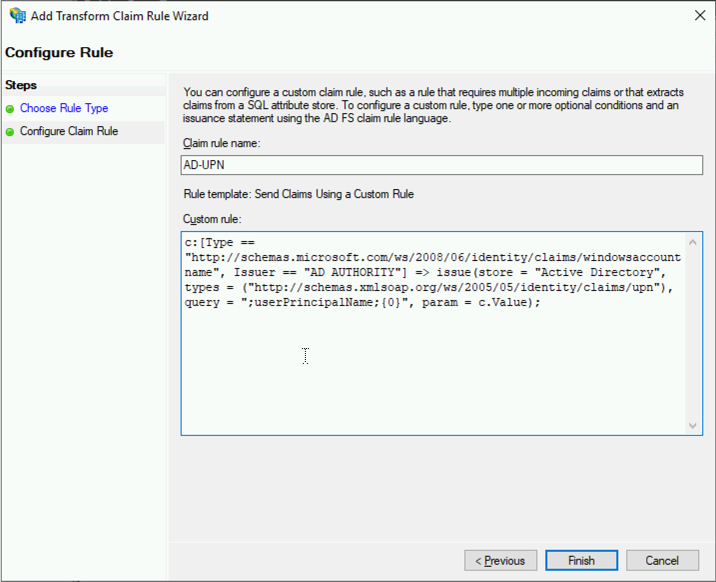
Add a second rule > Again choose ‘Send Claims Using a Custom Rule’ > Next.
Client Rule Name: AD-UPN
Custom Rule:
c:[Type == "http://schemas.microsoft.com/ws/2008/06/identity/claims/windowsaccountname", Issuer == "AD AUTHORITY"] => issue(store = "Active Directory", types = ("http://schemas.xmlsoap.org/ws/2005/05/identity/claims/upn"), query = ";userPrincipalName;{0}", param = c.Value);Click ‘Finish’.
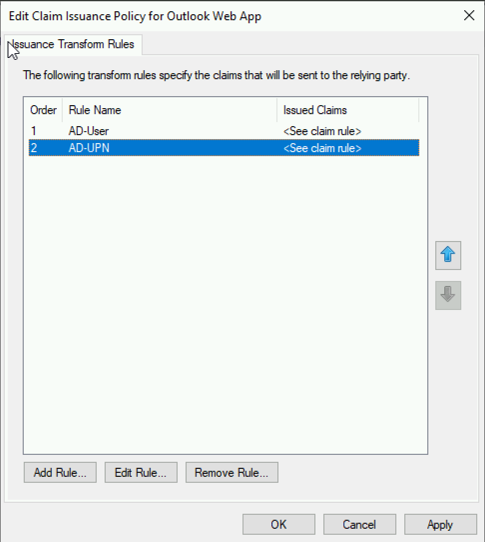
You should end up with something like this;
NOW REPEAT THIS PROCEDURE FOR THE ECP
Solution – Step 3 Deploy and Configure WAP
Firewall Requirements
- The WAP server either needs a Static public IP address that is registered in public DNS to the URLS you will be pointing to it, or HTTPS port forwarding form the firewalls outside IP address to the internal IP of the WAP server, (if you don’t have spare public IP addresses).
- WAP Server requires TCP Port 443 (HTTPS) open TO it from the outside world.
- WAP Server requires TCP Port 443 (HTTPS) open FROM it to BOTH the exchange server and the ADFS Server.
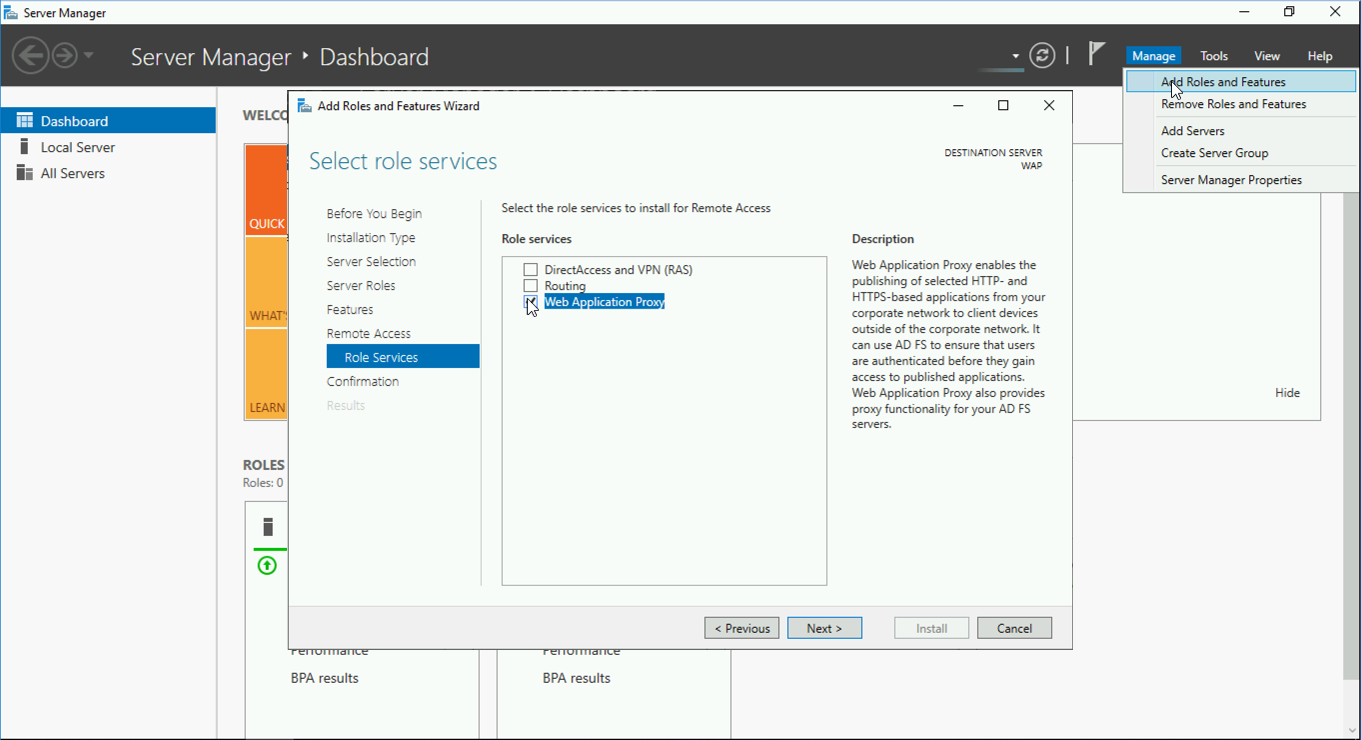
Installing Web Application Proxy
To be honest, this is pretty simple, the server itself does not have to be a domain member (which is good for a DMZ server!) For productions I’d disable the local administrator account and harden the server somewhat also. Make sure you have a copy of your wildcard certificate on this server also.
Server Manger > Manage > Add Roles and Features > Next > Next > Next > ‘Remote Access’ > Next > Next > Next > “Web Application Proxy” > Next > Install
Or use the following PowerShell;
Install-WindowsFeature Web-Application-Proxy -IncludeManagementTools
Launch the post deployment configuration wizard > Next.
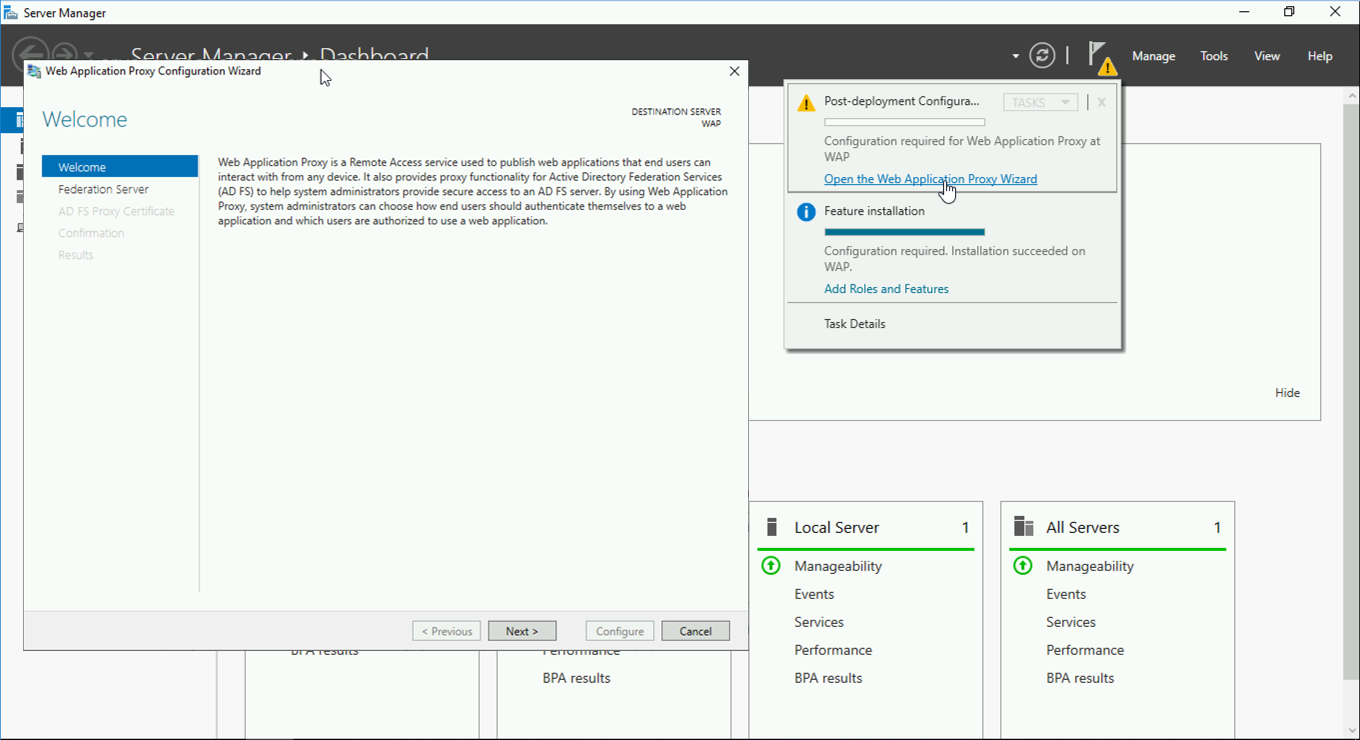
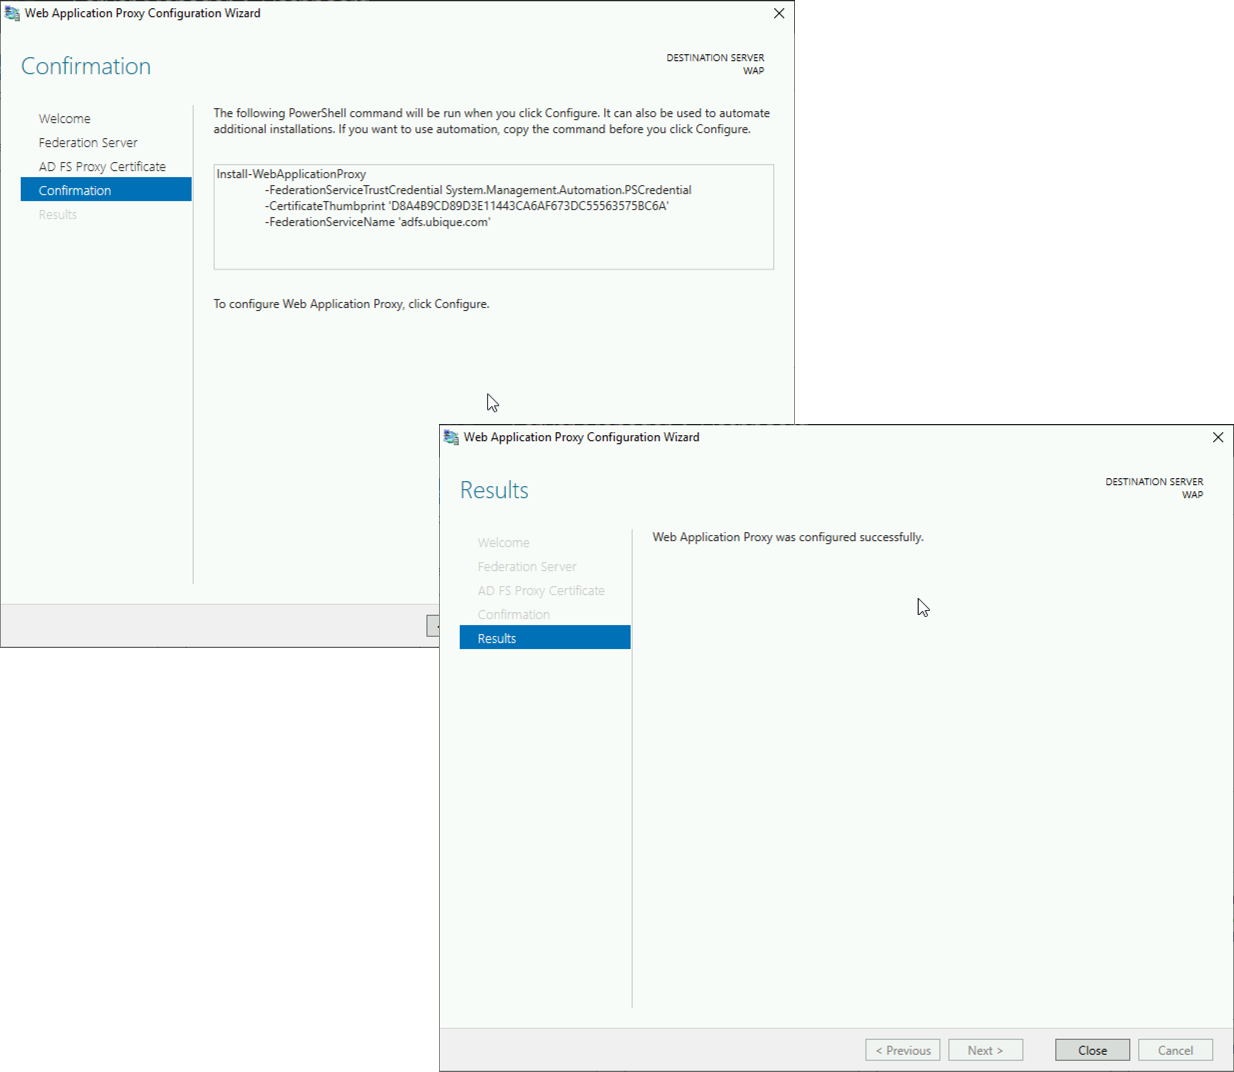
Enter the FQDN of your ADFS Server, and administrative credentials > Next > Select Your Wildcard Certificate > Next.
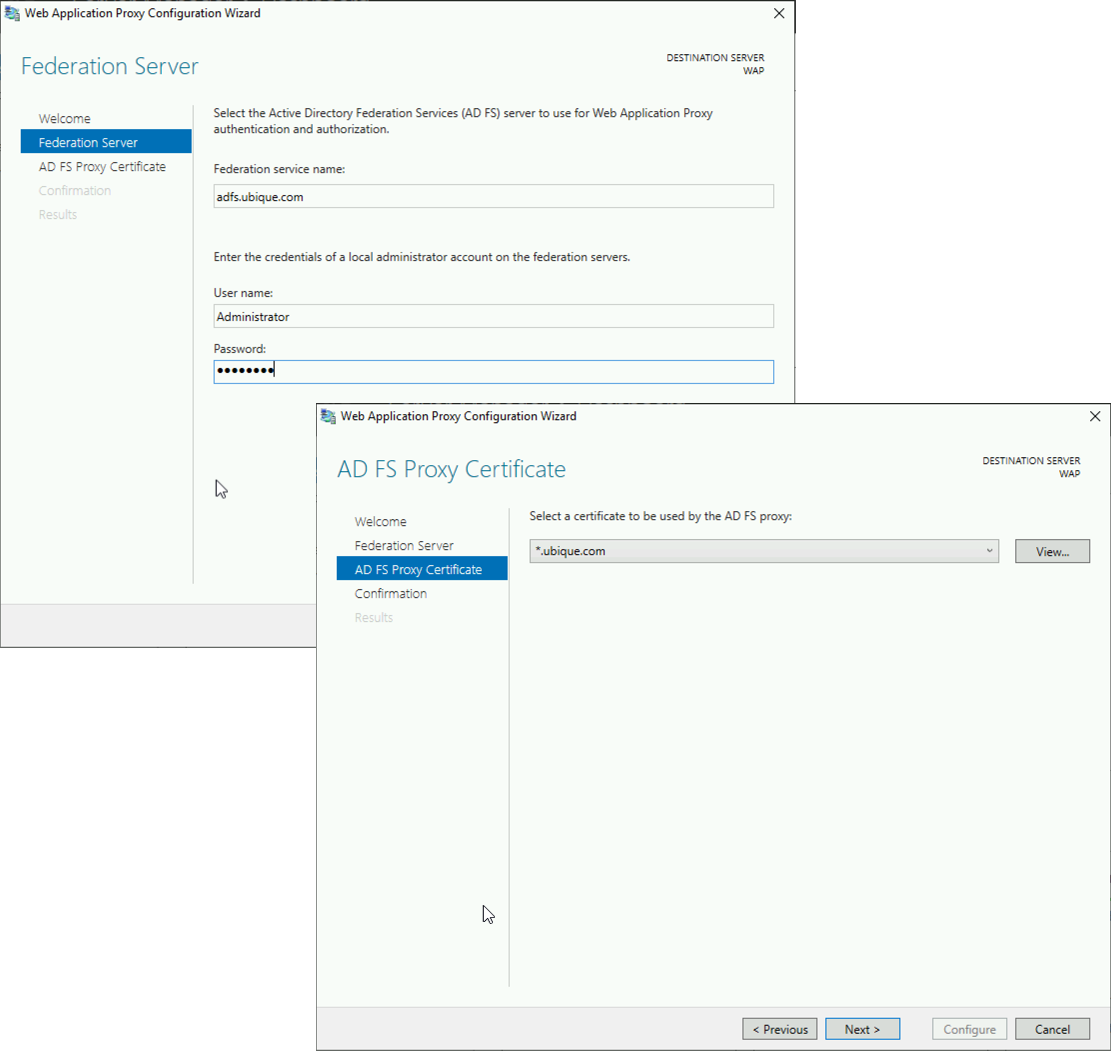
Configure > Close.
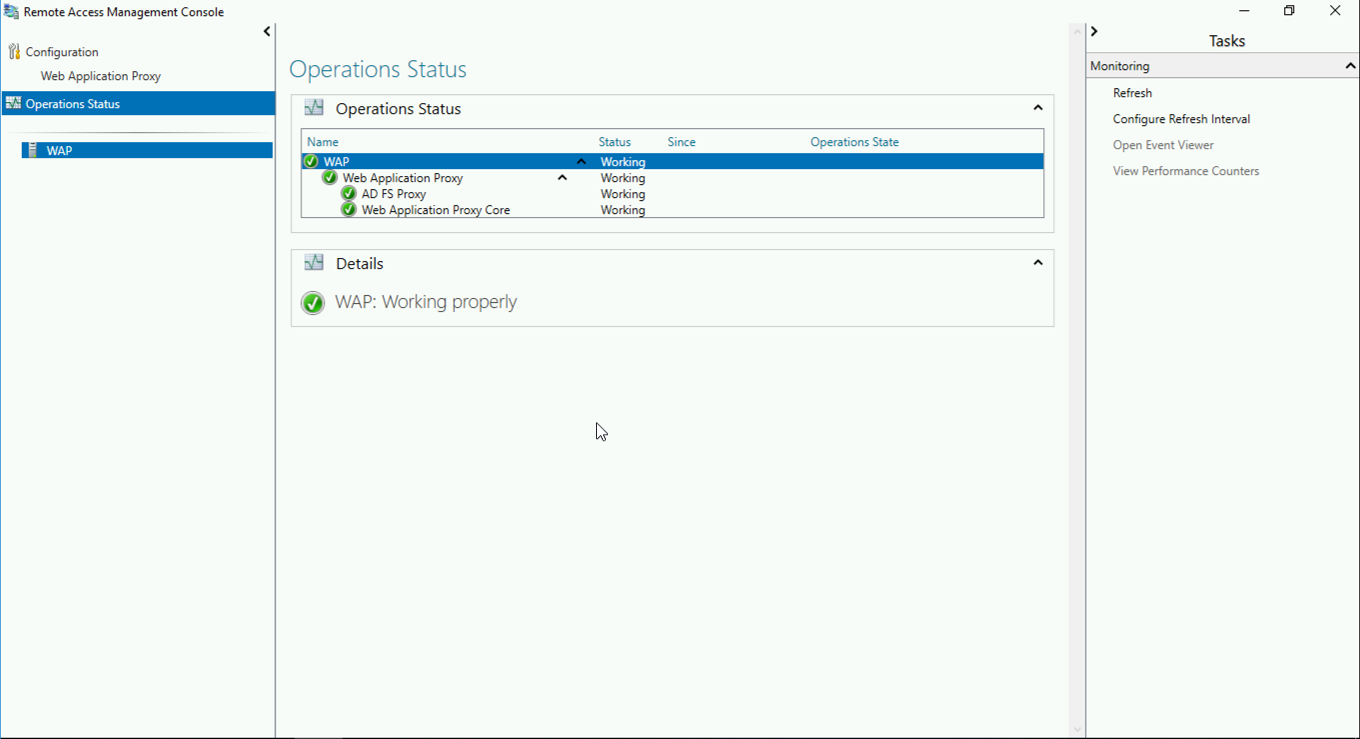
All being well the Remote Access management console should open and should show ‘All Green’ on the Operational Status.
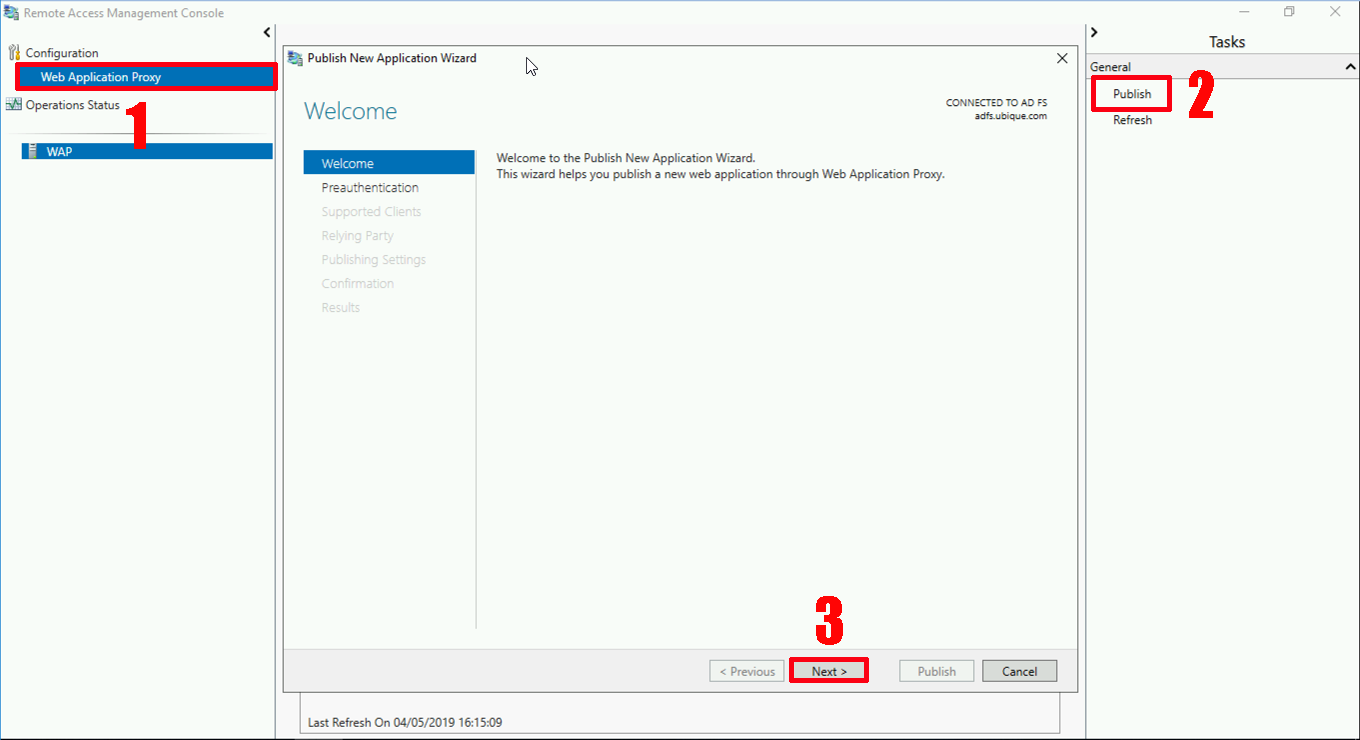
Configure Web Application Proxy for OWA and ECP
Navigate to > Configuration > Web Application Proxy > Publish > Next.
Select Active Directory Federation Services > Next > Select ‘Web and MSOFBA > Next.
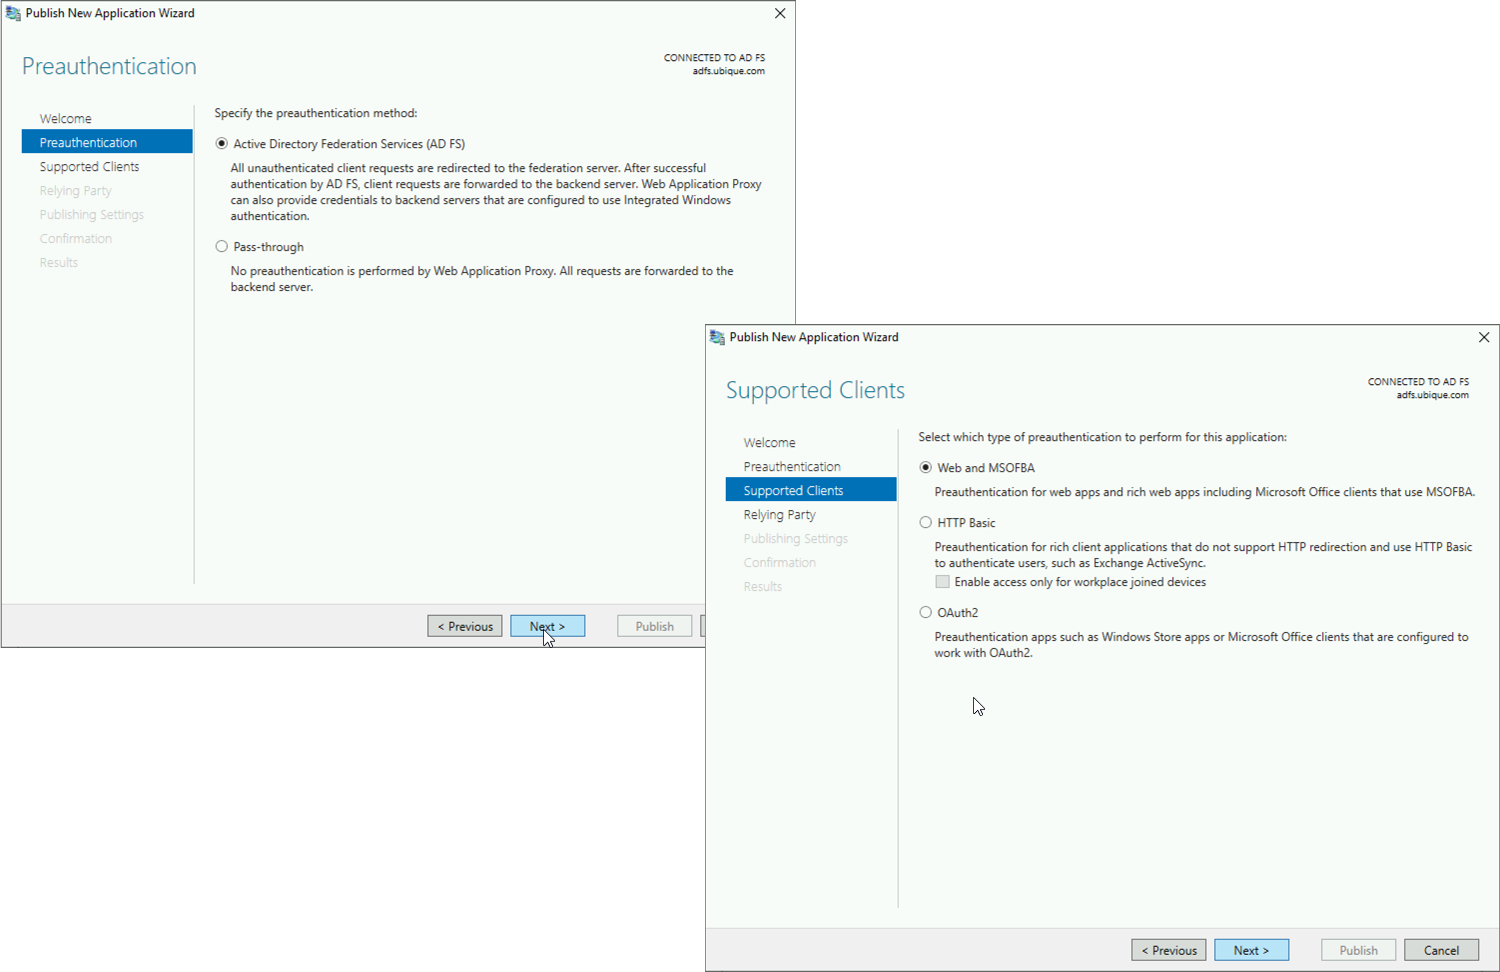
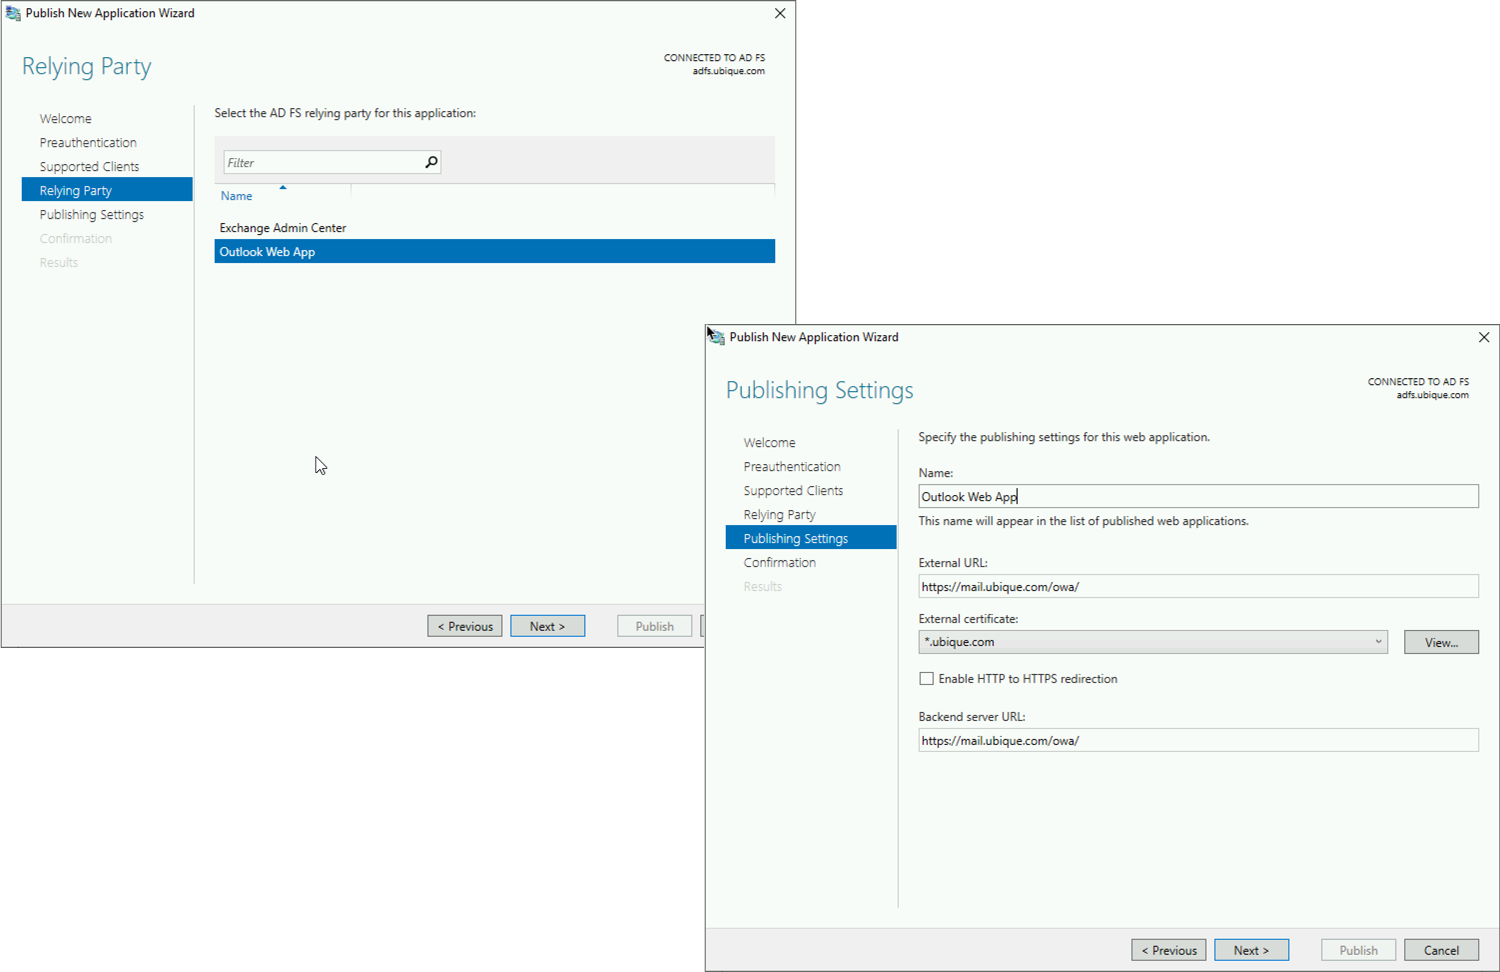
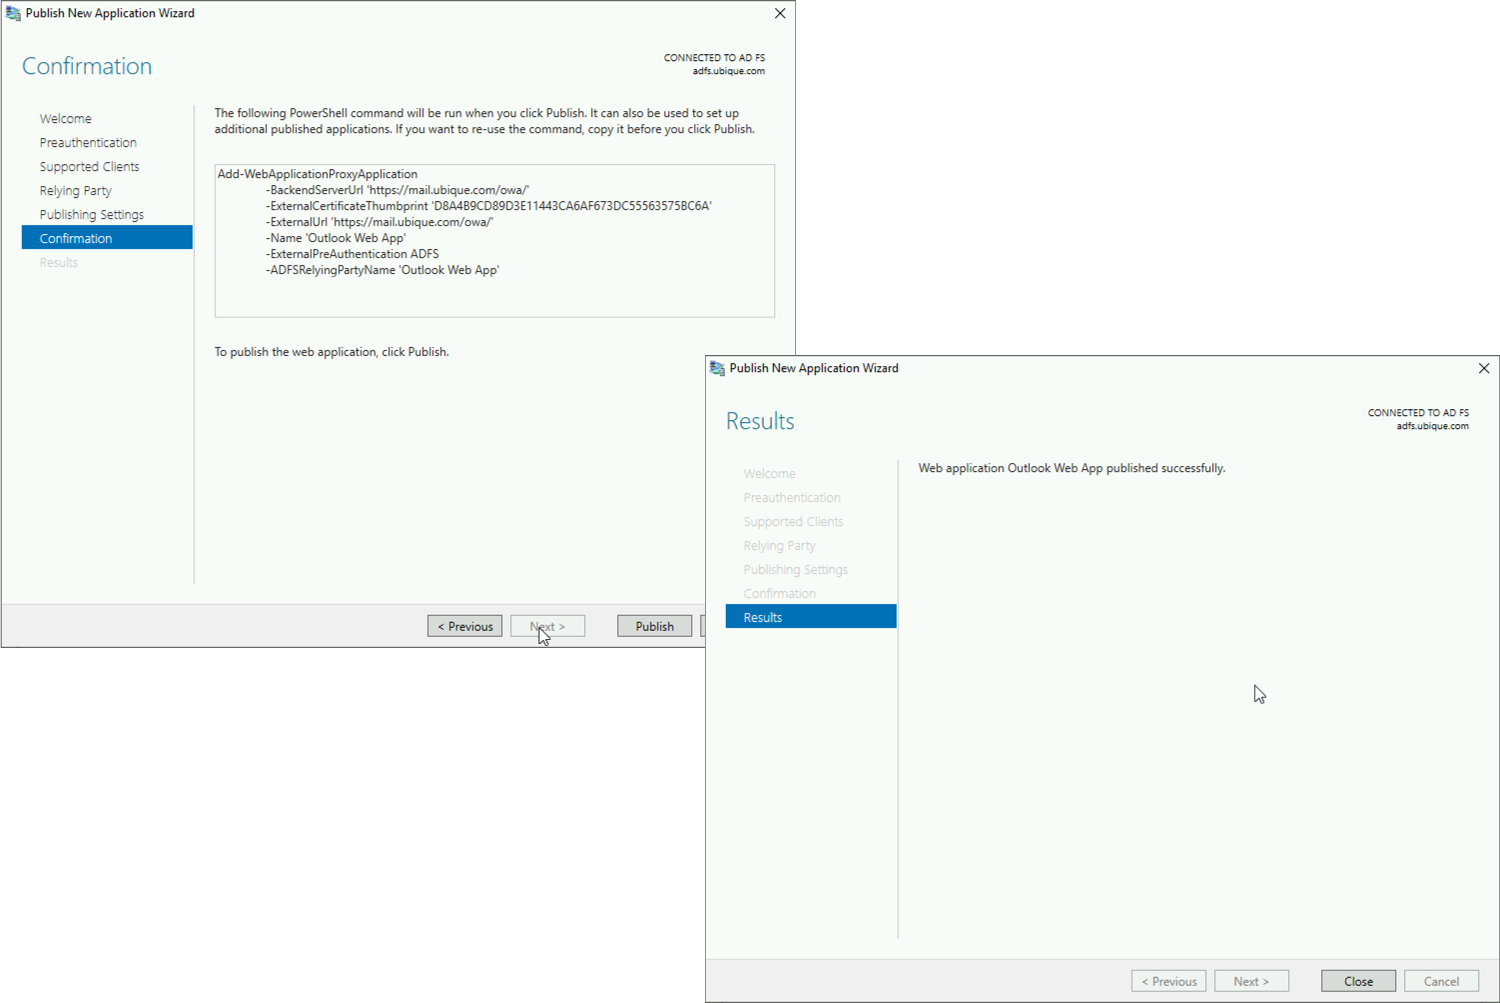
Select the ‘Relying Trust’ object that WAP can see for Outlook Web app > Next > Give the Published Rule a Name > Set the Public URL > Select the wildcard certificate > Set the Backend URL > Next.
Publish > Close.
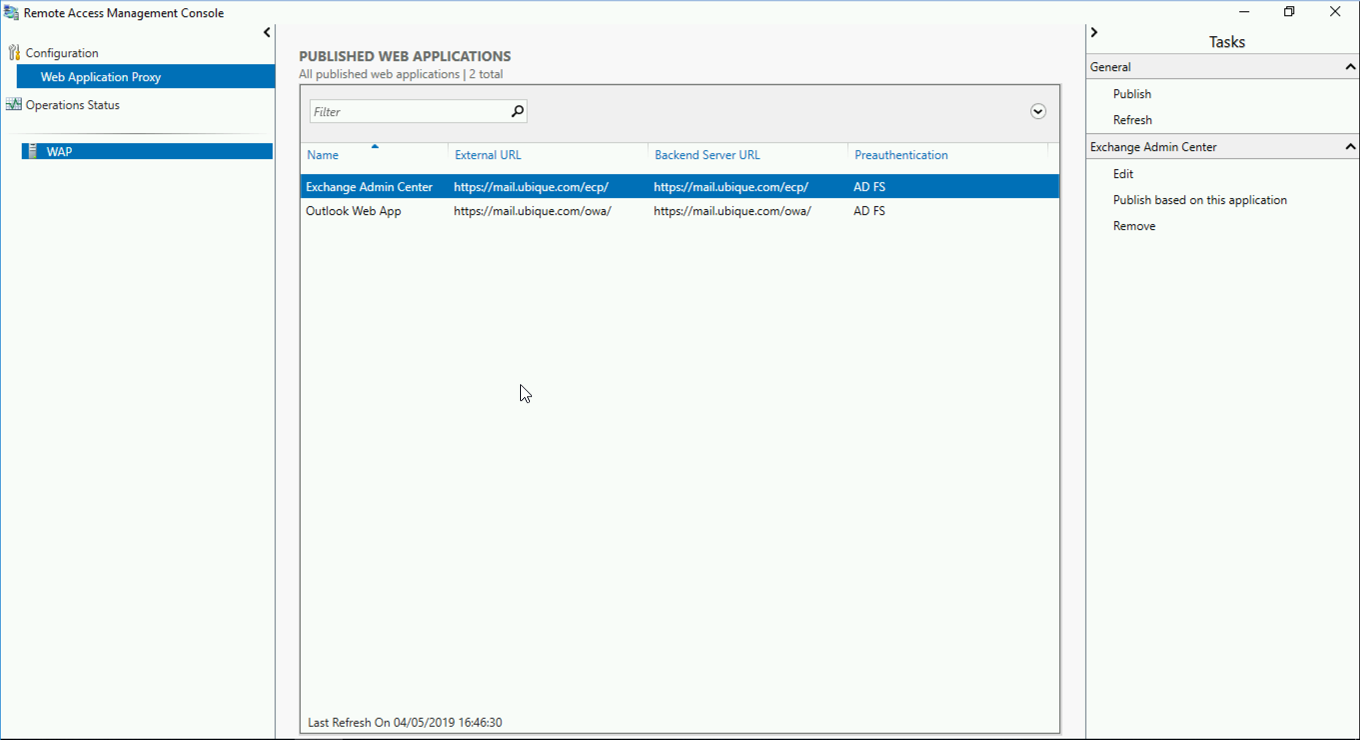
REPEAT TO PUBLISH ECP
When you have finished it should look something like this;
x
Solution – Step 4 Configure Exchange for ADFS Authentication
Your Exchange needs a copy of the ADFS Signing certificate, this certificate is a ‘self signed’ certificate created on the ADFS server itself, you can find it here;
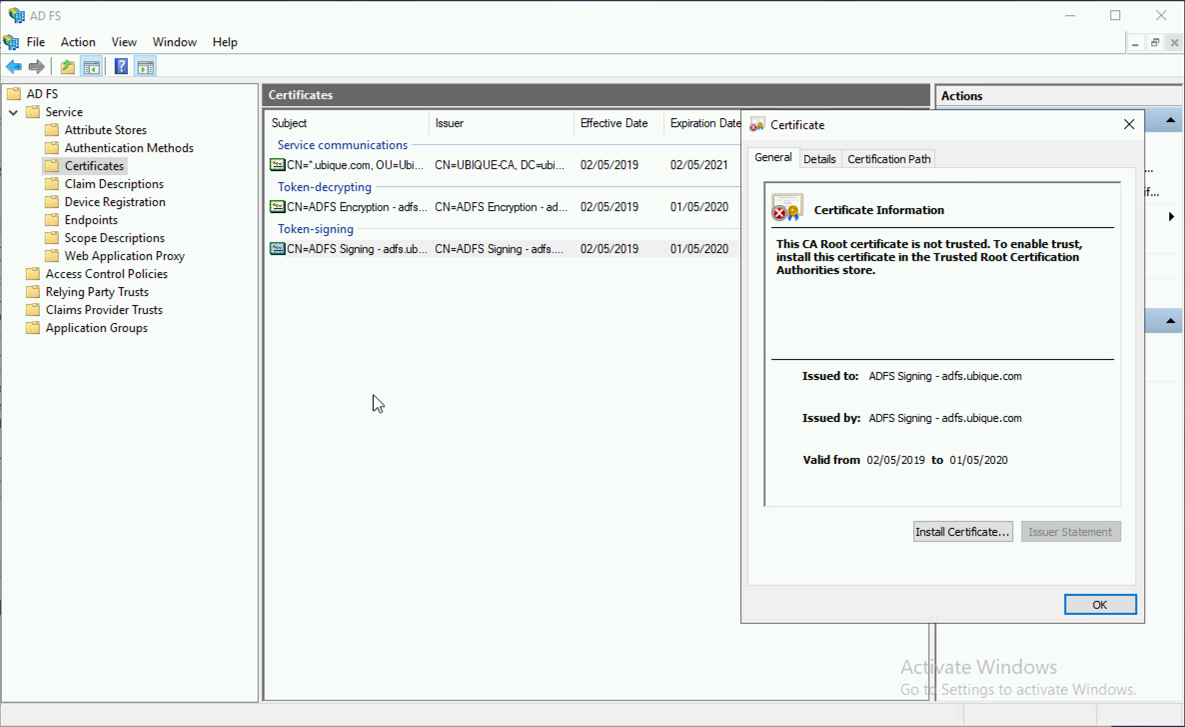
By Default this certificate only lasts a year, and will need to be manually imported onto Exchange, you can change the certificate duration by suing the following PowerShell and changing the Day value, (in this example to three years).

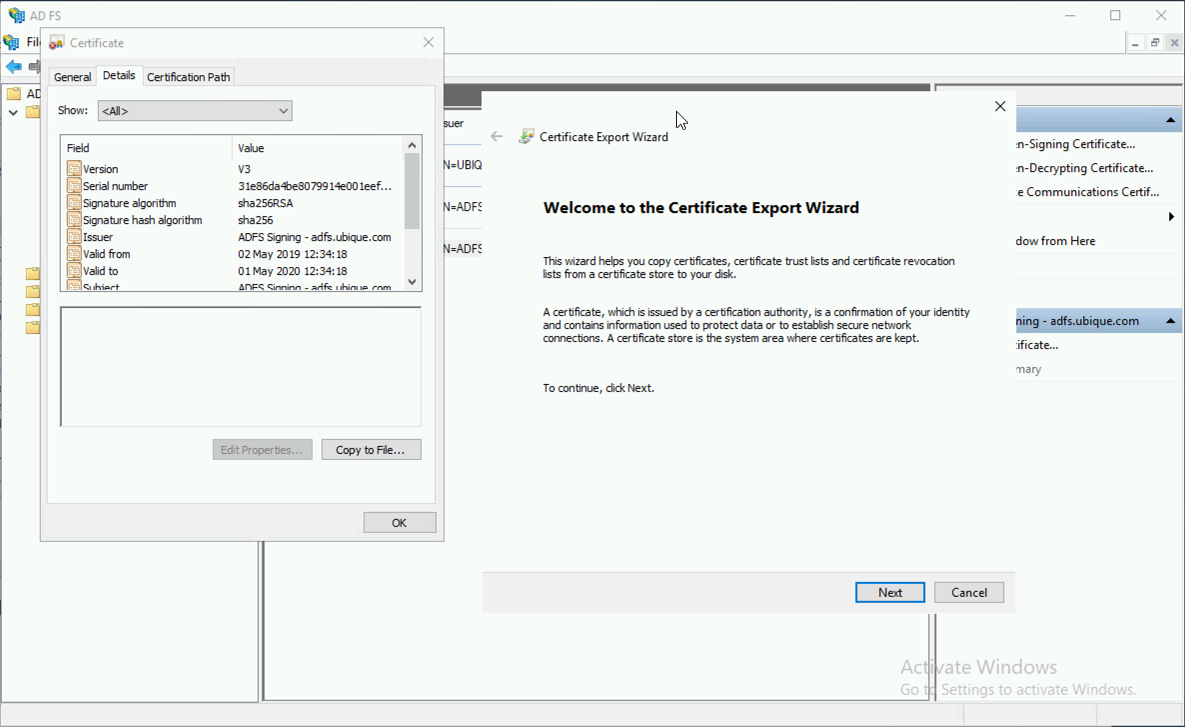
Exporting the ADFS Signing Certificate
With the certificate selected, navigation to the ‘Details‘ tab > Copy to File > Follow the instructions, (accept the defaults).
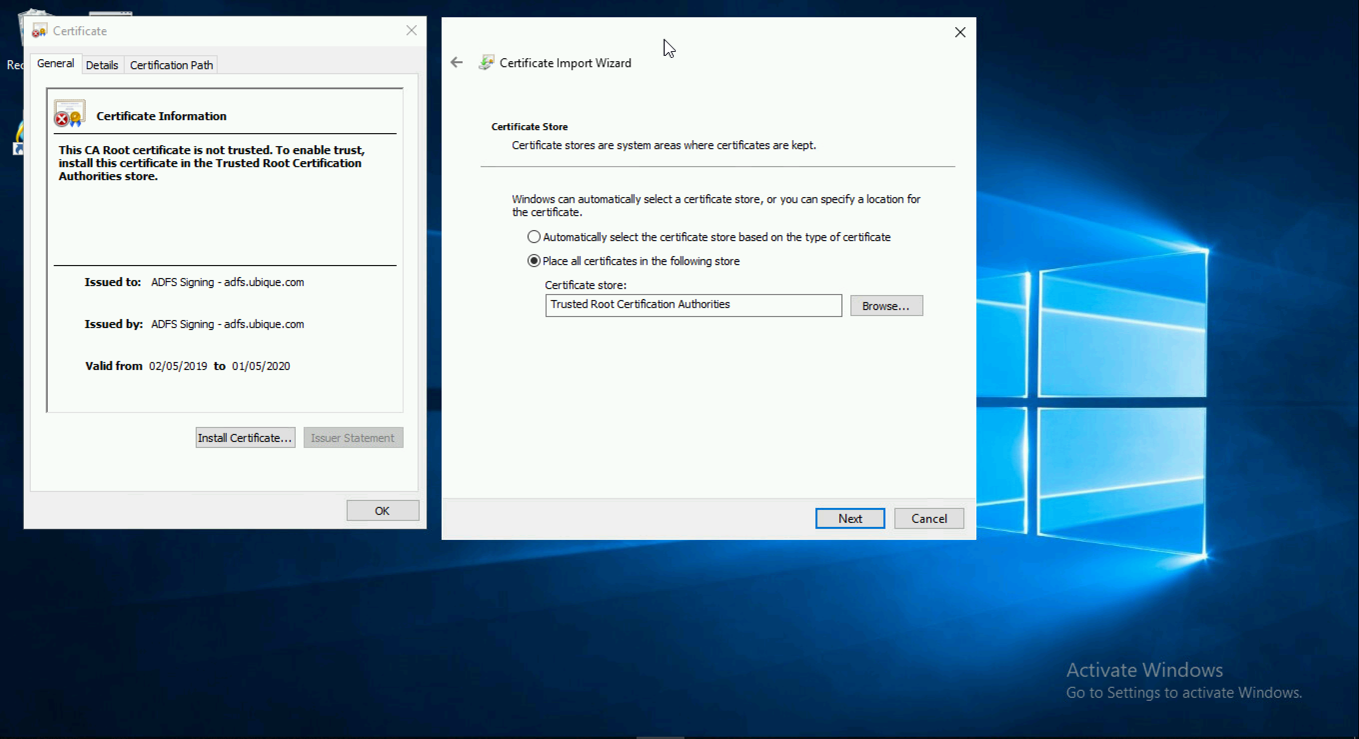
Importing the ADFS Signing Certificate Into Exchange
Physically copy the exported certificate to the Exchange server, and double click it > Install Certificate > Local Machine > Next > Place Into the Following Store > Trusted Root Certification Authorities > Next > Finish.
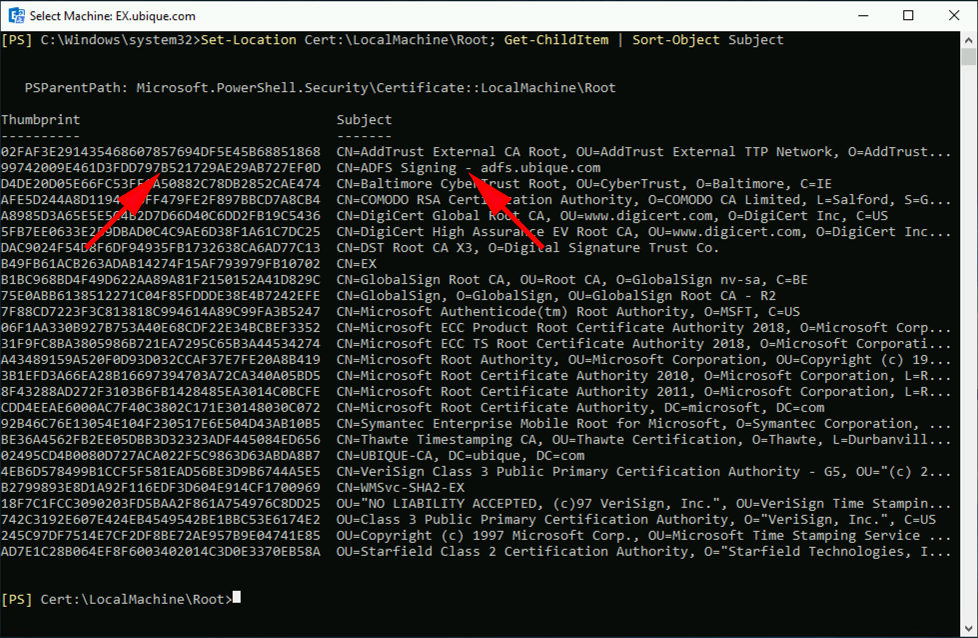
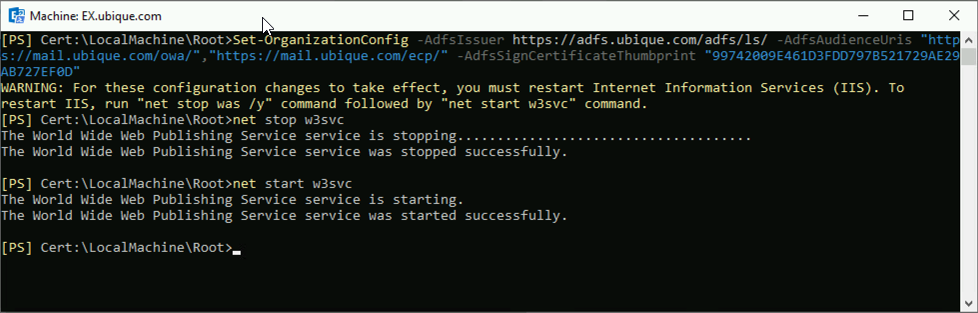
Now the certificate has been imported you need to get its thumbprint, open and Exchange Administration Console, and issue the following command. locate the ADFS certificate and copy its thumbprint to the clipboard.
Set-Location Cert:\LocalMachine\My; Get-ChildItem | Format-List FriendlyName,Subject,Thumbprint
Set that certificate as the ADFS certificate for your mail organisation with the following command;
Set-OrganizationConfig -AdfsIssuer https://{ADFS-FQDN}/adfs/ls/ -AdfsAudienceUris "{OWA-URL}","{ECP-URL}" -AdfsSignCertificateThumbprint "{Thumbprint}"
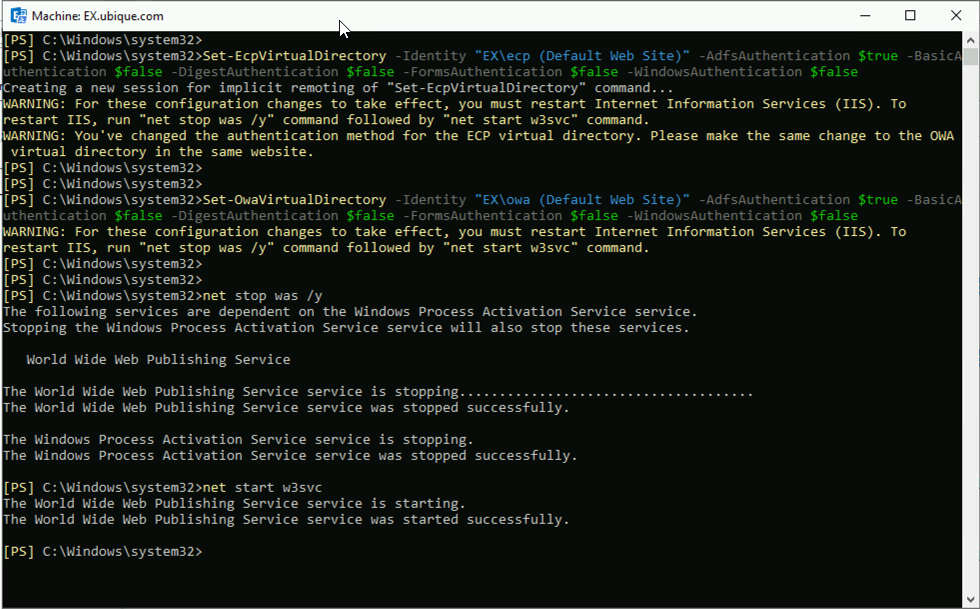
Finally you need to set the OWA and ECP virtual directories to accept ADFS authentication, then restart the IIS services, to make the changes take effect.
Set-EcpVirtualDirectory -Identity "EX-SERVER\ecp (Default Web Site)" -AdfsAuthentication $true -BasicAuthentication $false -DigestAuthentication $false -FormsAuthentication $false -WindowsAuthentication $false


Set-OwaVirtualDirectory -Identity "EX-SERVER\owa (Default Web Site)" -AdfsAuthentication $true -BasicAuthentication $false -DigestAuthentication $false -FormsAuthentication $false  -WindowsAuthentication $false

net stop was /y

net start w3svc
In PART TWO we will publish Outlook Anywhere, Active Sync, EWS, OAB, MAPI and Autodiscover.
Related Articles, References, Credits, or External Links
NA
09/09/2019
Minor typo fix for others benefit.
This command
Set-Location Cert:\LocalMachine\My; Get-ChildItem | Format-List FriendlyName,Subject,Thumbprint
Should be this
Set-Location Cert:\LocalMachine\root; Get-ChildItem | Format-List FriendlyName,Subject,Thumbprint
11/09/2019
Updated ThanQ
06/09/2021
Or just “Get-ChildItem -Path Cert:LocalMachineRoot”. If you’re not using custom signing certs you can get the actual thumbprint with:
Get-ChildItem -Path Cert:LocalMachineRoot | Where-Object -Property Subject -Like “*ADFS Signing*” | Select-Object -Property Thumbprint
That could easily be put into a variable to make the other commands work as an automatic script. I don’t know (nor care) enough PowerShell to do it, though. :/
Regardless, both ADFS (or Windows Server) and Exchange are Microsoft products, this company should made this a click-click-click automatic thing to justify the ridiculous price of these systems. When my Exchange server failed bc IDK..Friday. A Mac mini with macOS Server and only 6GB or RAM did a much better email server with vast resources to spare.
15/10/2019
Great Article, have you created part 2 yet?
15/10/2019
Yes click the words PART TWO 🙂
P
26/11/2019
Hi.
Did you ever get across that on 2019 WAP server this registry key must be enabled:
HKEY_LOCAL_MACHINESOFTWAREMicrosoftWindowsCurrentVersionInternet SettingsWinHttpEnableDefaultHttp2 Value: 0
I had some issues publishing Exchange services with WAP,ADFS on OS2019 and that key did the trick.
26/11/2019
It didn’t trip me up but I’ll publish it here for completeness, and further comments.
30/11/2019
Sounds great. Me on other hand ended with replacing WAP2019 with WAP2016 due to this http/2 bug on WAP2019.
Unfortunatelly after you add that registry key http/2 stops working on WAP for publishing http/2 web application. What is even worst if you delete that key and reboot WAP2019 server http/2 still stays blocked. It looks like ireversible and as we need http2 support on reverse proxy we have downgraded to wap2016 :/
17/03/2020
hello,
great post
a client has just requested this deployment and i have some questions if you can help me with.
im using on my exchange server a public certficate containing: mail.domain.com and autodiscover.domain.com.
is this the certificate to import on the adfs server and we app server?
or i have to buy new certificates??
thank you in advance
17/03/2020
no you can use the same certs, but the A record will need repointing the the ADFS server for them still to work.
17/03/2021
Great Article. Additionally, I may suggest that you move the domain controller to a different subnet (vlan).
It’s great for a lab.