
KB ID 0001481
Written by Tag Jones
When it comes to transferring files from PC to iPhone and vice versa, the most obvious choice is to use iTunes. However, it has been found that many users don’t like working with this application. Bloated and ponderous, iTunes continues Apple’s ongoing trend of having lost its design mojo.
Luckily, we have other options. One of the easiest ways is to use Wi-Fi Direct Transfer. With this method, you can pair your computer and iPhone/iPad within seconds and transfer anything you desire in a jiffy. Unlike AirDrop, Wi-Fi Direct allows you to work across all the platforms including Windows and Android. So you can also use this method to share files between an Android device and your iPhone/iPad as well.
How to use Wi-Fi Direct transfer
For it to work, your iPhone and your computer must be connected to the same Wi-Fi network. Since they will connect directly within the Wi-Fi network, you don’t even need an access point. In other words, your devices don’t have to connect to the Internet.
If there is no Wi-Fi network available nearby, you can create one on your own by using the Personal Hotspot feature. Just turn on Personal Hotspot on your iPhone, then on the computer, join the newly created hotspot. That way you can establish a connected Wi-Fi network from anywhere.
Now we’re going to install a wireless transfer tool on the computer and its companion app on the iPhone. There are actually plenty of tools offering this function in the market. The best ones? Well, below are the apps that I’ve used and personally recommend.
1. SHAREit
The SHAREit application is pretty popular due to the fact that the app is developed by Lenovo and it comes pre-installed on many Android devices from this brand.
Step 1:Download and install the SHAREit appson both your computer and iPhone. After they have been installed, launch the apps.
Step 2:Make sure both devices are connected to the same Wi-Fi network. To send files from your iPhone, select “Send” from the main screen. Note that you’re only able to send photos and videos and other files managed by the Files app.
Step 3:Select the files you wish to transfer to the computer, then tap “OK”. Now if your computer is on the same Wi-Fi network, it should display on the screen. Tap on it to start transferring. Once done, the files will appear on the window of the desktop app.
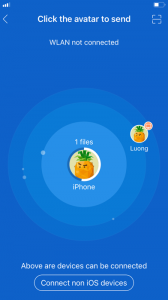
If you’re not able to connect the two devices, make sure the app is on-screen on both your computer and your iPhone. I have used SHAREit as the primary method to transfer photos from my iPhone to the PC(for editing with Lightroom and Photoshop) and it has worked fine.
3. Xender
Xender is quite similar to SHAREit, except that you don’t have to install a program on your computer. It can work by using your web browser.
Step 1:Download and install the Xender app on your iPhone. It’s free.
Step 2:Connect two devices to the same Wi-Fi network.
Step 3:On your PC, open your web browser of choice and go to http://web.xender.com. The web page will display the QR code used for connecting from the iOS device.
Related Articles, References, Credits, or External Links
NA
20/02/2024
I’m so grateful for this post! I’ve been wanting to transfer files wirelessly from my PC to my iPhone without using iTunes, and this tutorial has made it so easy. The steps are straightforward and easy to follow. I’ve already tried it out and it works perfectly. Thank you for sharing!
12/10/2024
Great tips! I was struggling with transferring files to my iPhone, but your step-by-step guide made it so easy. I appreciate the recommendations for apps too! Keep up the good work!
10/01/2025
Great article! I found the step-by-step instructions really helpful, especially the part about using Wi-Fi sync. It made transferring my files so much easier than I expected. Thanks for sharing!