
Part 2
Migrate Public Folders Exchange 2010 to Exchange 2013 / 2016
KB ID 0000789
Problem
Continued from Migration From Exchange 2010 to Exchange 2016 / 2013 Part 1
Solution
Exchange 2016 / 2013 Migration Step 7 “Migrate Public Folders”
Note: This article uses the newer ‘Batch Migration’ method. Make sure your exchange server is patched and up to date or the process will not work.
Minimum Patch Levels
- Source: Exchange 2010 SP3 RU8 (At Least).
- Source: Exchange 2007 SP3 RU15 (At Least).
- Destination: Exchange 2013 CU7 (Or Later).
- Destination: Exchange 2016 RTM.
The new migration scripts are here PF-Migration-Scripts-v2
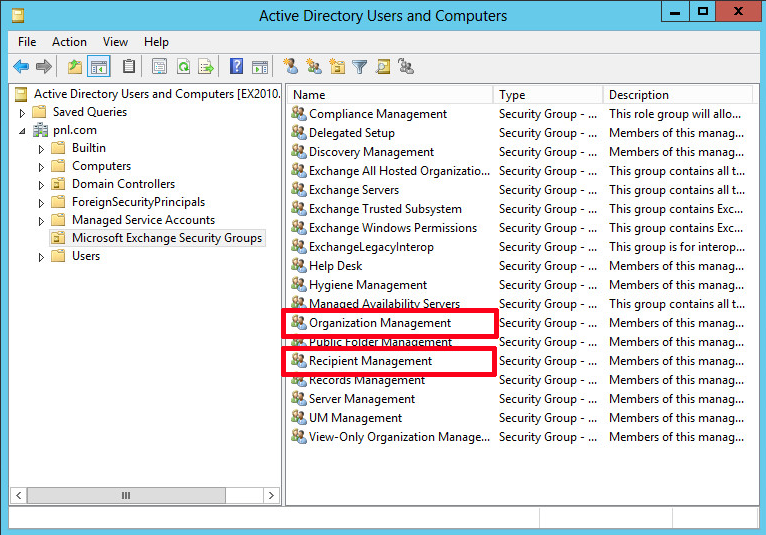
1. Make sure the user you will be performing the migration as, is in the right security groups, (Organizational Management and Recipient Management).
2. On the Legacy Exchange server download the PF-Migration-Scripts-v2 Then extract them to the servers C: drive.

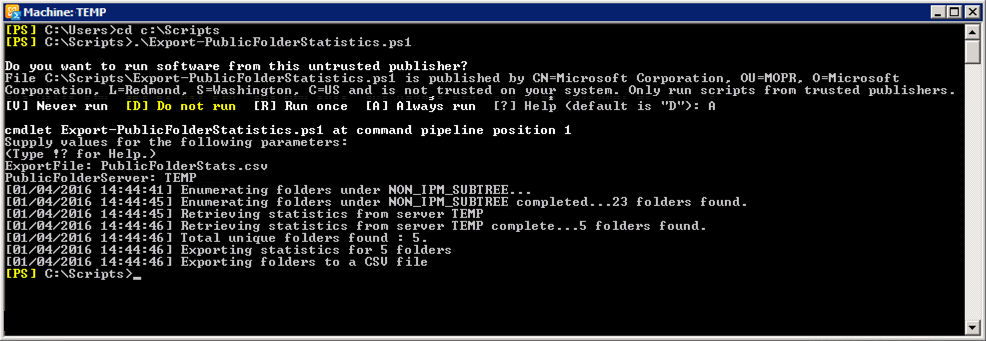
3. Launch the Exchange Management Shell > Change to the script directory > Then create a folder name to folder size mapping file by running the Export-PublicFolderStatistics.ps1 script, supply the name of the file you want to create. (Here I use PublicFoldersStats.csv). Then supply the name of the server, (the legacy one, with the source public folders on it).
cd c:\Scripts
./Export-PublicFolderStatistics.ps1 PublicFoldersStats.csv Mail-Server
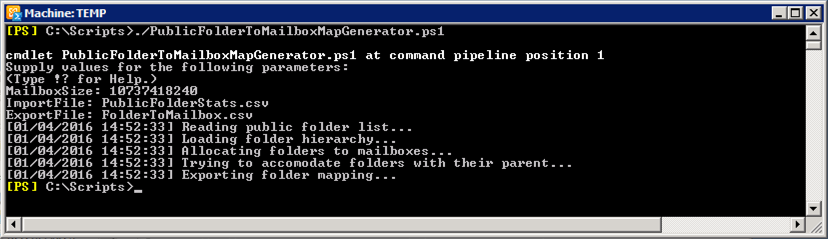
4. Create a Public Folder to Mailbox mapping file, by running the PublicFolderToMailboxMapGenerator.ps1 script, supply it with the maximum mailbox size (in bytes) Note: The Maximum size is 25GB. You will also need to supply the import file you created in step 3 (PublicFoldersStats.csv). Finally supply the name of the output file you wish to generate i.e. Folder2Mailbox.csv.
./PublicFolderToMailboxMapGenerator.ps1
5. Open the last CSV file you created (Folder2Mailbox.csv) and take note of the TargetMailbox name. By default the first one is called Mailbox1, I’m changing it to Public-Folder-Mailbox and saving the change. Note: You may get more than one! If so take note of them all, or rename them accordingly.

6. Now copy the ‘Scripts’ Directory from your legacy 2010 Exchange server, to the new 2013 / 2016 Server.

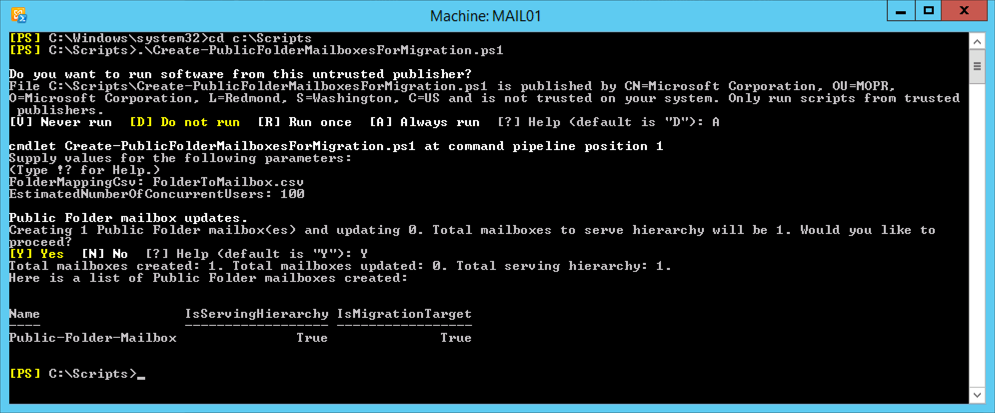
7. Whilst still on the new Exchange 2013 / 2016 Server, you need to open a command shell, navigate to the scripts directory and then run the Create-PublicFolderMailboxesForMigration.ps1 script. Reply ‘A’ to run all the scripts, then supply the name of the mapping csv you created above, (Folder2Mailbox.csv). Supply the estimated concurrent users to this mailbox, and enter ‘Y’ to proceed. Now the public folder mailbox will be created.
(Note: Public folders are now in a Mailbox, NOT their own Mailbox database, as in older versions of Exchange).
cd c:\Scripts
./Create-PublicFolderMailboxesForMigration.ps1
8. Next we need to create a ‘batch task’ much the same as when we migrate multiple mailboxes. This first command creates the task, and the second one sets it running. (Change the values in red to match your own).
Update: 05/08/16: Make sure you have a ‘mailbox database’ mounted on the source Exchange server before proceeding, or you may see the following problem.
Public Folder Migration Error hr=0x80040111
New-MigrationBatch -Name PF-Migration -SourcePublicFolderDatabase (Get-PublicFolderDatabase -Server EX2010) -CSVData (Get-Content C:\Scripts\Folder2Mailbox.csv -Encoding Byte) -NotificationEmails info@petenetlive.com
Start-MigrationBatch PF-Migration

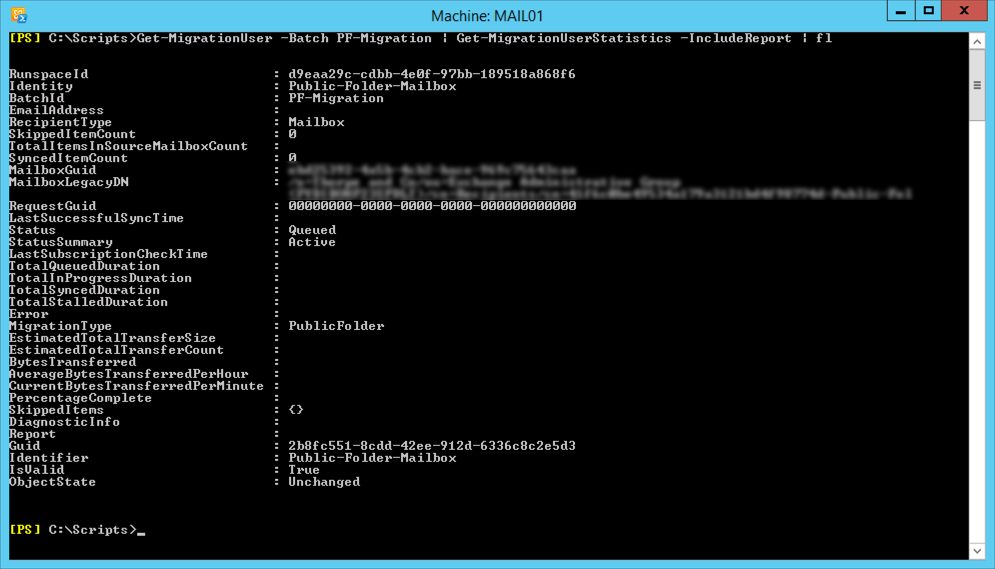
9. There are two ways to check its progress,
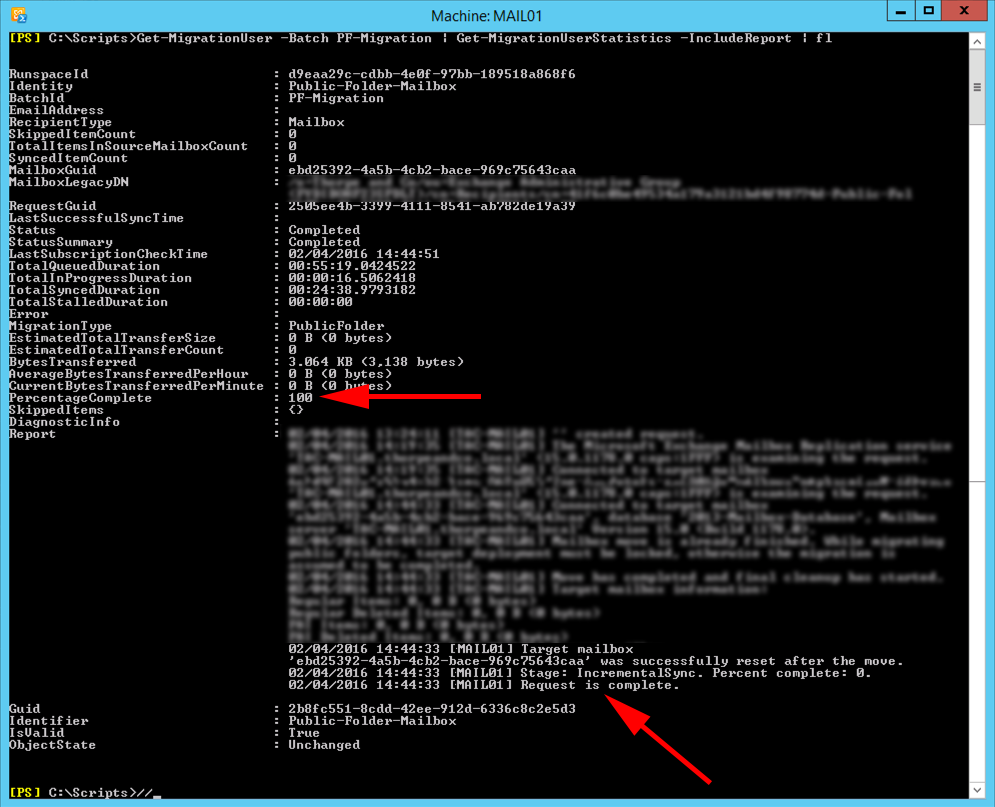
Check Public Folder Migration Progress Option 1 From Command Shell
Get-MigrationUser -Batch PF-Migration | Get-MigrationUserStatistics -IncludeReport | fl
It might say Queued for quite a while, don’t worry!
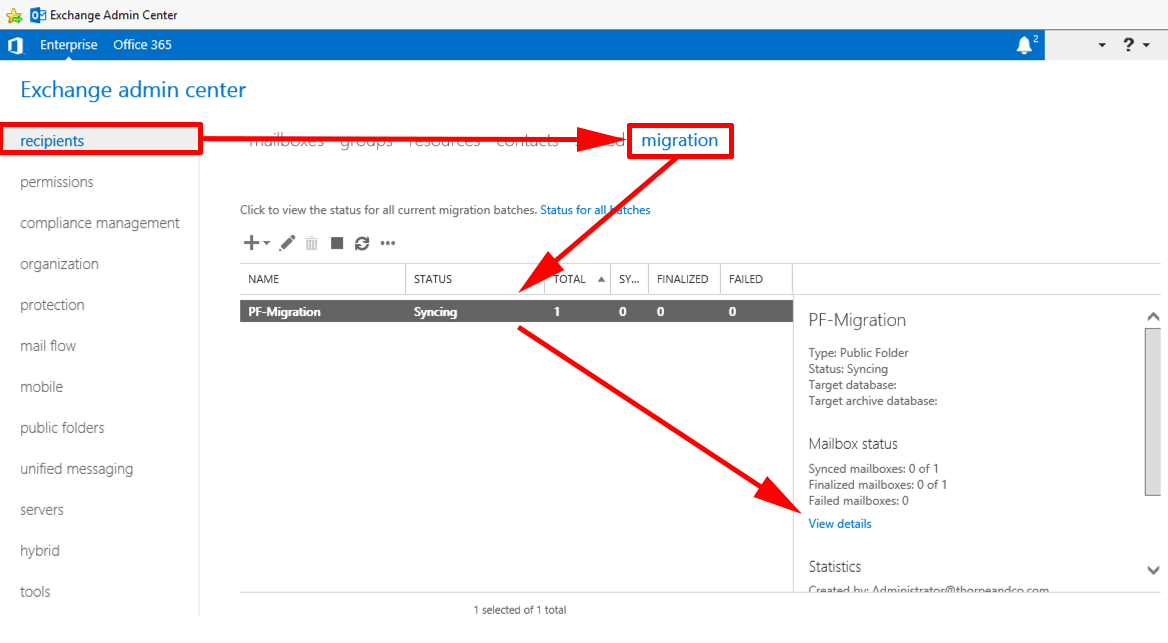
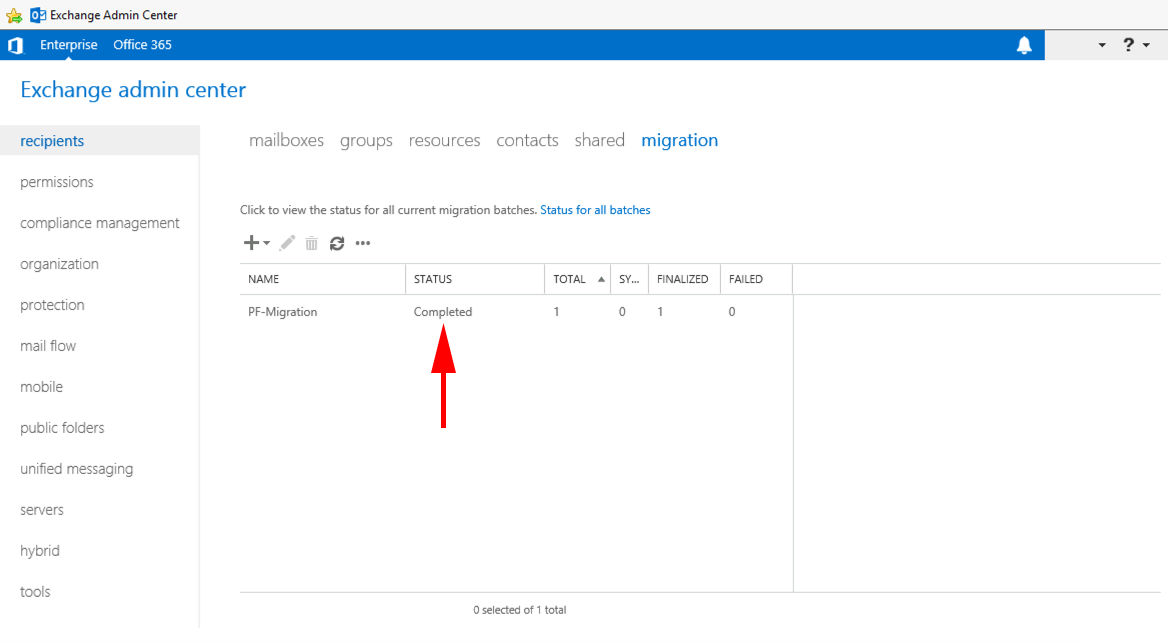
Check Public Folder Migration Progress Option 2 From EAC
Open the Exchange Admin Center website and logon. Navigate to recipients > Migration > View Details
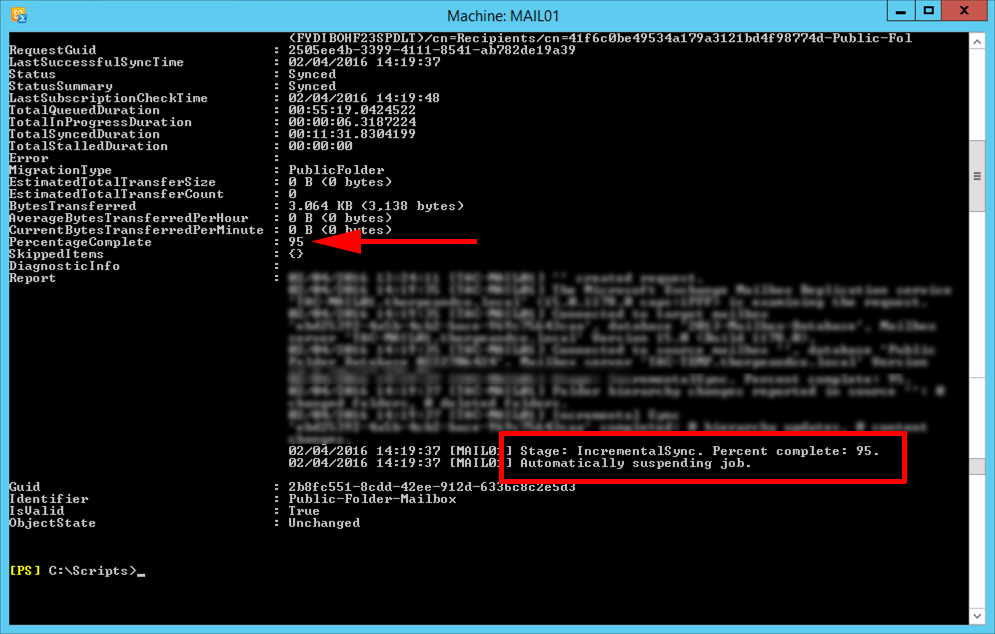
10. If you were looking at the progress you will see its stops just before 100%, this is because you need to “Lock” the source public folder and let the migration complete. WARNING this will involve downtime, so warn your users, or do this next step out of hours.
To MAKE SURE you are ready, check either the progress report like so;
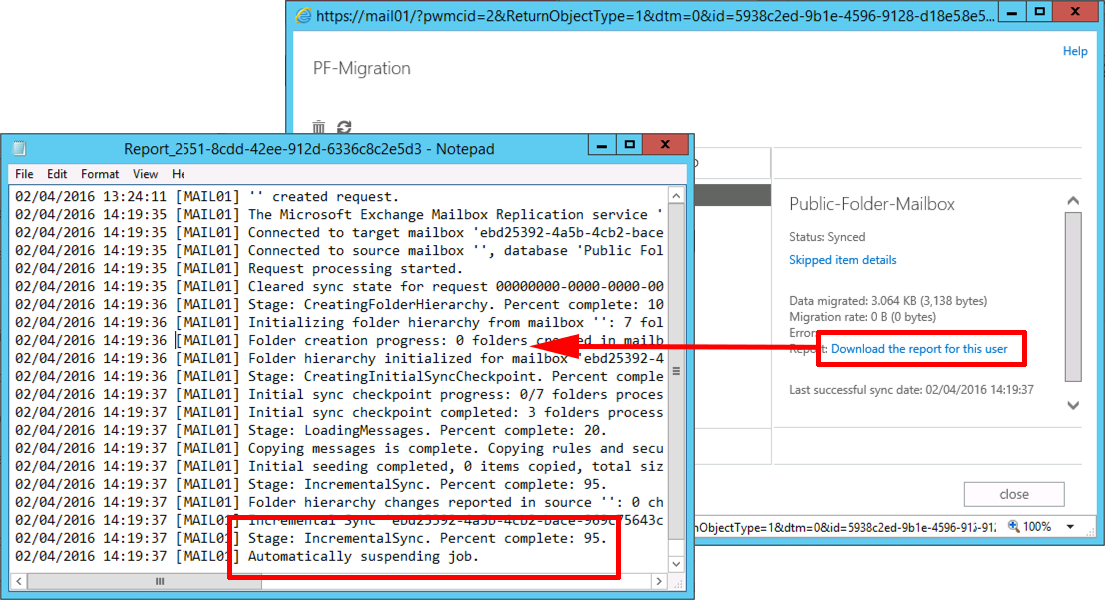
Or, re-run the progress command above and look for 95% completion and ‘Automatically suspending job’
DOWNTIME FROM THIS POINT ONWARDS
11. Go to the legacy Exchange 2010 server and ‘lock’ the source public folders for migration, and restart the service.
Set-OrganizationConfig –PublicFoldersLockedForMigration:$true
Restart-Service MSExchangeIS

12. Now access to the legacy Public Folder Database is shut down, but before replication to the new Public Folder Mailbox can be completed you need to return to the new Exchange 2013 / 2016 server and run the following commands;
Set-OrganizationConfig -PublicFoldersEnabled Remote
Complete-MigrationBatch PF-Migration
13. Wait until it completes;
or in the shell
This can take a little time, I would wait least a couple of hours before proceeding (depending on your network topology, if you have a slow network or the Exchange 2010 server is on another network segment it may take longer).
Now to check the migration worked with a test user, and (provide everything is OK, unlock the Public Folders.
Log on as that user, (Outlook 2010 SP3 or Later.) Make sure the public folders are correct, you can expand them, the permissions are correct and you can create and delete entries.
It’s All Gone Wrong!
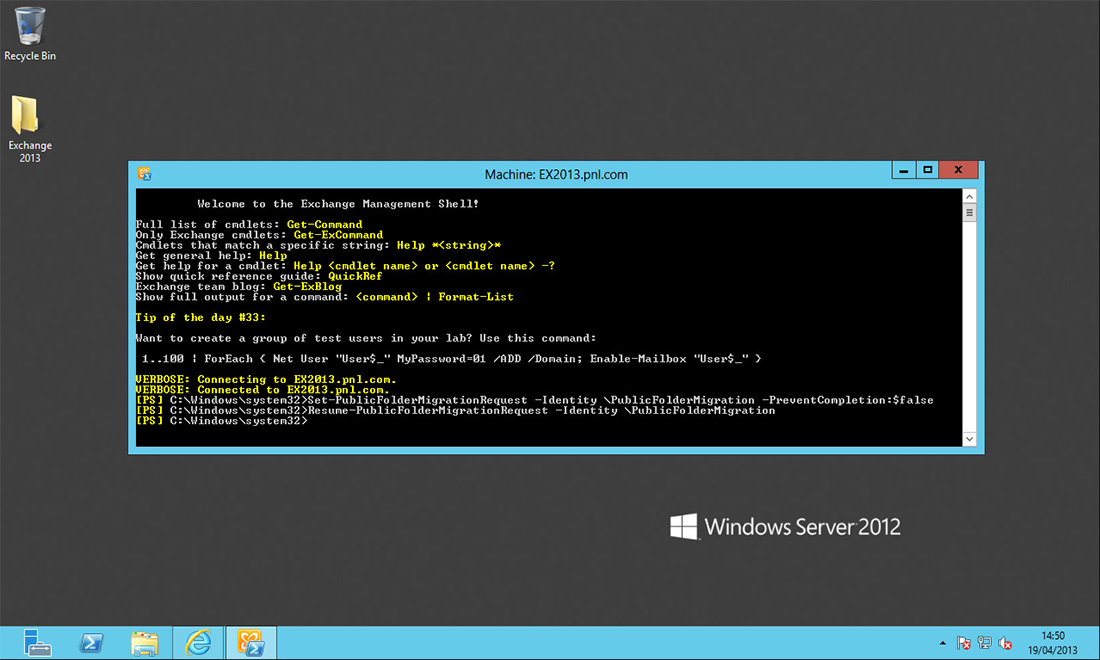
Don’t panic! You can remove the migration request with the following command;
Get-PublicFolderMigrationRequest | Remove-PublicFolderMigrationRequest
Then complete the migration, with the following two commands;
Set-PublicFolderMigrationRequest –Identity PublicFolderMigration -PreventCompletion:$false
Resume-PublicFolderMigrationRequest –Identity PublicFolderMigration
13. Once you are ready to proceed, issue the following command, and onfirm that, the public folders are now correct and available.
Get-Mailbox -PublicFolder | Set-Mailbox -PublicFolder -IsExcludedFromServingHierarchy $false
Note: As per feedback (from Tobias Gebler) Test mail flow to your public folders, you may need to manually “Mail Enable” them before they function properly, In some cases you need to disable then re-enable them before they work properly.

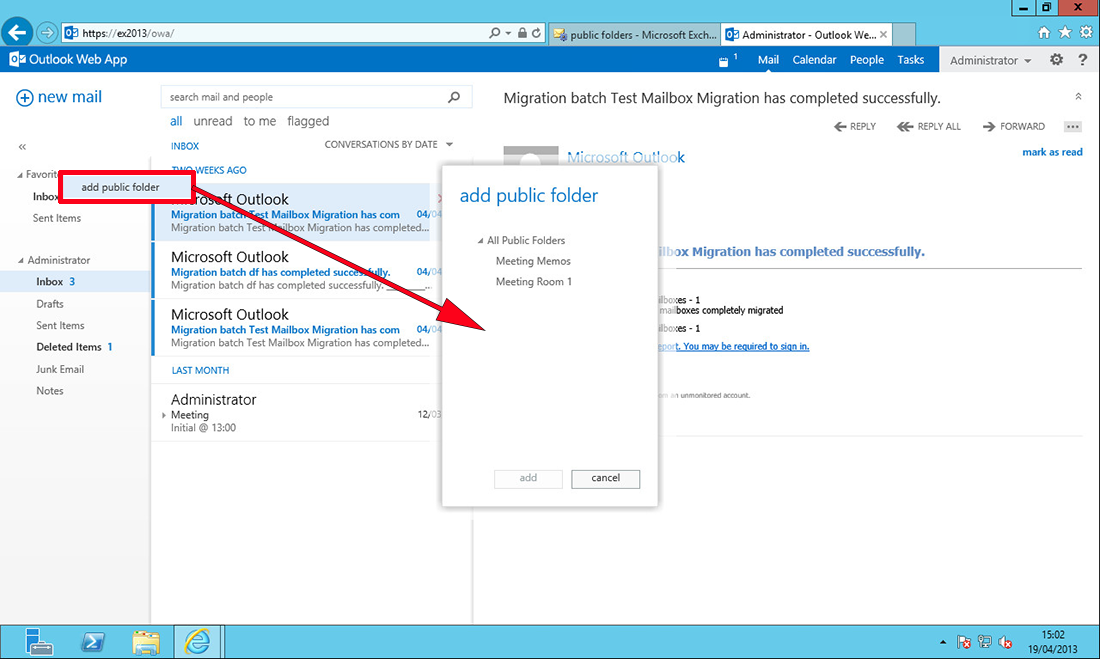
14. Remember in Outlook Web App 2013 / 2016, public folders are not visible until you add them!
Note: If, (post Migration to Exchange 2016). Your users cannot access the public folders, see the following article.
Users Cannot Access Public Folders Post Migration (Exchange 2016)
Related Articles, References, Credits, or External Links
Thanks to Brian L. Jensen, for the feedback about the new public folder migration procedure.
Thanks to Eske (Boxx Jakobsen), for the Public Folder Migration feedback and assistance.
Thanks to Tobias Gebler for the Public Folder mail flow feedback.
Migration From Exchange 2010 to Exchange 2016 Part 3
Covering transferring certificates from Exchange 2010, and decommissioning your old Exchange servers.
Original Article Written: 19/04/13