
KB ID 0000571
Problem
Note: This is for Cisco ASA 5500, 5500-x, and Cisco Firepower devices running ASA Code.
When Cisco released version 7 of the operating system for PIX/ASA they dropped support for the firewall acting as a PPTP VPN device.
Note: If you want to use PPTP you can still terminate PPTP VPNs on a Windows server, if you enable PPTP and GRE Passthrough on the ASA.
But if you want to use the native Windows VPN client you can still use L2TP over IPSEC. I had a look around the net to work out how to do this and most decent articles are written using the older versions of the ASDM, and the CLI information I found on Cisco’s site didn’t help either.
What I’m using
1. Cisco ASA5525 version 9.2(4) and ASDM version 7.6(1).
2. Network behind the ASA 192.168.110.0/24.
3. IP addresses of the remote clients 192.168.198.1 to 254 (DNS 192.168.110.10).
4. Split tunnelling enabled.
5. Local (On the ASA) user authentication.
6. Authentication via Pre Shared Key 1234567890.
Configure the ASA 5500 for L2TP IPSEC VPNs from ASDM
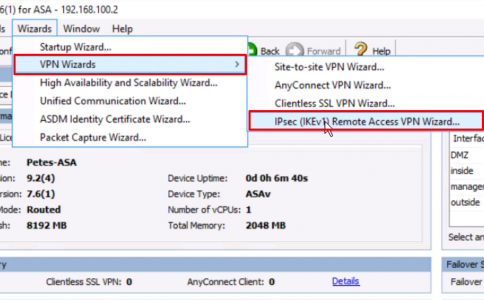
1. From within the ASDM > Wizards > VPN Wizards > IPSec (IKEv1) Remote Access VPN Wizard)
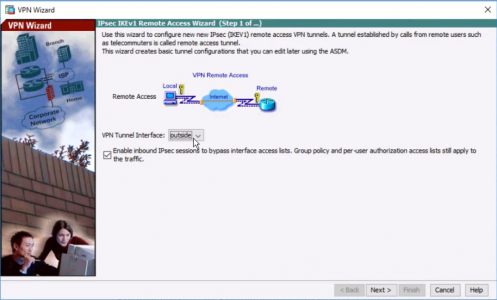
2. Next.
3. Tick Microsoft Windows Client using L2TP over IPSEC > Tick MS-CHAP-V2 ONLY > Next.

4. Type in a pre-shared key > Next.

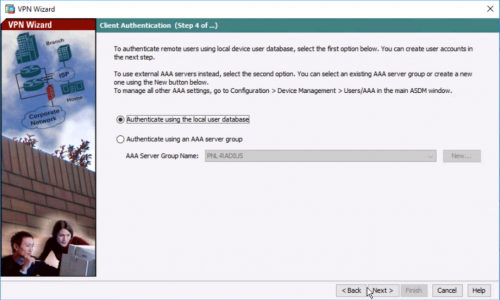
5. Select LOCAL authentication > Next.
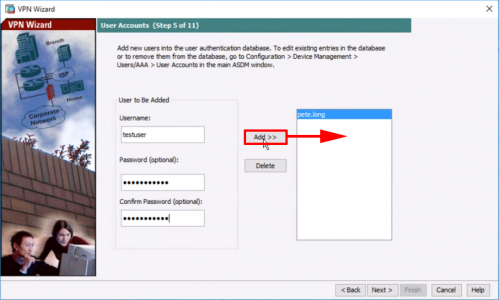
6. Enter a username/password to use for connection to the VPN > Next.
7. Create a ‘VPN Pool‘ for the remote clients to use as a DHCP pool > OK > Next.

8. Enter your internal DNS server(s) and domain name > Next.

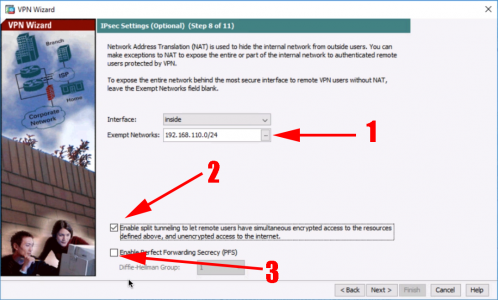
9. Set your internal network(s) > Tick “Enable Split tunnelling…” > Untick PFS > Next.
10. Finish.
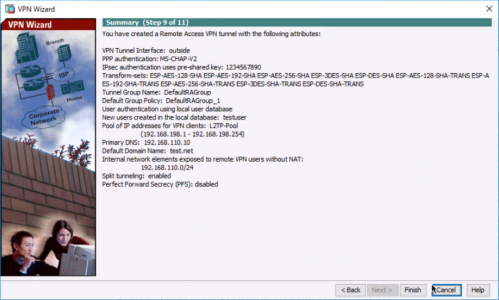
11. Save the changes.

Configure the ASA 5500 for L2TP IPSEC VPNs from CLI
1. Connect to the ASA, go to “enable mode”, then to “Configure terminal mode”
User Access Verification

Password:
Type help or '?' for a list of available commands.
PetesASA> enable
Password: ********
PetesASA# configure Terminal
PetesASA(config)#
2. First we need to create a “Pool” of IP addresses for the remote client to use.
PetesASA(config)# ip local pool L2TP-Pool 192.168.198.1-192.168.198.103. Now to make sure the traffic that’s going to travel over our VPN is not NATTED.
Note: This is assuming that 192.168.100.0/24 is the remote VPN clients subnet, and 10.254.254.0/24 is the subnet BEHIND the ASA.
PetesASA(config)# object network Internal-Subnet
PetesASA(config-network-object)#  subnet 192.168.110.0 255.255.255.0
PetesASA(config-network-object)# object network L2TP-Subnet
PetesASA(config-network-object)#  subnet 192.168.198.0 255.255.255.248
PetesASA(config-network-object)# nat (inside,outside) source static Internal-Subnet Internal-Subnet destination static L2TP-Subnet L2TP-Subnet no-proxy-arp route-lookup
4. Normally when a remote client is connected they will lose all other connections (including their other internet connections) while connected, to stop this you need to enable “Split Tunnelling“. You will refer to this later but for now we just need to create an ACL.
PetesASA(config)# access-list Split-Tunnel-ACL standard permit 192.168.110.0 255.255.255.0 5. We need a “Transform Set” that will be used for “Phase 2” of the tunnel, I’m going to use AES encryption and SHA hashing, then set the transform type to “Transport”.
PetesASA(config)# crypto ipsec ikev1 transform-set L2TP-IKE1-Transform-Set esp-aes esp-sha-hmac
PetesASA(config)# crypto ipsec ikev1 transform-set L2TP-IKE1-Transform-Set mode transport
6. Remote VPNs usually use a “Dynamic Cryptomap”, the following will create one that uses our transform set, then applies that to the firewalls outside interface.
PetesASA(config)# crypto dynamic-map L2TP-MAP 10 set ikev1 transform-set L2TP-IKE1-Transform-Set
PetesASA(config)# crypto map L2TP-VPN-MAP 20 ipsec-isakmp dynamic L2TP-MAP
PetesASA(config)# crypto map L2TP-VPN-MAP interface outside
7. Then enable IKE (version 1) on the outside interface. And create a policy that will handle “Phase 1” of the tunnel, in this case 3DES for encryption, and SHA for hashing, and Diffie Hellman group 2 for the secure key exchange.
PetesASA(config)# crypto ikev1 enable outside
PetesASA(config)# crypto ikev1 policy 5
PetesASA(config-ikev1-policy)#  authentication pre-share
PetesASA(config-ikev1-policy)#  encryption 3des
PetesASA(config-ikev1-policy)#  hash sha
PetesASA(config-ikev1-policy)#  group 2
PetesASA(config-ikev1-policy)#  lifetime 86400
PetesASA(config-ikev1-policy)#
8. Create a group policy, that hold the following, DNS server IP(s) that will be leased to the remote clients. Tunnel type (L2TP IPSEC), enable spit tunnelling using the ACL we created in step 4. The domain name that will be given to the remote clients. The “intercept-dhcp enable” looks after a Windows client problem. And finally create a user and password.
Note: In this example I’m using the ASA’s local database of users for authentication.
PetesASA(config)# group-policy L2TP-Policy internal
PetesASA(config)# group-policy L2TP-Policy attributes
PetesASA(config-group-policy)#  dns-server value 192.168.110.10
PetesASA(config-group-policy)#  vpn-tunnel-protocol l2tp-ipsec
PetesASA(config-group-policy)#  split-tunnel-policy tunnelspecified
PetesASA(config-group-policy)#  split-tunnel-network-list value Split-Tunnel-ACL
PetesASA(config-group-policy)#  default-domain value test.net
PetesASA(config-group-policy)#  intercept-dhcp enable
PetesASA(config-group-policy)# username testuser password password123 mschap
9. Every tunnel needs a “Tunnel Group”, You HAVE TO use the DefaultRAGroup (Unless you are securing things with certificates which we are not). This pulls in the IP Pool we created in step 2 and the policy we created in step 8.
PetesASA(config)# tunnel-group DefaultRAGroup general-attributes
PetesASA(config-tunnel-general)#  address-pool L2TP-Pool
PetesASA(config-tunnel-general)#  default-group-policy L2TP-Policy
10. For the tunnel group, setup a shared key, and the authentication method for our clients.
Note: We are disabling CHAP and enabling MSCHAP v2.
PetesASA(config-tunnel-general)# tunnel-group DefaultRAGroup ipsec-attributes
PetesASA(config-tunnel-ipsec)#  ikev1 pre-shared-key 1234567890
PetesASA(config-tunnel-ipsec)# tunnel-group DefaultRAGroup ppp-attributes
PetesASA(config-ppp)#  no authentication chap
PetesASA(config-ppp)#  authentication ms-chap-v2
11. Finally save the new config.
PetesASA# write mem
Building configuration...
Cryptochecksum: 79745c0a 509726e5 b2c66028 021fdc7d
7424 bytes copied in 1.710 secs (7424 bytes/sec)
[OK]
PetesASA#
Configure Windows VPN client for L2TP IPSEC connection to Cisco ASA 5500
Note: Windows 10 Enterprise used.
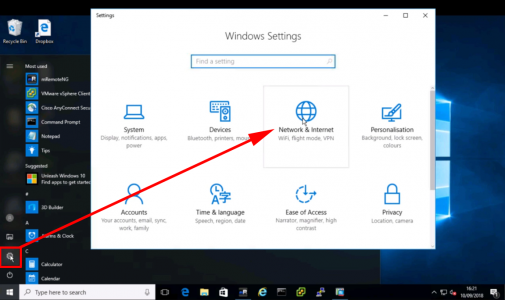
1. Start > Settings > Network and Internet.
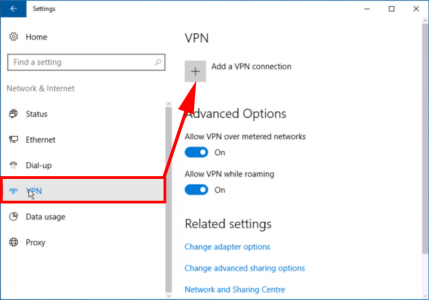
2. VPN > Add a VPN Connection.
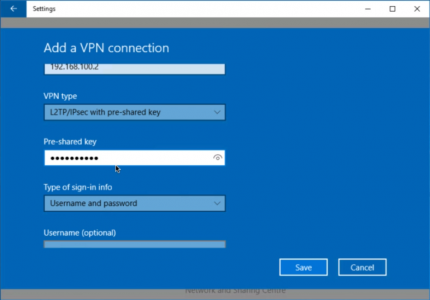
3. VPN Provider = Windows (Built-in) > Connection Name = (A Sensible name) > Server name or Address = Public IP/Hostname of the ASA > Scroll Down.

4. VPN Type = L2TP/IPSEC with pre-shared key > Pre Shared Key = {the one you set on the firewall in our example 1234567890} > Type of sign-in information = Username and Password.
Note: You may want to untick “Remember my sign-in information” To supply a username and password each time.
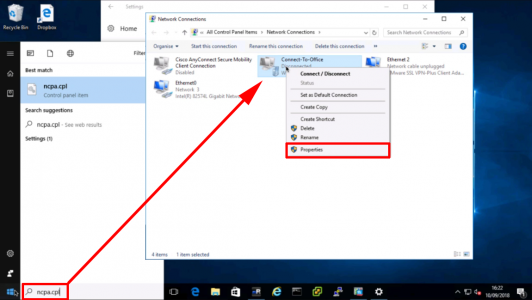
5. Start > ncpa.cpl {Enter} > Right click your VPN connection profile > Properties..
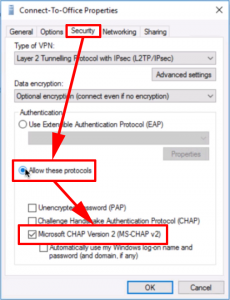
6. Security Tab > Allow These Protocols > Tick “Microsoft CHAP version 2 (MS-CHAP v2)” > OK.
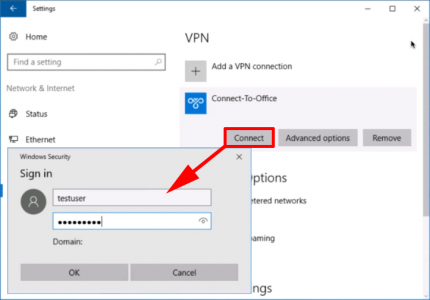
7. You can now connect your VPN.
Related Articles, References, Credits, or External Links
Cisco ASA Site to Site VPN’s Site to Site ISAKMP VPN
Set up Remote Access PPTP VPN’s in server 2008
Using the Microsoft VPN client through Cisco ASA/PIX
Enable Split Tunnel for IPSEC / SSLVPN / WEBVPN Clients