
KB ID 0000234
Problem
Before we start, I’m aware “Migration”, “Swing Migration”, and “Transition” have three very different meanings, depending on which KB, blog or piece of Microsoft documentation you are reading. Be under no illusions the terminology used in the title and the tags on this page, are to catch the web searches of those who have an Exchange 2003 Server and want to move all their Exchange, to Exchange 2010 server.
There are a lot of people who held out on the upgrade to Exchange 2007, and those people will now be looking to jump straight to Exchange 2010. Unfortunately you can’t just “Pop in the DVD” and let it upgrade. In fact there is no direct upgrade, you need to perform what Microsoft calls a “Transition” to Exchange 2010.
This means you prepare your existing Windows domain and Exchange Organisation, to let Exchange 2010 exist, then you build an Exchange 2010 server, migrate your data into it, and finally remove your original Exchange 2003 server.
Solution
Assumptions:
In this example I’ve got an existing Exchange 2003 environment running on Windows 2003. I’m putting in Exchange 2010 onto a new server running Server 2008 R2. Post install the NEW server will hold client access, mailbox, and hub transport roles.
Exchange 2003 to 2010 Licensing Requirements
Unless you have Microsoft “Software Assurance” you cannot simply upgrade to 2010 for free. You will need to buy the Exchange 2010 Base product (Server Licenses come in two flavours, Enterprise or Standard) and you will need a CAL for each client that will access Exchange. Exchange CAL’s also come in two flavours, Standard and Enterprise (For most people standard is fine, enterprise lets you use archiving and unified messaging. Enterprise CAL’s are an “Add On” you need a standard CAL AS WELL, though you can mix and match, i.e. Have 100 Standard and 50 enterprise CAL’s, (so you have 100 people connecting, but only 50 of then need the enterprise features).
You may wish to look at an “Open Value Agreement”, which lets you pay the cost over a three year term.
Note: An Enterprise CAL is NOT just for Exchange Enterprise 2010 and a Standard CAL is NOT just for Exchange Standard, this is a common mistake.
Note2: To use the archiving feature of the enterprise CAL, you need to have a licensed copy of Outlook 2010 on the client.
Warning: Exchange 2003 let you run a licensed copy of Microsoft Outlook for each client, this was dropped (with Exchange 2007). If you are upgrading Exchange from 2003 to 2010, and have your Outlook licensed like this you will NEED TO PURCHASE licenses for each clients copy of Outlook.
Step 1 – “Pre-Site Visit”
1. Make sure, before you start, that you have the Exchange 2010 media and unlock code, you don’t want to download the media on a site with a slow internet connection, (at time of writing the disk image is 1GB in size).
2. If your existing servers are all x32, and you are also upgrading domain controllers, during the process you will be extending the domain schema (i.e. it’s not 2003 R2) then make sure you have x32 bit Windows media with you.
3. Make sure any third party anti virus and/or mail scanning software is supported and will work on Exchange 2010, and you have the media and licenses handy.
4. You will need to install on a x64 bit server, make sure you have a server capable, and Windows x64 bit media with licenses.
5. You will need your Exchange 2003 CD, it’s fond of asking for it during the uninstall process.
6. Before you even think about going further make sure you have a good backup! If you are lucky enough to have VMware ESX, Hyper-V or another virtualisation platform, consider doing a P2V conversion on your Exchange 2003 server then simply turning the 2003 Server off, then if it all goes to hell in a hand cart simply turn the original server back on again.
7. While your thinking about backups – does your backup software support Exchange 2010? you might need a new Exchange agent, check with your software re seller.
Step 2 – “Pre Install”
1. Before you do anything, it’s time for a common sense check, make sure your existing Exchange 2003 Organisation is happy and running cleanly, and has good communication with the domain and DNS. Get in the event logs and make sure its a happy server.
Time spent on reconnaissance is seldom wasted!
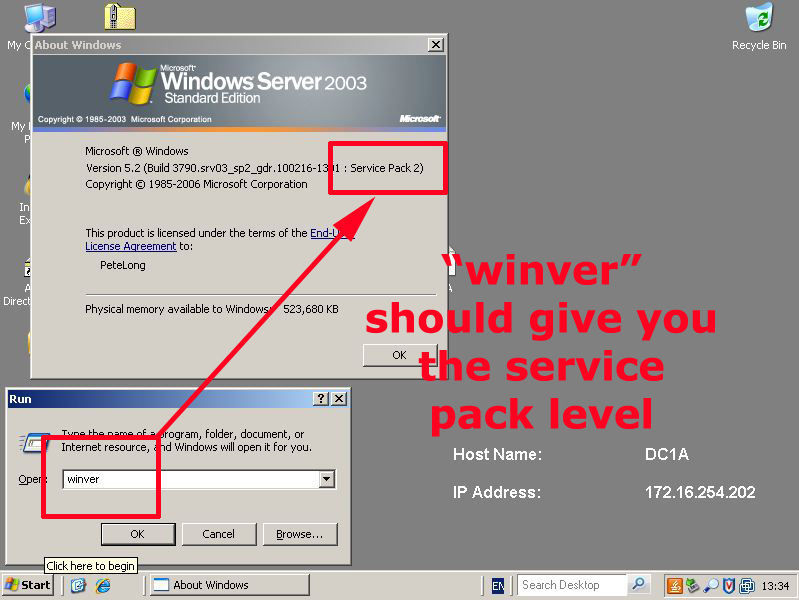
2. Make sure your Exchange 2003 server(s) is/are up to “Exchange 2003 Service Pack 2” (In fact get the latest Exchange update roll up after that as well to be on the safe side).
Note: Update 07/01/15: Ensure if you use ActiveSync, that you install this hotfix on the 2003 server. (Yes it says for Exchange 2007 co-existence, but it’s relevant to Exchange 2010 upgrades as well).
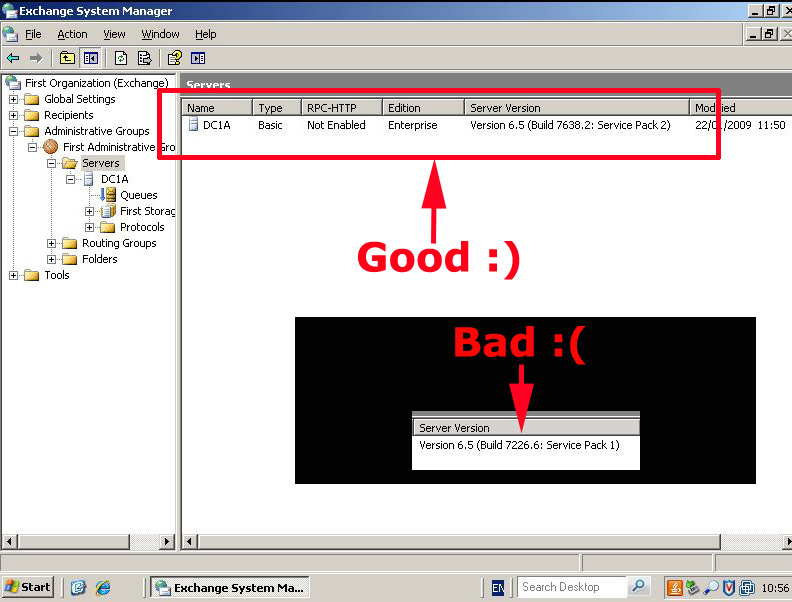
Exchange 2003 Build Numbers
Microsoft Exchange Server 2003 6.5.6944 October 2003 Microsoft Exchange Server 2003 SP1 6.5.7226 May 2004 Microsoft Exchange Server 2003 SP2 6.5.7638 October 2005
If it looks like this, your onto a winner;
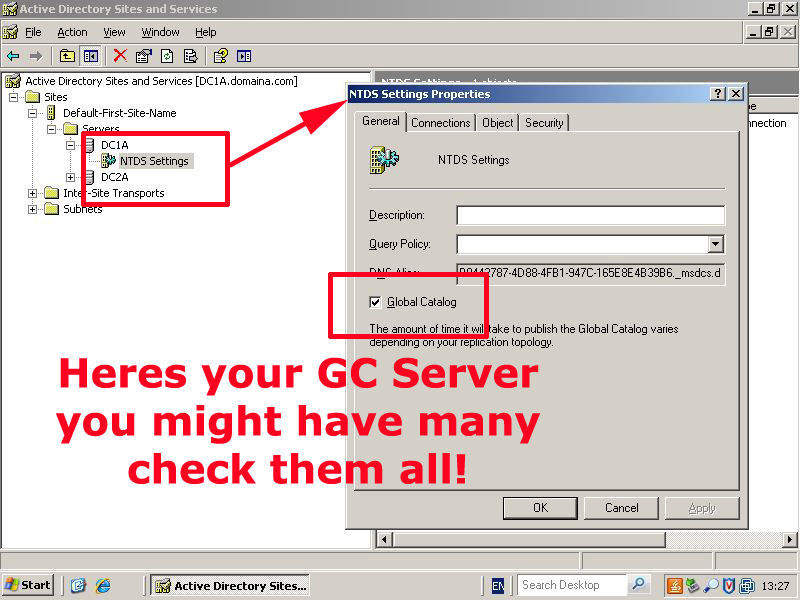
3. The brief says your Global Catalog server should be at at least Server 2003 SP2, however I’d be updating all the domain controllers to Service Pack 2. (Note: you need 381Mb free space on the system drive, plus 170MB additional free space to install SP2).
Locate the Global Catalog Server
Find the Service Pack Level
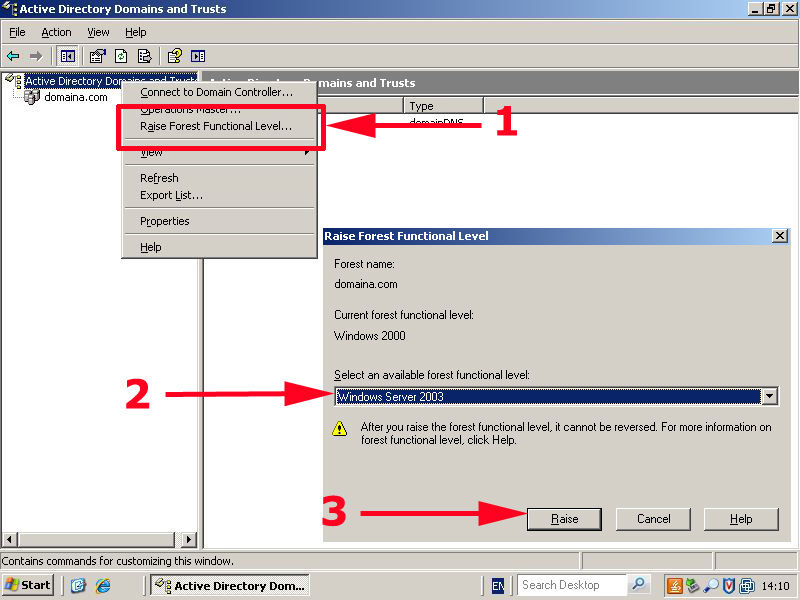
4. The domain functional level needs to be at “Windows Server 2003”. When done, leave enough time for it to replicate to all domain controllers in the domain.

5. Now the forest functional level needs raising to “Windows Server 2003”. When done leave enough time to replicate across the entire forest.
6. Now you need to put your existing Exchange organisation into “Native Mode”.

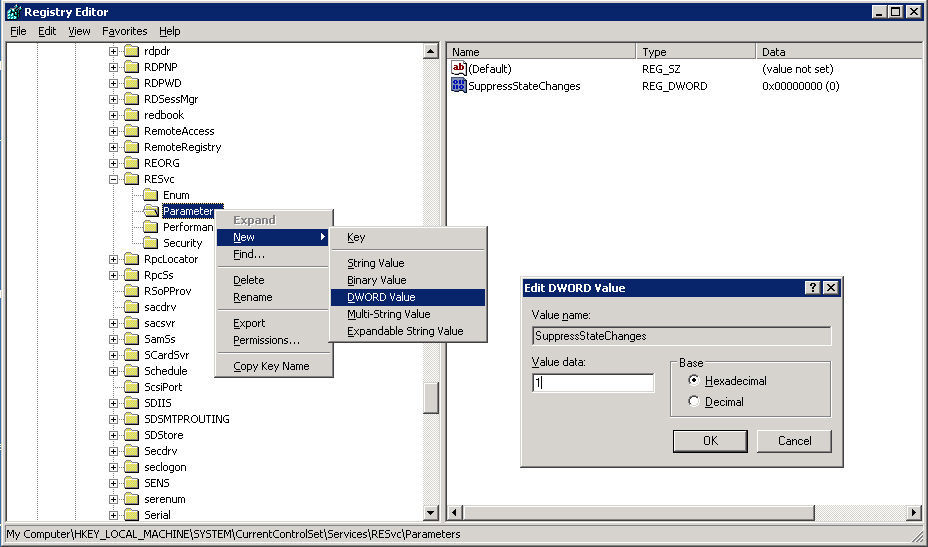
Multiple Exchange 2003 Servers Note:
7. If you have multiple Exchange 2003 Servers with routing groups you need to suppress link states, on EVERY Exchange 2003 server, Start > Run > regedit {enter} > Navigate to Locate HKEY_LOCAL_MACHINESystemCurrentControlSetServicesRESvcParameters > Right Click > New DWORD > Call it SuppressStateChanges. > Set its value to 1 >Then either reboot or restart the Simple Mail Transfer Protocol (SMTP) service, the Microsoft Exchange Routing Engine service, and the Microsoft Exchange MTA Stacks services.
8. At this point I would apply the “cup of coffee” rule, then check the domain controllers event logs and the event log on the Exchange 2003 box make sure everything is running smoothly.
9. Now you THINK Exchange is happy, it’s time to MAKE SURE download and then run the Microsoft Exchange Pre-Deployment Analyser (ExPDA).
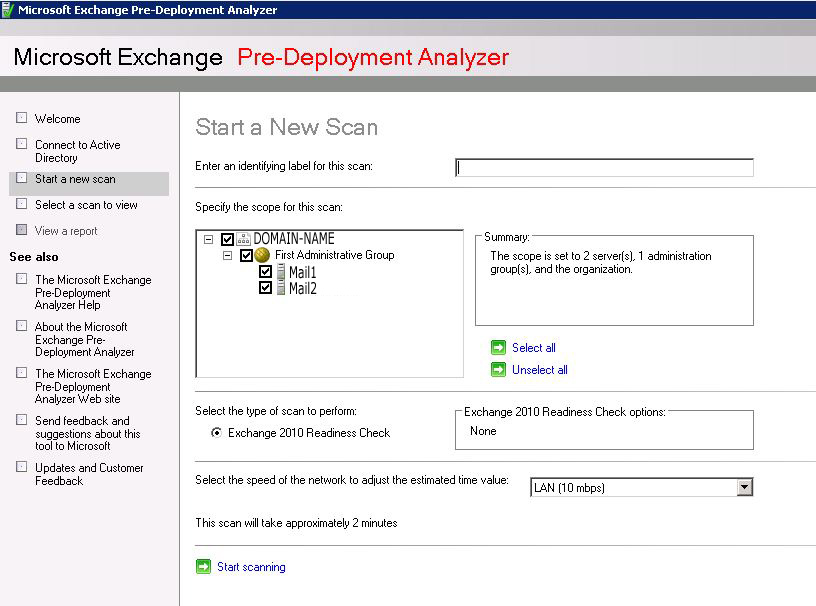
9. Continue to run and fix any problems it reports. Note: If you use a smart host, you may see the following warning,
SMTP is configured to route all messages to a smart host.
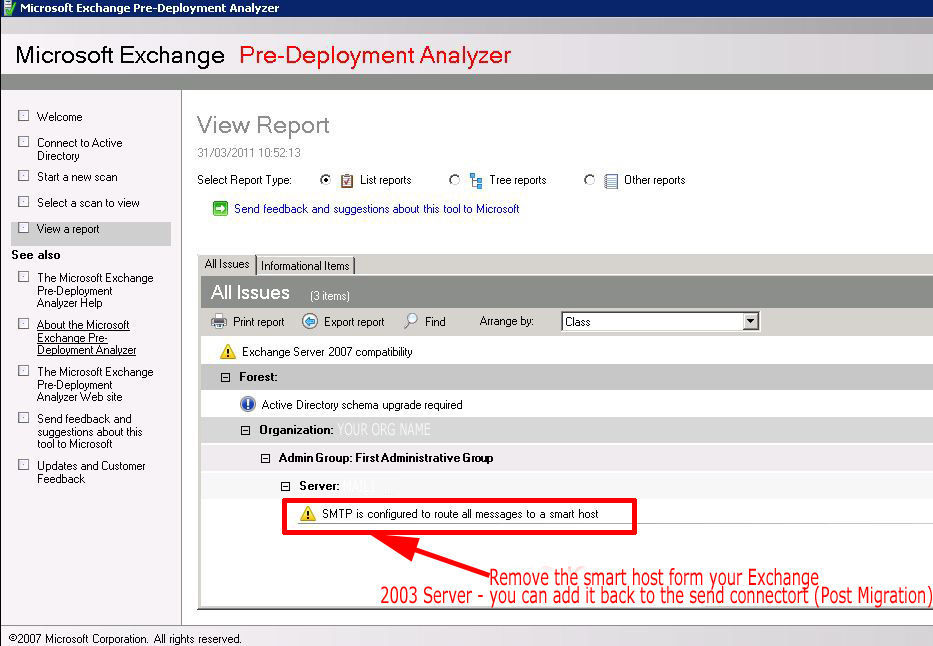
You may have some mail routing issues if you leave your smart host configured (it’s set on the Virtual SMTP server on the Exchange 2003 Server (or on your SMTP connector if you have one in routing groups)). Remove it for now, and add it back to the 2010 Send connector later.
Step 3 – “Deploy Exchange 2010“
1. Build your new server and apply all the latest service packs and updates. Join it to the domain, and log in with a user account that is a member of the Schema Admin’s group, before proceeding you need to install the Office 2010 filter pack on the new server CLICK HERE.
Warning: Never disable IPv6 on an Exchange 2010 Server! Make sure it’s installed before proceeding.
2. You need to add certain roles to the new server before attempting to install Exchange 2010 you can script that though I prefer to do things myself. Start > Server Manger > Roles > Add Roles > Next > Select Web Server (IIS) > Next > Next.

3. On Role Services, under security > tick Basic Authentication > tick Windows Authentication > Tick Digest Authentication > Under Performance tick Dynamic Content compression.
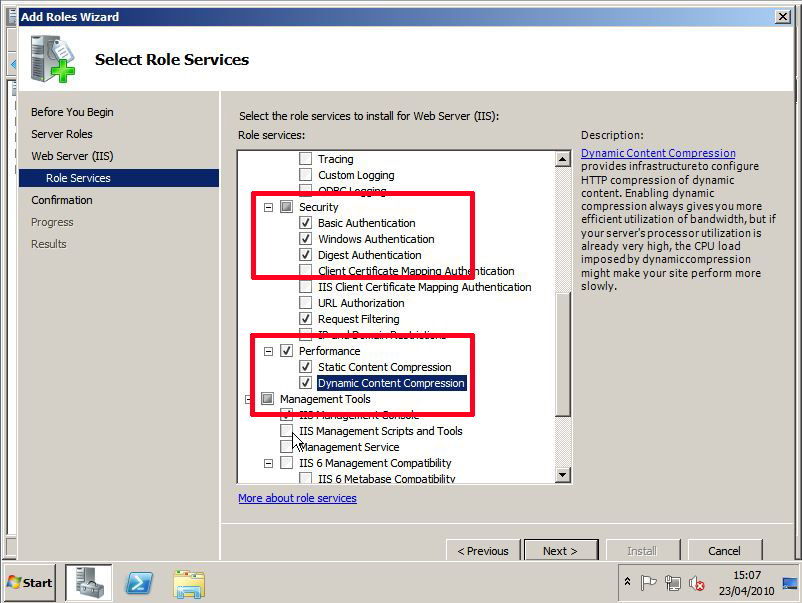
4. Under Management Tools > Select IIS6 Management Comparability > Next > Install > Close (when finished).

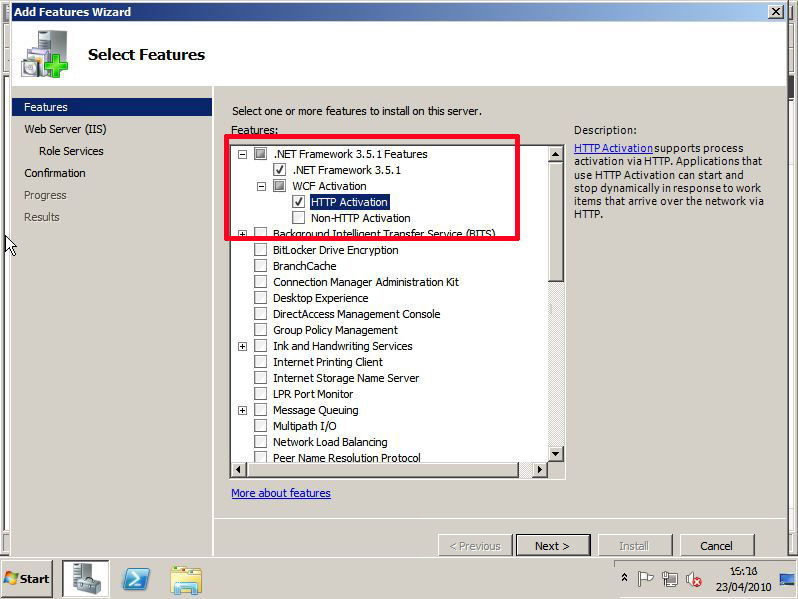
5. Now you need to add “Server Features”, primarily .Net Framework 3.5 that is in Server Manager > Features > Add Features > Expand .NET Framework 3.5.1 Features > Expand WCF Activation > tick HTTP Activation > Select to add Required Role Services.
6. Scroll down and below “Remote Server Administration Tools” > Role Administration Tools > Select “AD DS and AD LDS Tools” > Next > Next > Next > Install > Close (when finished) > You may be asked to reboot.
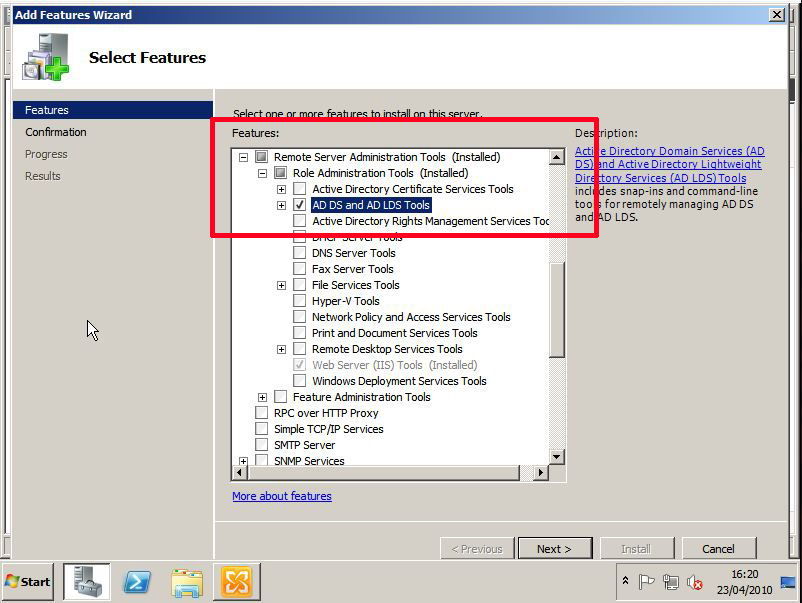
The next step cannot be carried out unless you have rebooted.
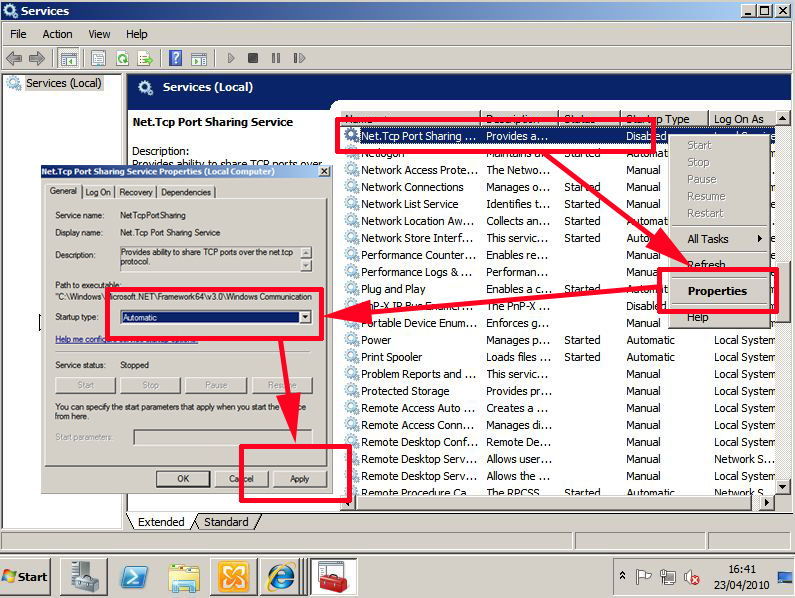
7. You need to set the startup type of the “Net Tcp Port Sharing” service to automatic > Click start > Run > Services.msc {enter} > Locate the Net Tcp Port Sharing Service and set its startup type to automatic.
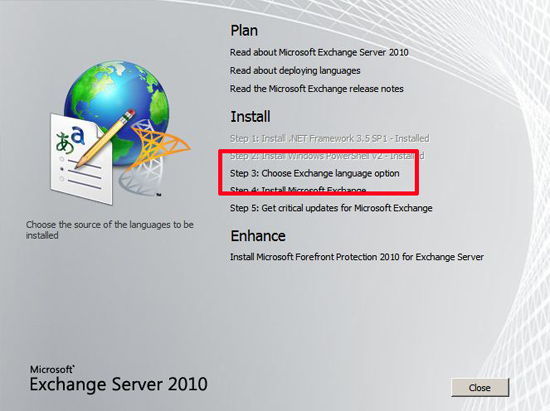
8. Put in the Exchange 2010 DVD, run setup.exe. If you are using the multi language version you should be at “Step 3: Choose Exchange Language option” > Select it. > Select Install Languages from DVD.
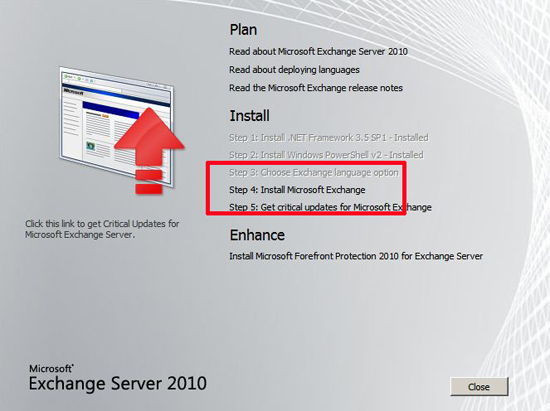
9. Select “Step 4: Install Microsoft Exchange” > Files will extract and setup will Start.
10. At the Introduction screen > Next.
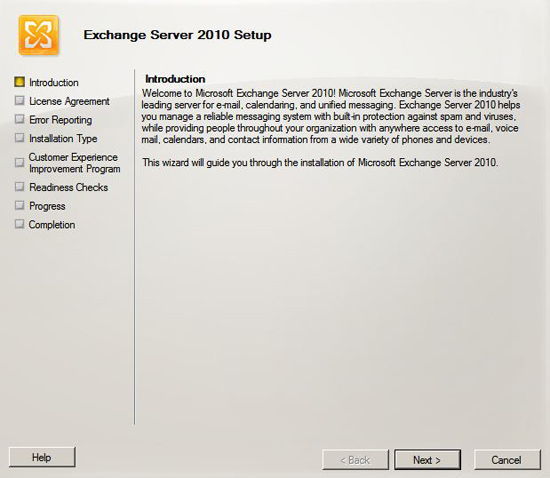
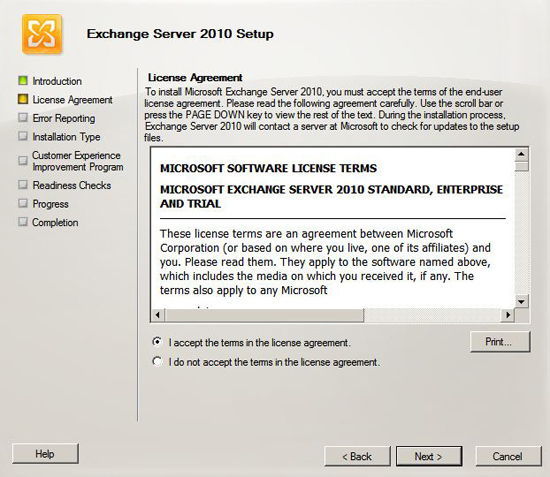
11. Accept the EULA > Next.
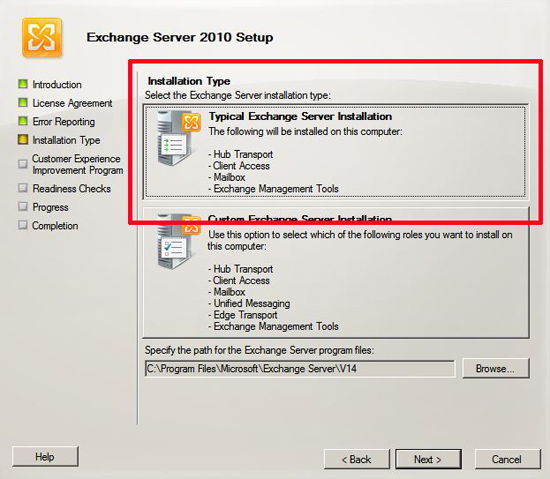
12. No, we don’t want to do error reporting > Next > Select “Typical” > (If you’re installing with SP1 see the note below) > Next.
*****Update 18/03/11*****
If you are deploying Exchange 2010 with SP1 included, at this point select “Automatically install Windows Server roles and features required for Exchange Server”

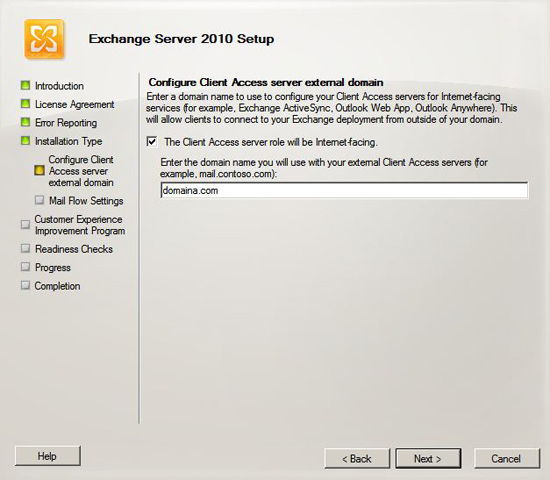
13. If this is the only one, or it going to be your main “Bridgehead Server” then it will be internet facing > tick the box > enter your domain name > Next
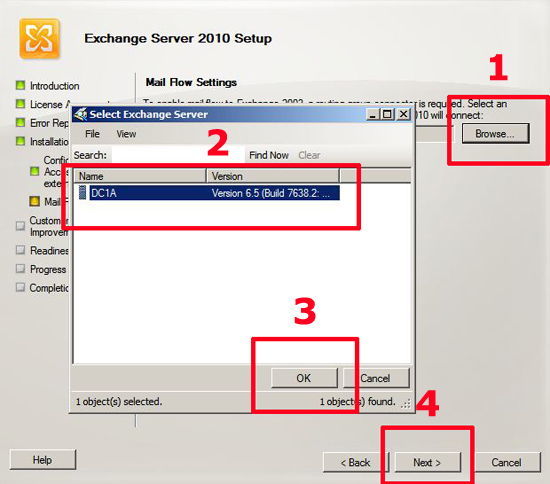
14. At this point you select your existing Exchange 2003 Server > Browse to it > Select it > Next > No we don’t want to join the CEIP > Next.
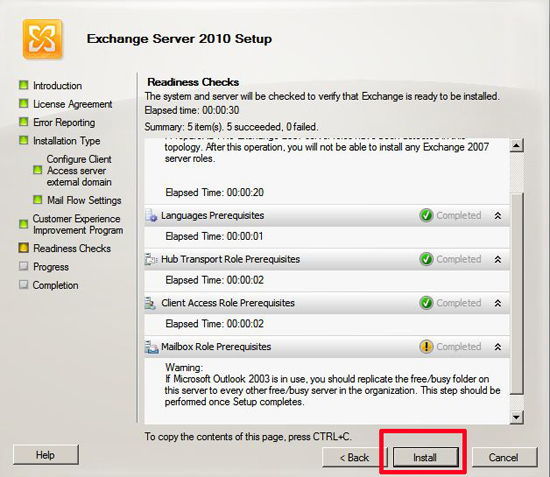
15. Exchange will perform its readiness checks, it will probably give you a couple of warnings, the first one is telling you (once ran) you can’t have an Exchange 2007 server in the domain, and the other it telling you to replicate free/busy data if you have Outlook 2003 clients. (We will sort that out later). > Click Install.
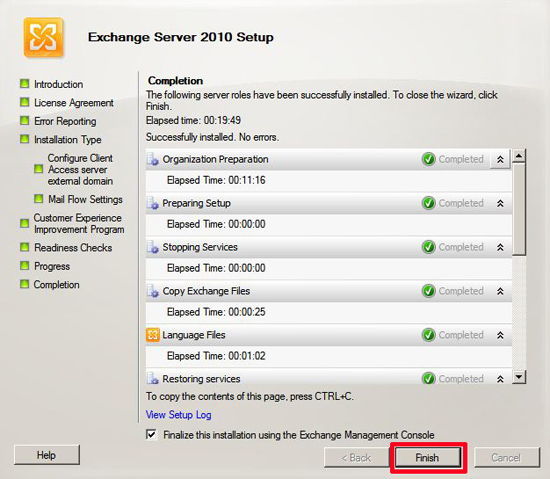
16. When done click Finish.
17. The Exchange management console will open, to enter the Product Key, select “Server Configuration > Select the server > Select Enter Product Key. Then either restart the exchange information store service or reboot.
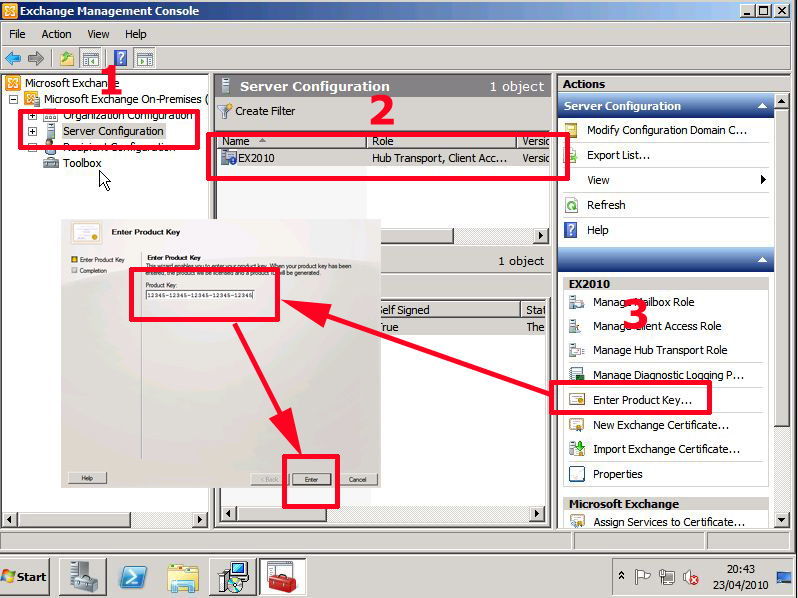
Note: You will notice that, if you look in the Exchange 2003 Management Console you now have an extra administrative group (Called FYDIBOHF23SPDLT – that’s geek humor, roll each letter and number back one).

Step 4 – “Configure and Migrate”
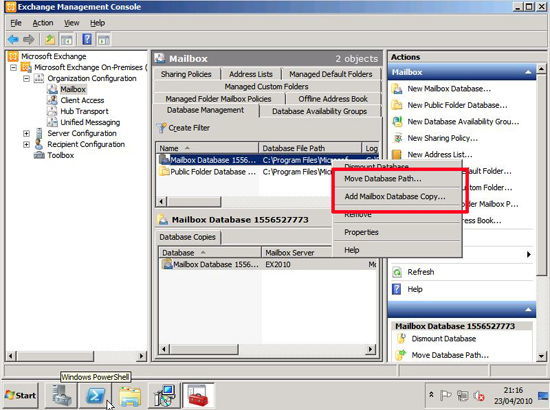
1. Your new server will have one mailbox database and one Public folder database, you can change their paths, if you want to move them onto faster drives, or other volumes. Select “Organisation Configuration” > Mailbox > You can right click each data store and move it if required. Note: You can also set up local continuous replication here as well.
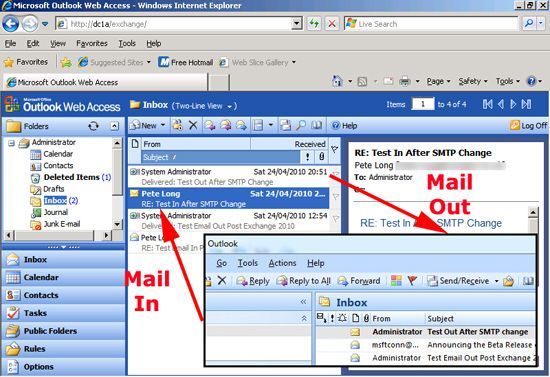
2. Now Its time to make sure nothing is broken, go to the existing Exchange 2003 Server and check mail flow inbound and outbound.
3. Do you have any clients running Outlook 2003 or earlier? If you do remember the warning we saw earlier?
Warning: If Microsoft Outlook/Office 2003 is in use, you should replicate the free/busy folder on this server to every other free/busy server in the organization. This step should be performed once setup completes.
Well now, lets assume we do have Outlook 2003, this means calendar scheduling is done from a public folder (called the SCHEDULE+ FREE BUSY folder) this public folder needs to be replicated to our new server, or calendaring and scheduling will break. Note: If your clients are Outlook 2007 or above then skip this step – those clients use the auto discover service instead.
On the Exchange 2003 Server Open Exchange Management > Locate the Public folders > Change the view to “System Folders”.
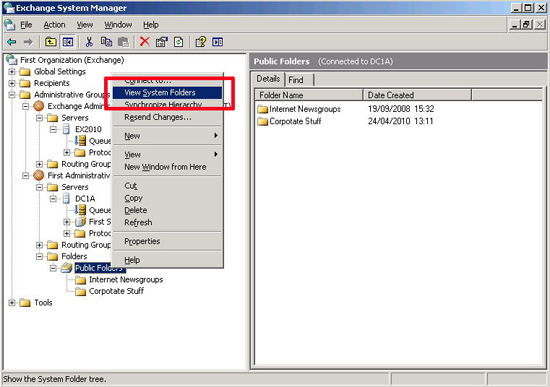
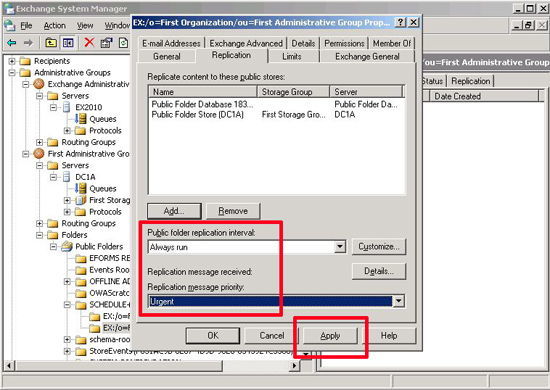
Then expand the “SCHEDULE+ FREE BUSY” folder and locate the folder that has the same name as your OLD administrative group (i.e. NOT the one with FYDIBOHF23SPDLT in it). right click it and select properties.
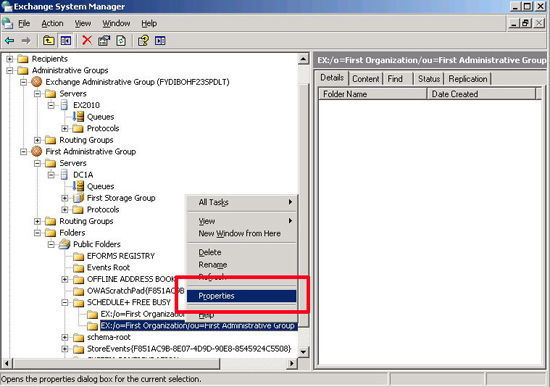
Then on the replication tab, add in the NEW Exchange servers “Public Folder Database”.
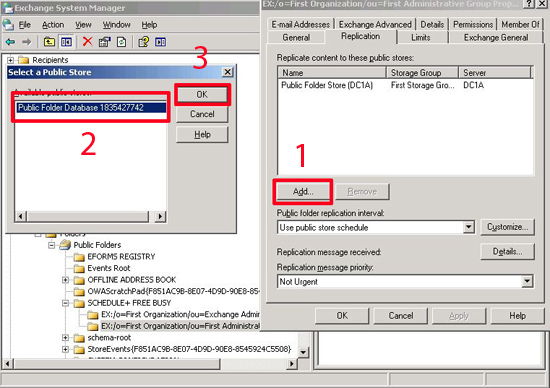
Once you have it added, set the replication.
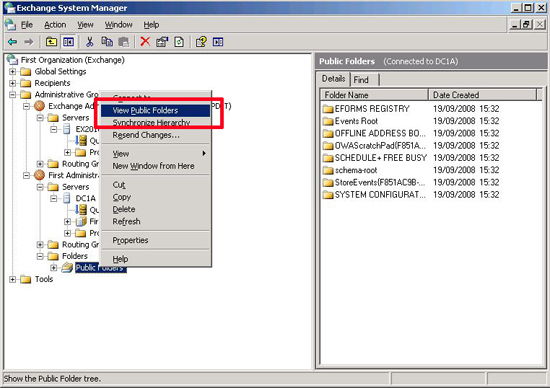
4. Do you use Public Folders? If not skip to the next step, if you do you will need to replicate them to the new server. If you have just completed the step above the procedure is the same. On the Exchange 2003 Server, open Exchange System Manager> Locate the Public folders > If you cannot see your public folders, change the view to “View Public Folders”.
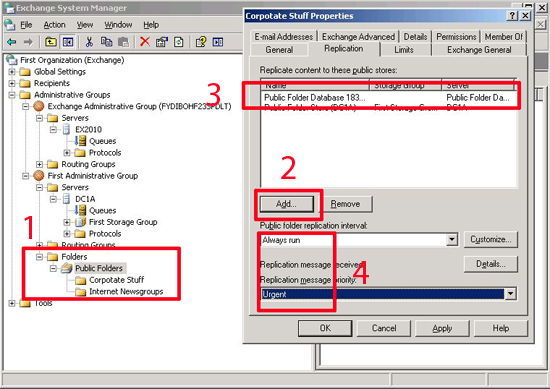
Select each one of your public folders, go to its properties and add in the New Exchange 2010 Server as a replication partner.
Note: If you have a lot of “Nested Public folders” then this can take ages, click here
Note: If mail cannot flow from 2003 to 2010 then the public folders will NEVER replicate make sure that works before expecting the folders to replicate OK. If it does skip to number 5.
Mail will not flow between Exchange 2003 and Exchange 2010
This happens a lot! The quickest and simplest way to fix it, is to delete and re-create the routing group connector between the Exchange 2003 and Exchange 2010 server. Execute the following four commands in the Exchange Management Shell. (Just insert your server names).
Note: If replication fails and you recieve an Event ID 1020
The store driver couldn’t deliver the public folder replication message “Backfill Request (SMTP Address)” because the following error occurred: Property: [0x3ff00102] , PropertyErrorCode: UnknownError, PropertyErrorDescription: 0x80040107.
Then go to Microsoft KB2855083
5. At this point you need to change the SMTP feed from the old Exchange 2003 box to the new Exchange 2010 Server, how you do this depends on your network setup, some examples of how you might do this are,
i. Change the SMTP (TCP Port 25) Port redirect on your router/firewall address ii. Swap IP addresses from the old to the new server. iii. Change the translation from public to private IP address to point to the new IP.
Note: If you have any mail scanning servers, anti spam hardware devices etc, then they will also need changing to point to the new server.
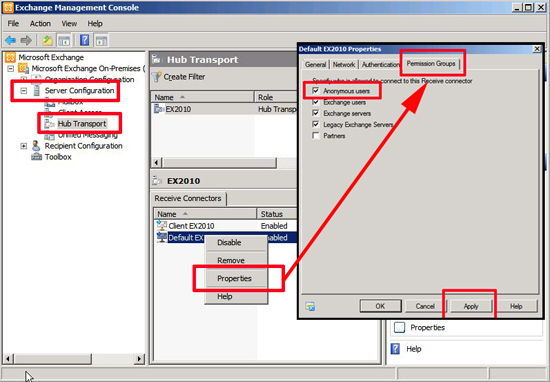
6. Once the SMTP Feed has swapped across, inbound mail may fail and return the following error,
EX2010.domaina.com #530 5.7.1 Client was not authenticated ##
To fix that you will need to allow anonymous access on the servers default receive connector.
You may also find outbound mail will fail and sit on the outbound queue with the following error,
A matching connector cannot be found to route the external recipient
To fix that you will need to create a “Send Connector”. Launch the Exchange 2010 Management Console > Organization Configuration > Hub Transport > Send Connectors > New Send Connector.

Give the new connector a name > Under “Select intended use for this send connector”, select “Internet” > Add >Set the address space to a single asterisk > Select “Include all sub domains” > OK > Next > Enter a smart host (if you use one, or you removed it earlier) > Next > Next > New > Finish.

Then test mail flow works once again, this time through the new server.
7. Now you can start moving mailboxes from the old server to the new one. What I tend to do is move one mailbox, test mail flow outbound/inbound, then test mail flow internally from the mailbox I’ve just moved, to a mailboxes that’s still on the old server. Once I’ve proved this works I will move the rest of the mailbox’s.
To move a mailbox, open the exchange 2010 management console, expand “Recipient Configuration” > Select Mailbox > You should see all the mailbox’s listed > Right click the mailbox you want to move > Select “New Local Move Request”.
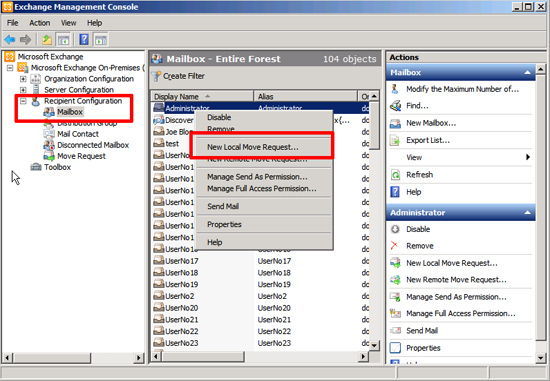
At the introduction screen, hit the browse button and select your new servers data store > Next > Next > New > Finish.
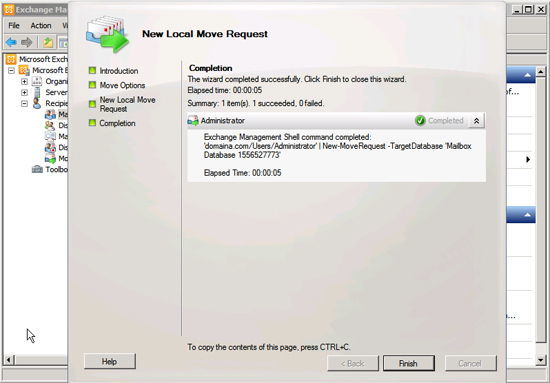
Once you have moved one and tested it you can move the rest of the mailboxes.
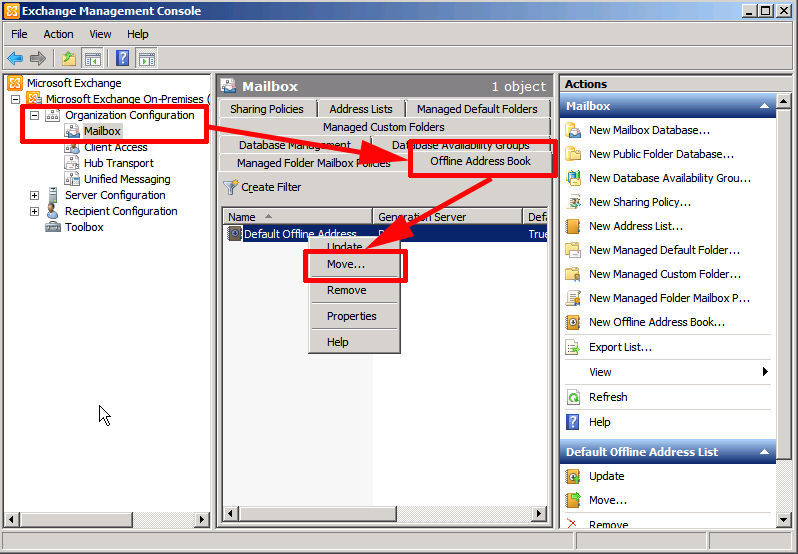
8. Next task is to change the server responsible for generating the offline address book. On the Exchange 2010 server Exchange Management Console, Expand “Organization Configuration” > Mailbox > Select the “Offline Address Book” tab > Right click the Default Offline address book and select “Move” > Browse > Select the new server > OK > Move > Finish.
9. The old Exchange server relies on the recipient update service, the new server does not. If you try and edit your address policy with the Exchange 2010 console you will see this error,
“The specified e-mail address policy couldn’t be edited. E-mail address policies created with legacy versions of Exchange must be upgraded using the ‘Set-EmailAddressPolicy’ task, with the Exchange 2010 Recipient Filter specified.”
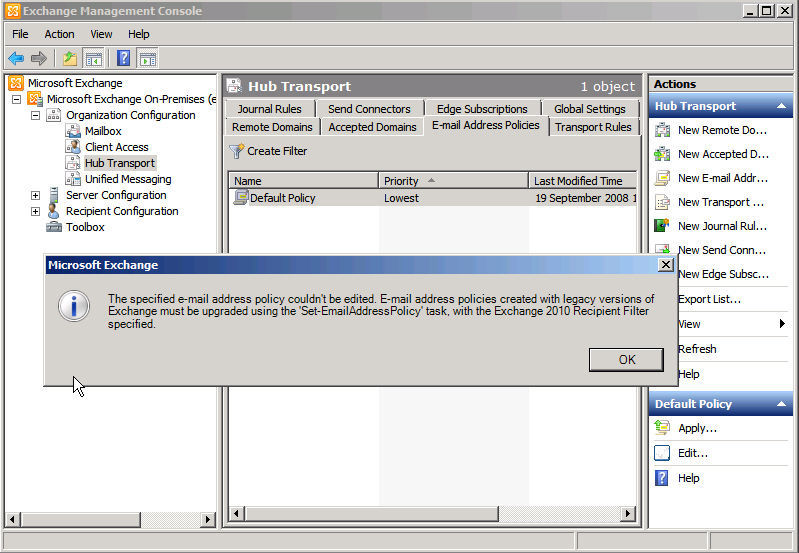
Unfortunately this can not be fixed in the management console, you need to issue some powershell commands to fix it. Click Start > All Programs > Microsoft Exchange Server 2010 > Exchange Management Shell.
Issue the following command,
Get-EmailAddressPolicy | where {$_.RecipientFilterType –eq “Legacy”} | Set-EmailAddressPolicy –IncludedRecipients AllRecipients Once executed you need to press “Y” to accept.
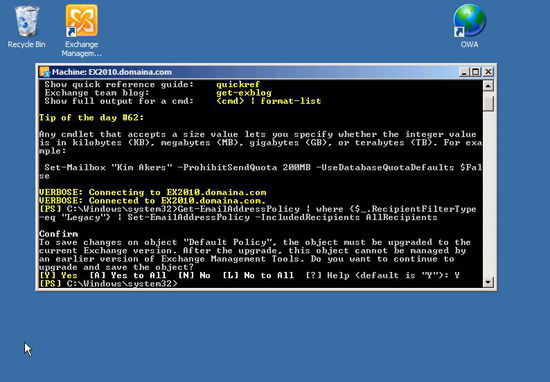
Note: You may have multiple recipient policies in operation, they will all need upgrading.
Note2: If you get an error along the lines of “Mailbox manager settings cannot be managed by the current version of Exchange Management Console” Click here.
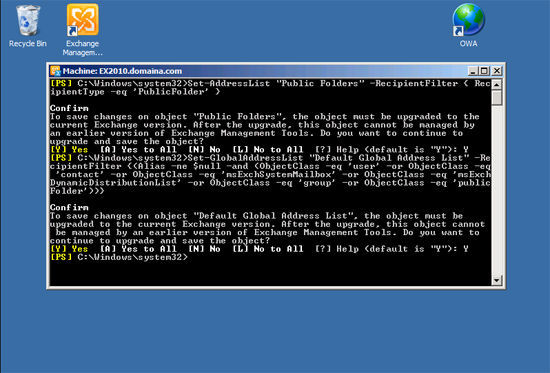
10. While we still have the “Management Shell” window open we need to update our “Address Lists” as well to do that issue the following 5 commands one by one.
Set-AddressList “All Users” –IncludedRecipients MailboxUsers
Set-AddressList “All Groups” –IncludedRecipients Mailgroups
Set-AddressList “All Contacts” –IncludedRecipients MailContacts
Set-AddressList "Public Folders" -RecipientFilter { RecipientType -eq 'PublicFolder' }
Set-GlobalAddressList "Default Global Address List" -RecipientFilter {(Alias -ne $null -and (ObjectClass -eq 'user' -or ObjectClass -eq 'contact' -or ObjectClass -eq 'msExchSystemMailbox' -or ObjectClass -eq 'msExchDynamicDistributionList' -or ObjectClass -eq 'group' -or ObjectClass -eq 'publicFolder'))}
Enter “Y” for yes when prompted.
11. At this point locate the directories that hold your new Exchange databases and logs, and MAKE SURE that these folders have been excluded from your normal AV scanning. AV has a habit of quarantining Exchange log files and breaking the database – this is easy to fix when the stores won’t mount but it’s not good!
Step 5 – “Do Nothing“
Seriously, now you need to wait, before you can proceed all the public folders need to have replicated to the new server, in some cases this can take days, as a general rule of thumb, at this point I would wait 1 week before proceeding to decommission the Exchange 2003 server, this allows for both public folder replication, and any head slapping “Doh! we forgot to {insert random forgotten thing here}”.
Also in this time, any clients running Outlook (Pre 2007) can log in, and will get their Outlook profile automatically updated to point to the migrated mailbox on the new Exchange 2010 server.
Step 6 – “Decommission and remove Exchange 2003”
1. Lets check our public folders, this one is in sync.
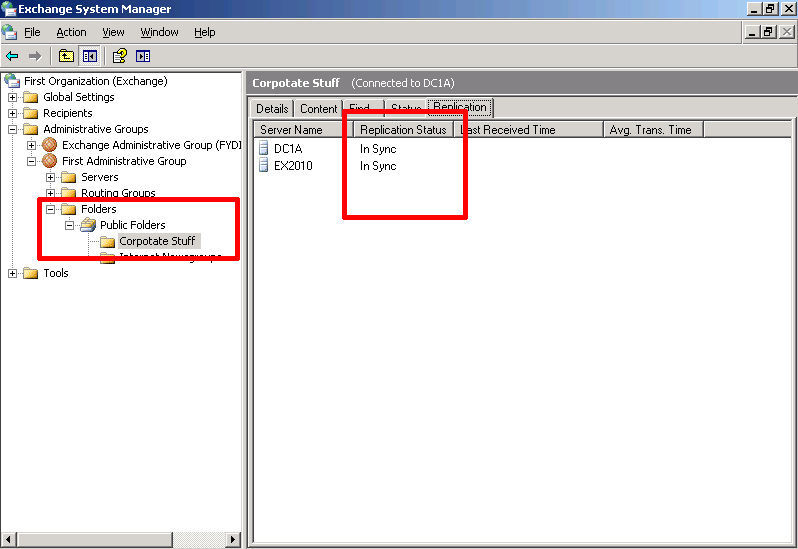
And then switch to system folders (See here if you forgot how to swap the view). If you see the status as “Local Modified” or “Remote Modified” then check the item count on the folders to make sure they have the same item count (Select the status column).

2. Once you are happy you can remove the replica that is on the Exchange 2003, > Properties > Replication > Select the 2003 Server > Remove > Apply.

3. Repeat the above procedure for all the public folders you have set to replicate to the new server. Note: Here’s a quick method if you have a lot to do.
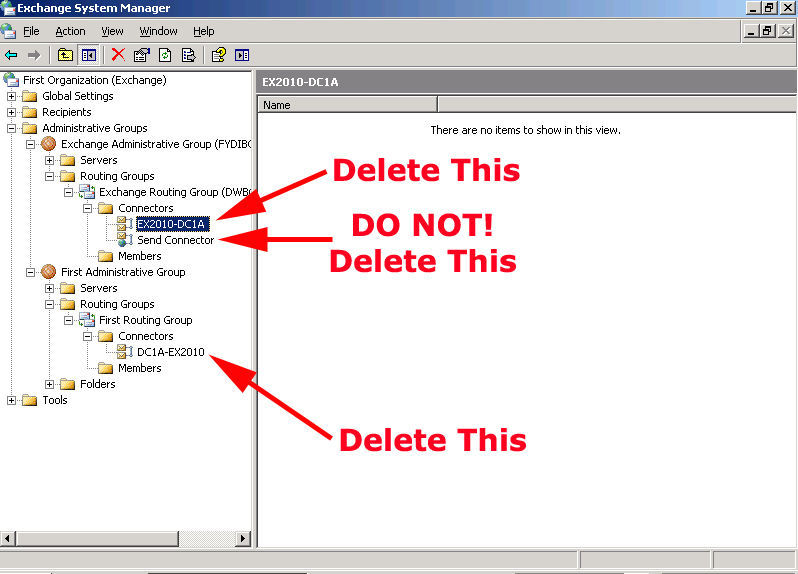
4. Remember when you installed Exchange 2010 it created a new administrative group in your Exchange 2003 organisation? (The FYDIBOHF23SPDLT one). It did this to connect to the existing organisation, and it created some routing group connectors, you now need to remove them.
5. Even though Exchange 2010 does not use the recipient update service, you need to tell Exchange 2003 that it does, because you can’t remove Exchange 2003 from a server that thinks it is providing Recipient Update Services. Launch the “Exchange System Manager” > Expand recipients > Select Recipient Update Services > Right click each one and change the server name to the new Exchange 2010 server. Do this for EVERY policy.
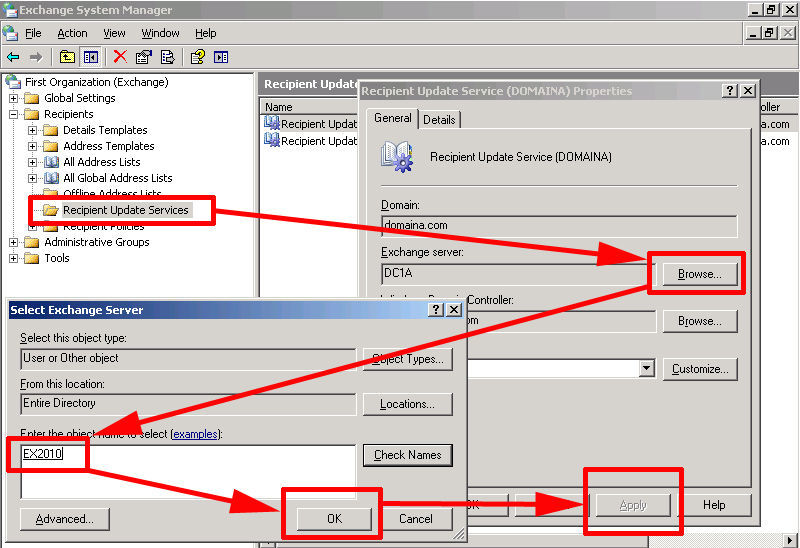
Note: With Exchange 2010 (post SP1) This May Not Work!
So that you can gracefully remove Exchange 2003, The Recipient Update Services needs to be removed first. If you cannot gracefully remove it (as above). Then you will need to Manually Remove it from Active Directory. To do this run ADSIEdit.msc (On Server 2003 you will need the support tools installing first). Then navigate to;
Then delete the entries in the right hand window.

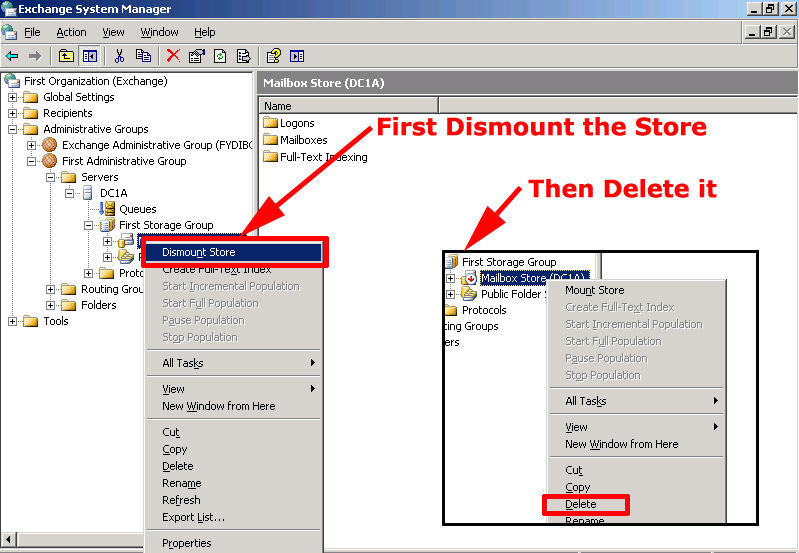
6. Have a quick common sense check! Are you sure everything is OUT of your Exchange 2003 Databases? If so, delete your stores from Exchange 2003 > you will need to dismount them first > Repeat for all private databases.
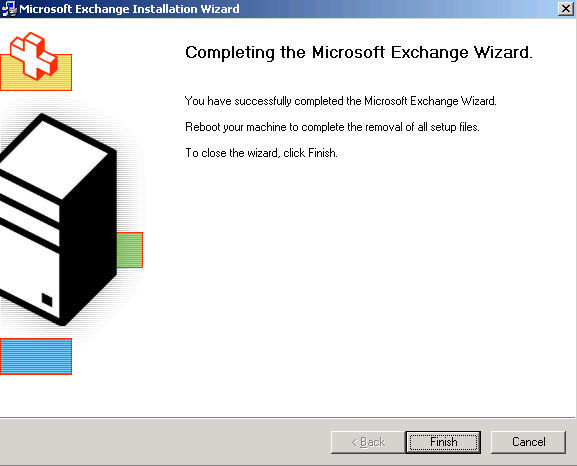
7. Finally you can now go to “Add or Remove Programs” and remove Exchange 2003. (Change the action type to “Remove”). Note: You may be asked to insert the Exchange 2003 install media.

When done reboot the server.
Step 7 – “Finish up“
1. Now you may need to change your backups to include the new data stores. Your backup software may require you install the Microsoft Exchange Server MAPI Client and Collaboration Data Objects, before you install the backup agents (ARCserve and Symantec Backup Exec for example).
2. If you have any links to “Outlook Web Access” (i.e. on your public website or in Share point, they will need the URL’s changing from https://server/exchange to https://server/owa if you would like to redirect http to https see the following article,
Exchange 2010 – Redirect OWA (HTTP to HTTPS)
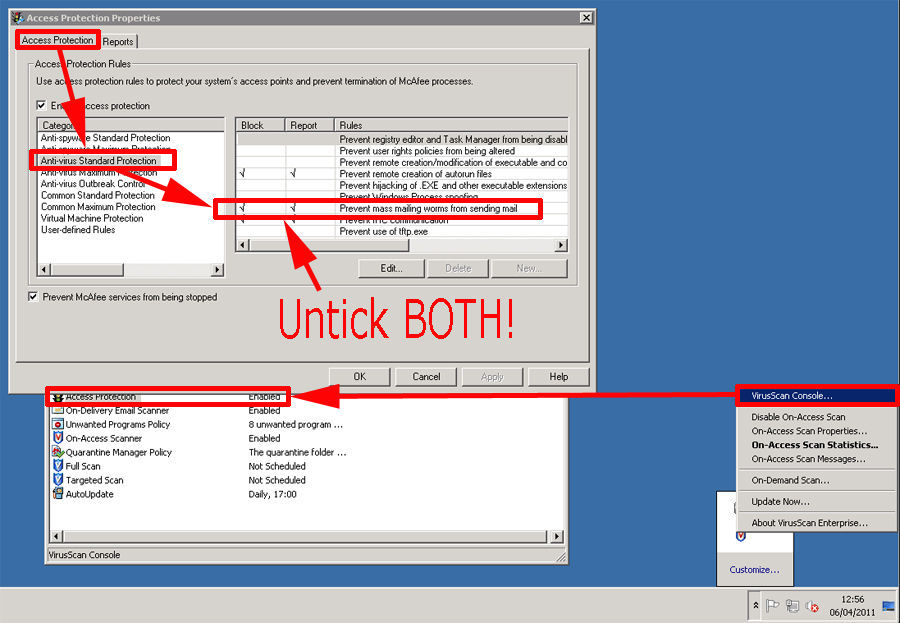
3. Be aware: some AV software (McAfee for example) likes to block TCP port 25 (SMTP), this is not good on an Exchange server! Don’t forget to disable this feature or you may have mail flow issues.
4. You may get some support calls like “internal user A cannot send an email to internal user B” if that happens check that they are NOT using the automatically remembered email facility in Outlook. This stores previously typed email addresses in a local file called an NK2 file (or nicknames file), but it stores internal addresses like this…
Those paths no longer exist, get then to pick the name from the “Global Address List” instead, or if they are really persist ant you can add a line to the login script that deletes the .nk2 file.
5. ActiveSync problem on migrated users. You may find there is a problem with some migrated users unable to use ActiveSync, if that is the case see the following link.
Exchange ActiveSync Not Working for Some Users “Post Migration”
Update 26/05/10
Thanks to Rick Faria, who both pulled me up on my shoddy technical terminology, and asked,
The only thing I don’t see in your article and actually the thing that seems to be the most involved is dealing with trying to move over your Exchange 2003 SSL cert for OWA or if your renewal is close taking care of that with a new one. You don’t really mention that process.
Fair enough, here we go, Transferring Certificates from Exchange 2003/2007 to Exchange 2010
Footnote:
If this helped in anyway let me know . To get me in to do this for you would have cost you a fair few thousand pounds, feel free to make a donation.
If anyone has anything to add, click here.
Related Articles, References, Credits, or External Links
Thanks to Mark V for the hotfix to 2003 update. Thanks to Rasmus Haslund for the feedback. Thanks to Dave Pape for the feedback Thanks to Jay Malone for the “Removing RUS information” Thanks to Shane Brath for the feedback and suggestions. Original Article written: 11/10/12