
(This method uses the ASA to hold the user database) to use RADIUS CLICK HERE to use Kerberos CLICK HERE
KB ID 0000070
Problem
Note: IPSEC VPN is still possible, but getting Windows clients is a little sketchy, and you will have to mess about with them to get them to work on modern versions of Windows. (Mac OSX and iPhone/iPad can connect with their built in VPN software though).
Below is a walkthrough for setting up a client to gateway VPN Tunnel using a Cisco ASA appliance.This is done via the ASDM console.
It also uses the Cisco VPN client – This is no longer available form Cisco see the following article.
Download Cisco VPN Client Software
Solution
Step1 Configure the ASA5500
1. Open up the ADSM console. > Click Wizards > VPN Wizard.

2. Select “Remote Access”. > Next.

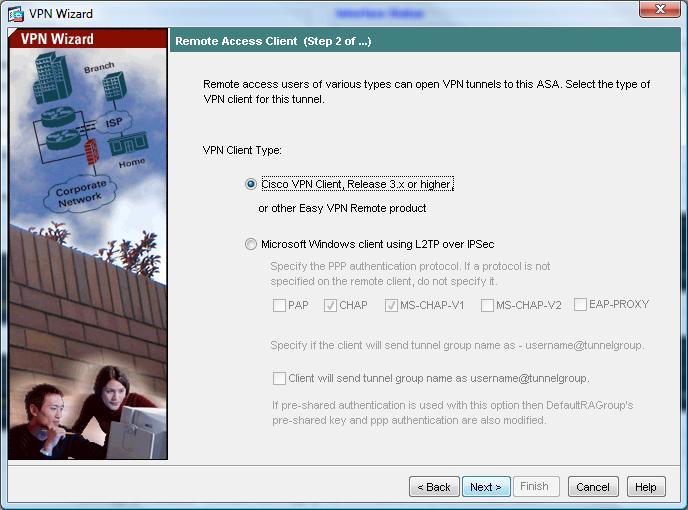
3. Select Cisco VPN Client. > Next.
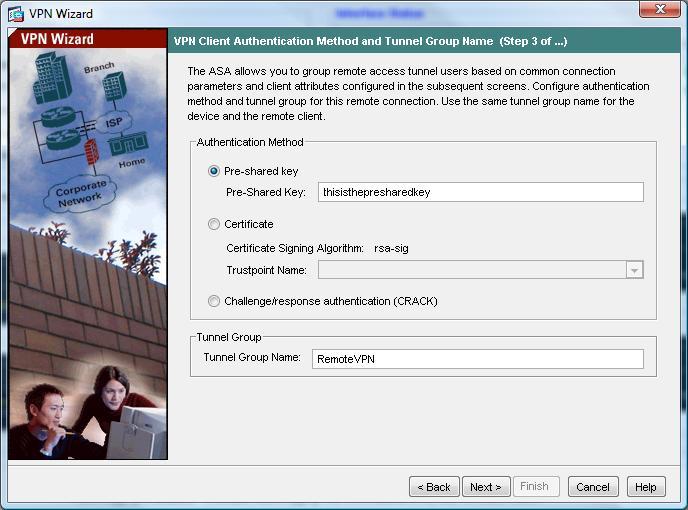
4. Enter a Pre Shared Key e.g. thisisthepresharedkey > And then give the Tunnel group a name e.g. “RemoteVPN”. > Next.
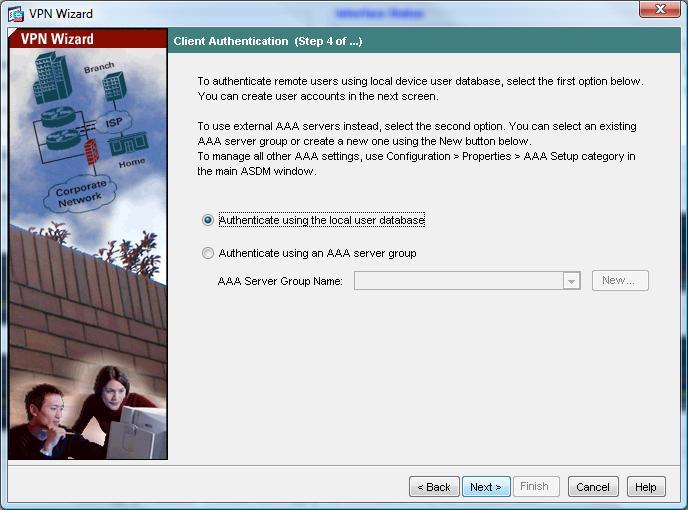
5. Select “Authenticate using the local user database”. > Next.
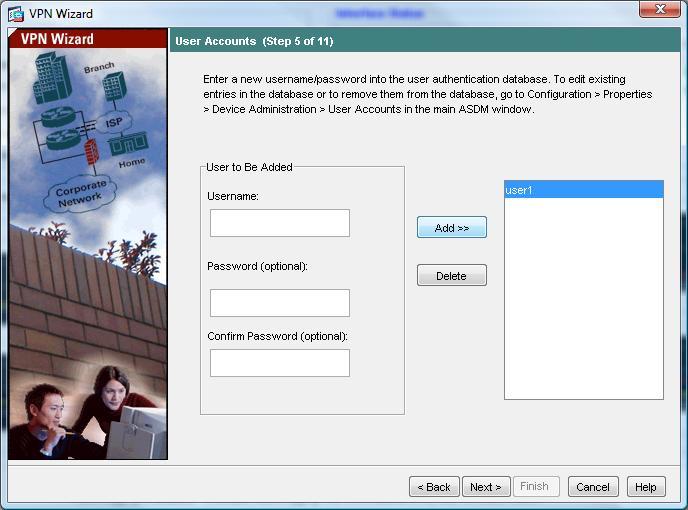
6. Now create a user, for this exercise I’ve created a user called user1 with a password of password1
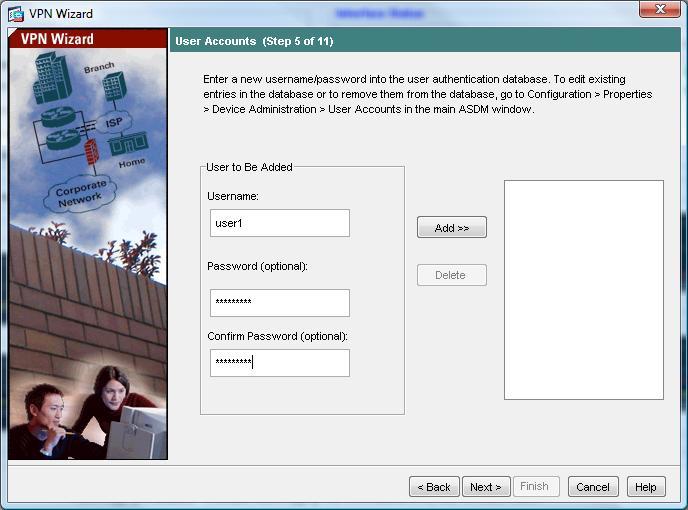
7. Click Add. > Next.
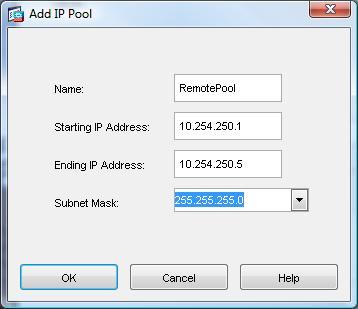
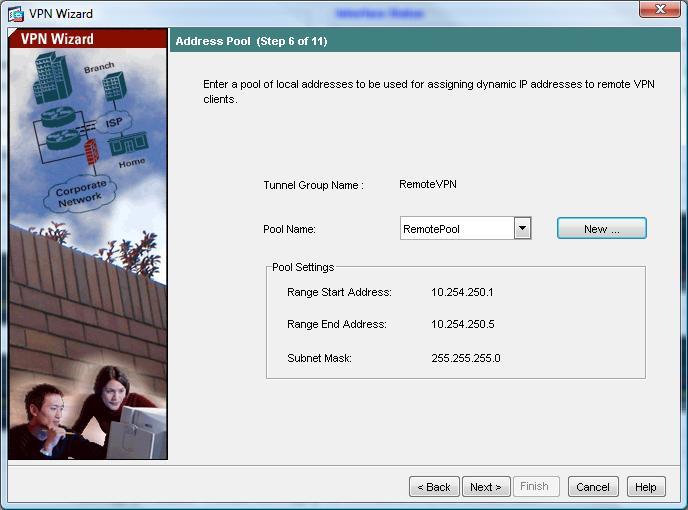
8. Now we need to create some IP addresses that the remote clients will use when connected. > Click New

9. Give the Pool a name e.g. RemotePool and set the start and end IP addresses you want to lease (note these DONT have to be on the same network as your internal IP’s – In fact, for auditing its good practice to make them different). > Enter a Subnet Mask. > OK.
10 Click Next.
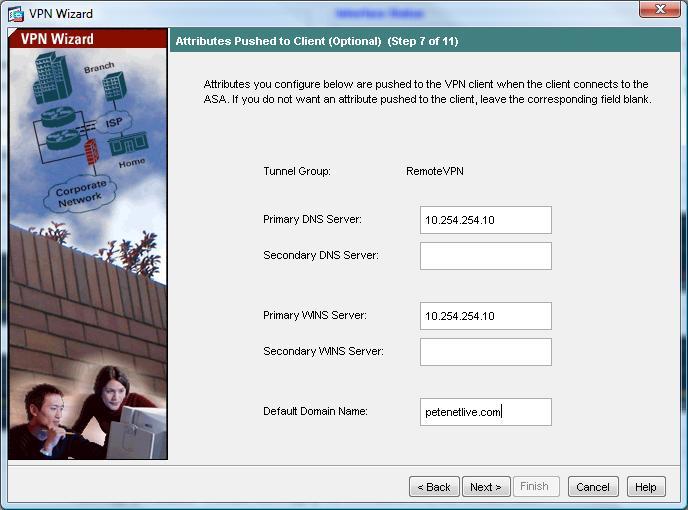
11 Enter the details you want the remote clients to use while connected, DNS servers, WINS Servers and domain name. > Next.
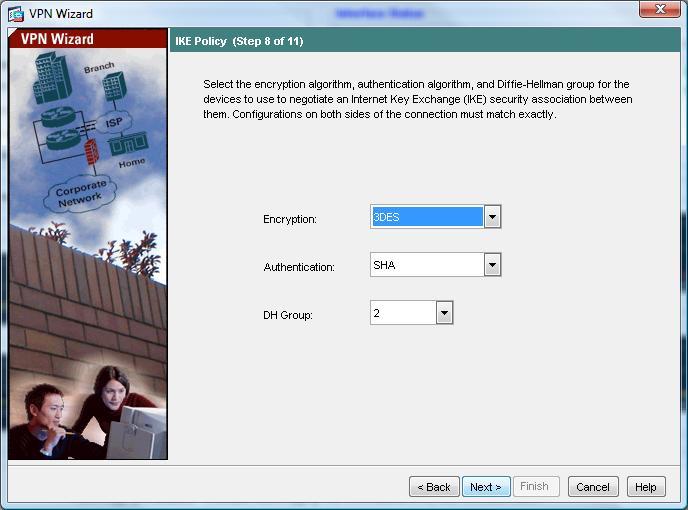
12. Leave it on the defaults of 3DES, SHA and DH Group 2 (Note some Cisco VPN clients will not support AES). > Next
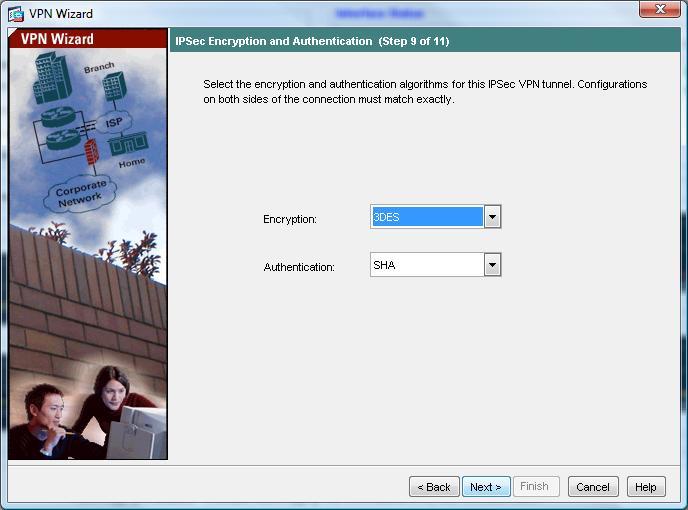
13. Again leave it on the default of 3DES and SHA. > Next.
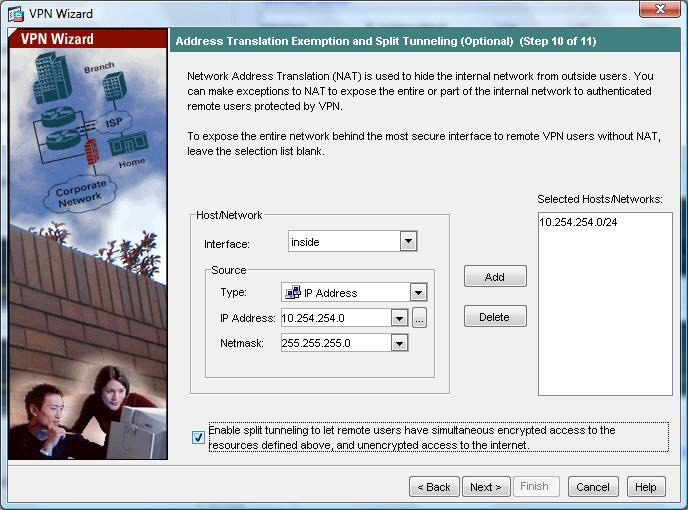
14. You can choose what IP addresses you want the remote VPN clients to have access to, first change the dropdown to “Inside”, here I want them to have access to the entire network behind the ASA so I will choose 10.254.254.0 with a mask of 255.255.255.0 > Click Add. > Next.
NOTE If you do not tick the box to enable “Split Tunneling” then the client cannot browse the internet etc while connected via VPN.
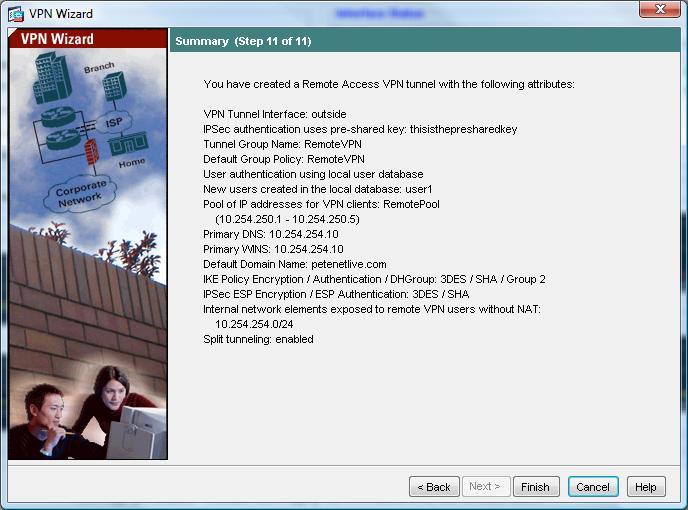
15. Review the information at the end of the wizard. > Finish
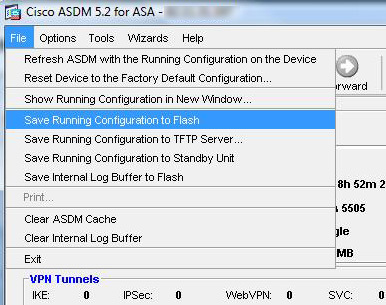
16. Now you need to save the changes you have just made, From the ASDM Select File > “Save running configuration to flash”
Step 2 Configure the Client VPN Software on the remote client.
Also See THIS VIDEO
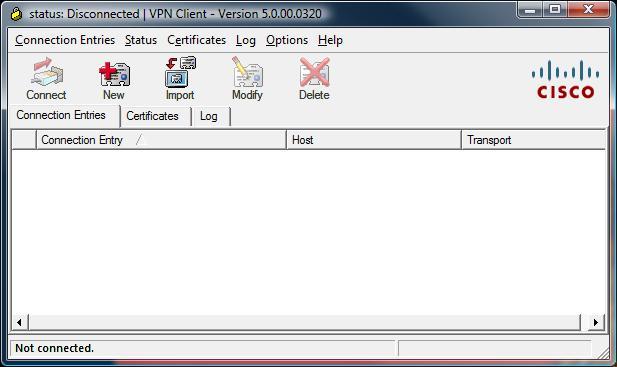
1. I’ll assume you have the software installed you can get it from two places, On the CD that came with the ASA, or download it direct from Cisco (NOTE this needs a valid Cisco CCO account and a service contract). > Click New.
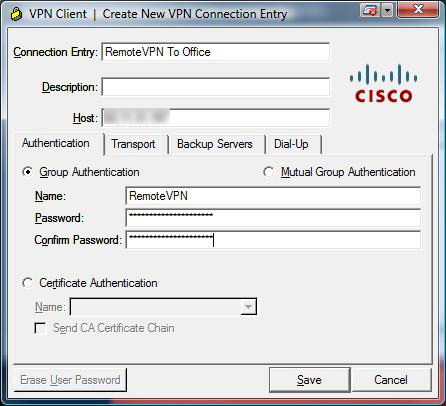
2. Under connection entry give the connection a name e.g. “Remote VPN to Office” > Under “Host” enter the Public IP of the ASA (NOTE I’ve blurred this one out to protect my IP address). > Under “Name” enter the name you created earlier (Step 1 number 4) > Under Password use the password you created earlier (Step 1 number 4) and enter it a second time to confirm. NOTE these are NOT the usernames and passwords you created in Step 1 number 6. > Click Transport Tab.
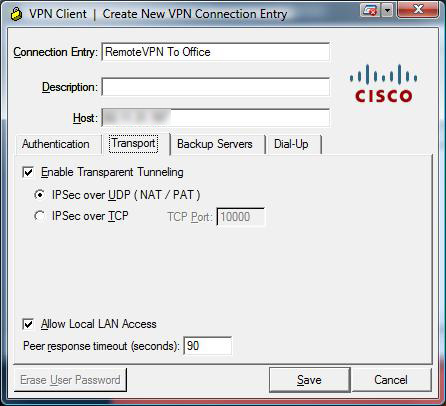
3 Accept the defaults but tick “Allow LAN access if you want to be able to access YOUR drives etc from the network behind the ASA” > Save.
4. Select the Connection you have just created. > Connect.

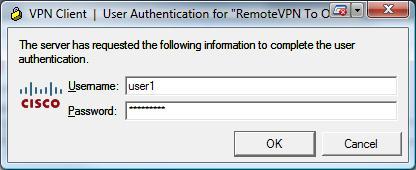
5. Enter the username and password you created earlier (Step 1 Number 6) of user1 and password1. > OK.
6 After a few seconds (provided the details were all right) it will connect, hover over the padlock in your task tray and it should say “VPN Client – Connected”.

Create Additional Users on the ASA
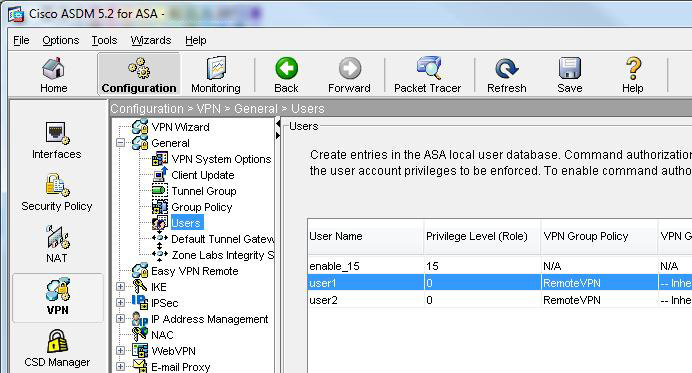
1. Open the ASDM and navigate to Configuration > VPN > General > Users > Add.

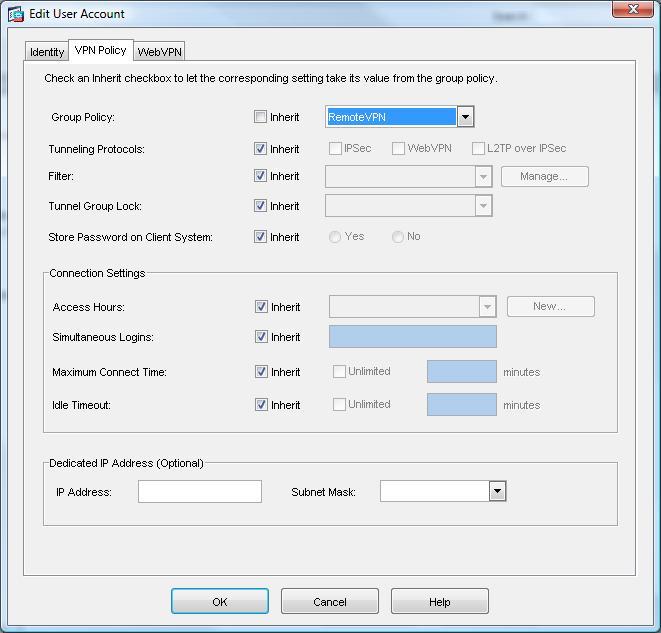
2. Give the user a name > Enter and confirm a password > Set the Privilege Level to 0 > Then Select the VPN Policy Tab

3. > Under Group Policy untick “Inherit” > Select RemoteVPN (the policy you set in Step1 Number 4) > OK.
4. You will now see the user listed (Don’t forget to save the settings, (File > “Save Running Configuration to Flash”).
Setup ASA 5500 IPSEC Remote VPN From Command Line
ip local pool IPSEC-VPN-POOL 10.254.250.1-10.254.250.100 mask 255.255.255.0
!
access-list ACL-SPLIT-TUNNEL standard permit 10.254.254 255.255.255.0
!
object network Obj-Remote-IPSEC-VPN
 subnet 10.254.250.0 255.255.255.128
!
object network Obj-Local-LAN
 subnet 10.254.254.0 255.255.255.0
!
group-policy IPSEC-Remote-VPN internal
group-policy IPSEC-Remote-VPN attributes
  von-tunnel-protocol ikev1
  split-tunnel-policy tunnelspecified
  split-tunnel-network-list value ACL-SPLIT-TUNNEL
  dns-server value 8.8.8.8
  default-domain value petenetlive.com
  vpn-simultaneous-logins 5
!
tunnel-group IPSEC-Remote-VPN type remote-access
tunnel-group IPSEC-Remote-VPN general-attributes
 default-group-policy IPSEC-Remote-VPN
 address-pool IPSEC-VPN-POOL
 tunnel-group IPSEC-Remote-VPN ipsec-attributes
 ikev1 pre-shared-key 123456
!
crypto ikev1 policy 10
authentication pre-share
encryption 3des
hash sha
group 2
lifetime 86400
!
crypto ikev1 enable  outside
!
crypto ipsec ikev1 transform-set ESP-3DES-SHA esp-3des esp-sha-hmac
!
crypto dynamic-map SYSTEM_DEFAULT_CRYPTO_MAP 65535 set pfs group2
crypto dynamic-map SYSTEM_DEFAULT_CRYPTO_MAP 65535 set ikev1 transform-set ESP-3DES-SHA
crypto map outside_map 65535 ipsec-isakmp dynamic SYSTEM_DEFAULT_CRYPTO_MAP
crypto map outside_map interface  outside
!
nat (inside,outside) 1 source static Obj-Local-LAN Obj-Local-LAN destination static Obj-Remote-IPSEC-VPN Obj-Remote-IPSEC-VPN no-proxy-arp route-lookup
!
crypto isakmp nat-traversal 20
!
username TestUser password Password123 privilege 0
username TestUser attributes
vpn-group-policy IPSEC-Remote-VPN
Below, is the commands required for an ASA running code OLDER than version 8.3
access-list splitvpn standard permit 10.254.254.0 255.255.255.0
access-list nonat extended permit ip 10.254.254.0 255.255.255.0 10.254.250.0 255.255.255.0
ip local pool VPNPool 10.254.250.1-10.254.250.254 mask 255.255.255.0
nat (inside) 0 access-list nonat
group-policy remotevpn internal
group-policy remotevpn attributes
dns-server value 10.254.254.10
ipsec-udp enable
split-tunnel-policy tunnelspecified
split-tunnel-network-list value splitvpn
split-dns value petenetlive.com
username user1 password IzFIX6IZbh5HBYwq encrypted privilege 0
username user1 attributes
vpn-group-policy remotevpn
sysopt connection tcpmss 1200
crypto ipsec transform-set ESP-3DES-SHA esp-3des esp-sha-hmac
crypto dynamic-map dynmap 20 set transform-set ESP-3DES-SHA
crypto map outside_map 64553 ipsec-isakmp dynamic dynmap
crypto map outside_map interface outside
crypto isakmp identity hostname
crypto isakmp enable outside
crypto isakmp policy 10
authentication pre-share
encryption 3des
hash sha
group 2
lifetime 86400
crypto isakmp nat-traversal 20
tunnel-group remotevpn type ipsec-ra
tunnel-group remotevpn general-attributes
address-pool vpnpool
default-group-policy remotevpn
tunnel-group remotevpn ipsec-attributes
pre-shared-key thisisthepresharedkey
Related Articles, References, Credits, or External Links
Original article written 21/01/10 updated 07/06/11
Windows 8 and Cisco (IPSEC) VPN Client
Windows 10 – Running the Cisco VPN Client Software