
KB ID 0001312
Problem
Following on from Part Two, now we have an offline Root CA, and a CRL server, our next step is defined by our PKI design, are we three tier, or two tier? (Look in Part One for a definition).
Solution
As previously mentioned, Microsoft just treats Intermediate CAs and Issuing CA’s as the same thing (SubCAs). So the next step is identical for either. But I would suggest one difference, If I was deploying an Intermediate CA, I would have “LoadDefaultTemplates=0” in the CAPolicy.inf file, and for an Issuing server I would not, (that’s just my personal preference).
I’m going to continue this piece for a two tier PKI deployment. And my next SubCA will be an Issuing CA.
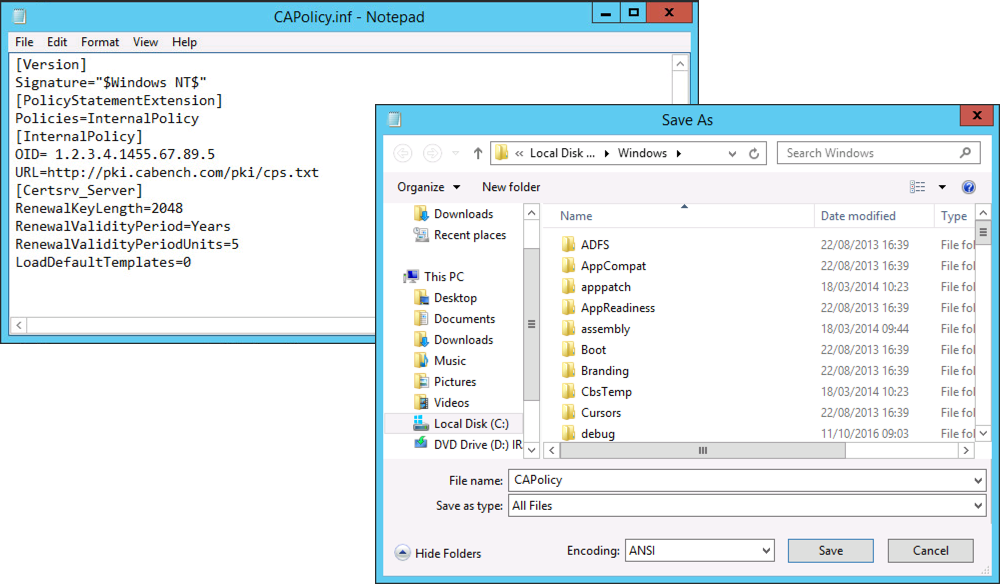
Create your SubCA CAPolicy.inf file and save it to C:\Windows
[Version]
Signature="$Windows NT$"
[PolicyStatementExtension]
Policies=InternalPolicy
[InternalPolicy]
OID= 1.2.3.4.1455.67.89.5
Notice="Legal Policy Statement"
URL=http://pki.cabench.com/pki/cps.txt
[Certsrv_Server]
RenewalKeyLength=2048
RenewalValidityPeriod=Years
RenewalValidityPeriodUnits=15
CRLPeriod=weeks
CRLPeriodUnits=1
CRLDeltaPeriod=Days
CRLDeltaPeriodUnits=0
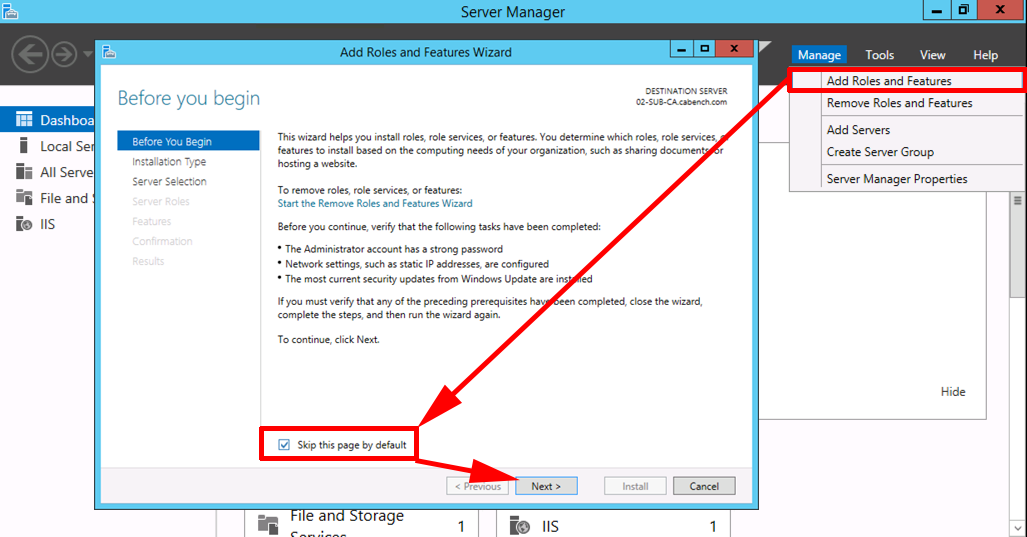
Launch Server Manager > Manage > Add Roles and Features.
Role Based > Next > Select the Local Server >Next > Active Directory Certificate Services > Add Features > Next.
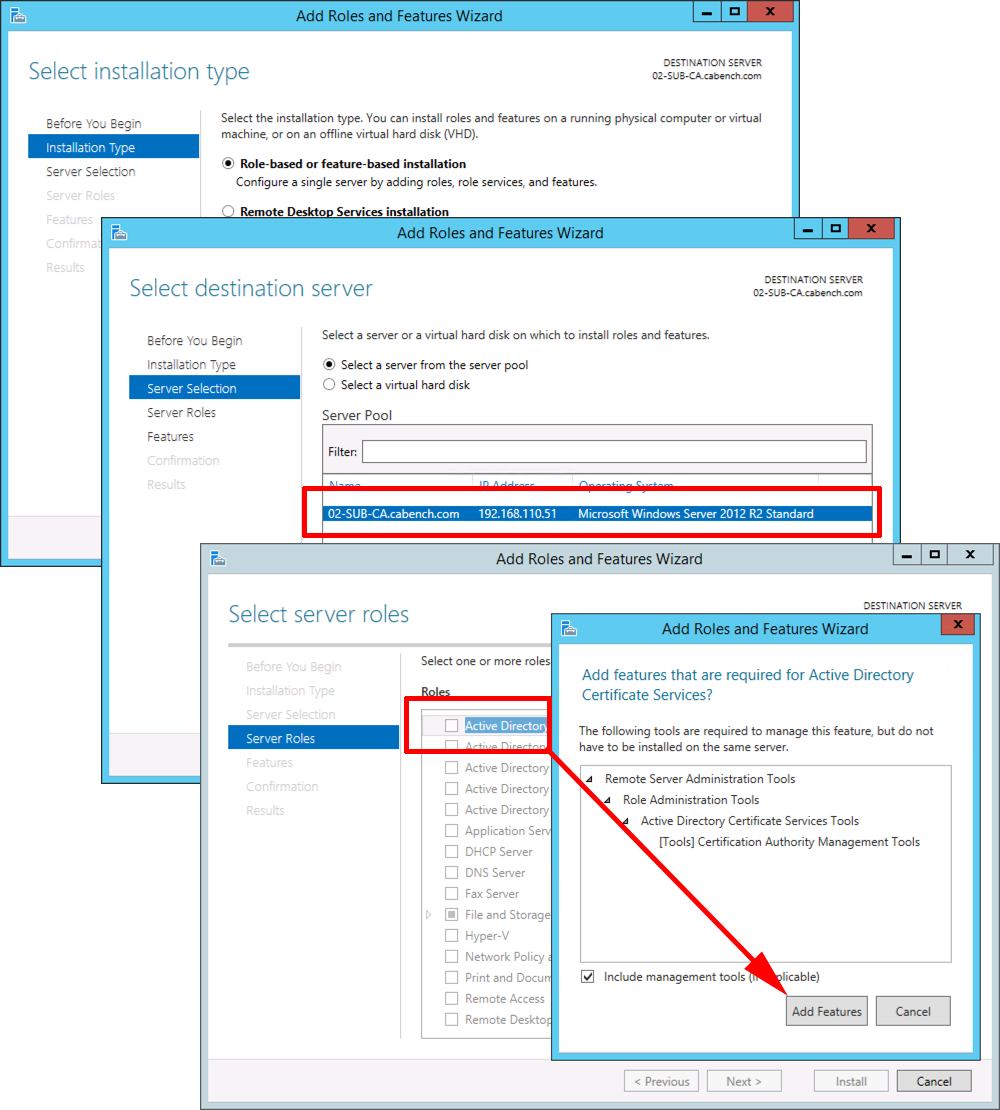
No additional Features are Needed > Next > Next > Select Certification Authority > Optional*: Select Certificate Authority Web Enrolment > Next.
*Note: This gives you the nice registration website for certificates.

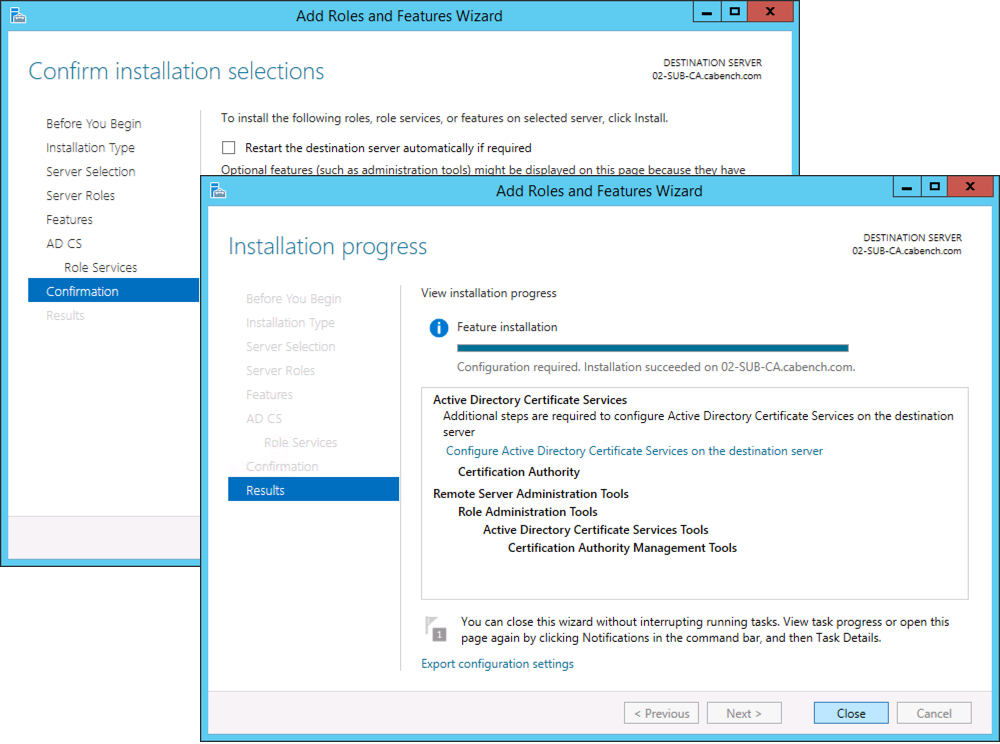
Next > Install > Close.
Configure Active Directory Certificate Services.

Next > Select ‘Certification Authority’ and ‘ Certificate Authority Web Enrolment’, if you selected it above > Next > Enterprise CA > Next.
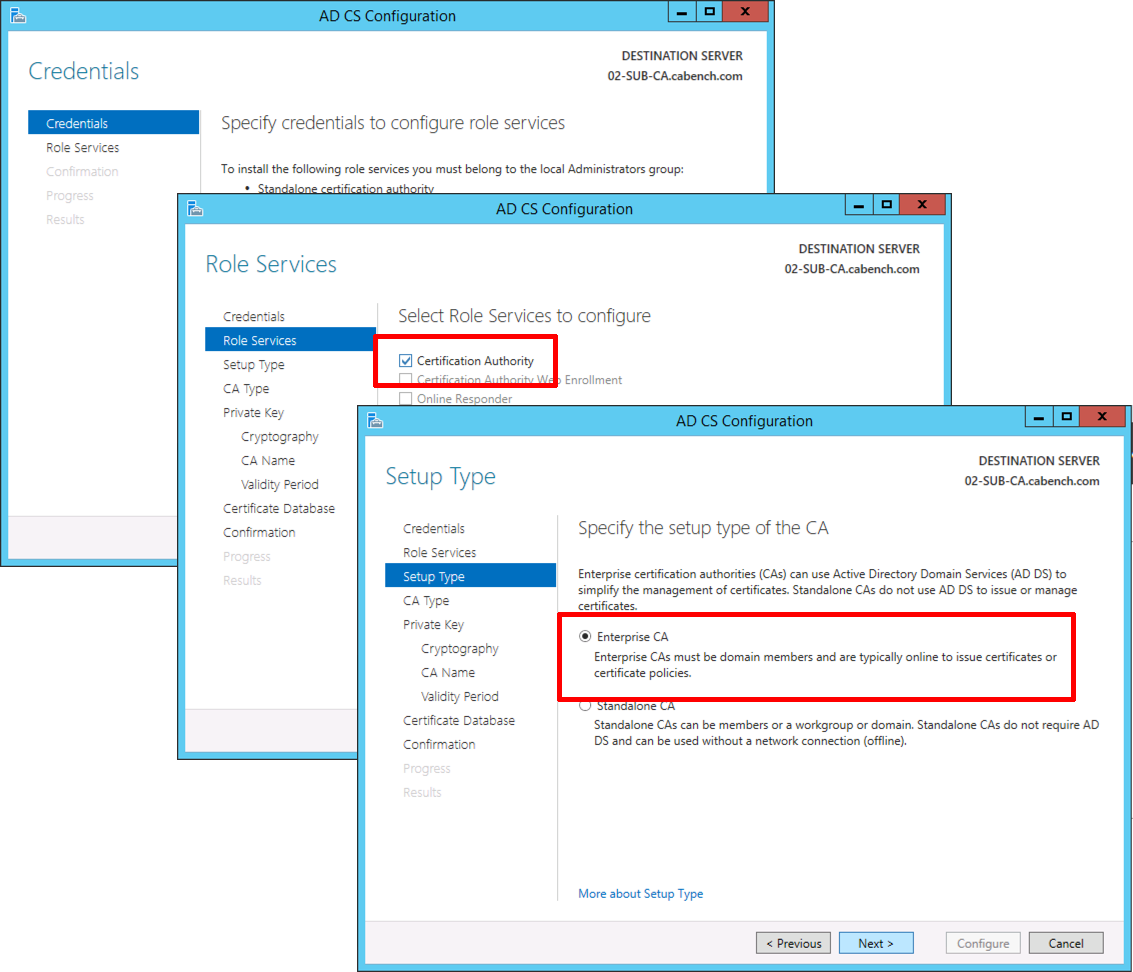
Subordinate CA > Next > Create New Private Key > Next > Change the Hash algorithm to SHA256 > Next.
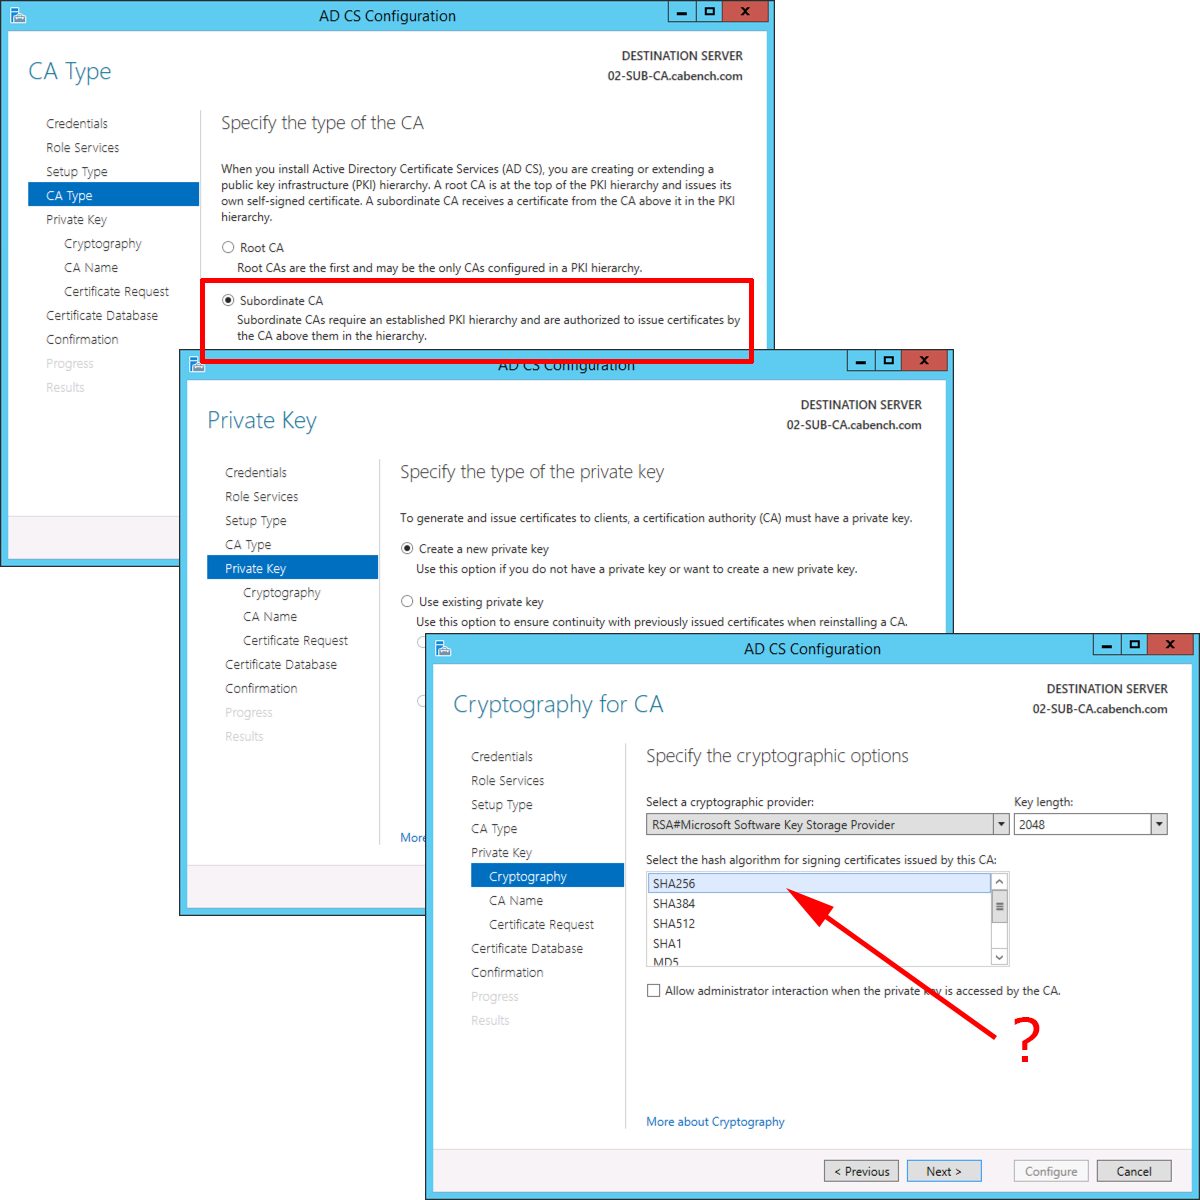
Give the CA a sensible Name > Next > Select ‘Save certificate request to a file on the target machine’ > Next.

Next > Next > Install > Close.
Note: The warning is fine, we haven’t installed the certificate yet, that’s our next step

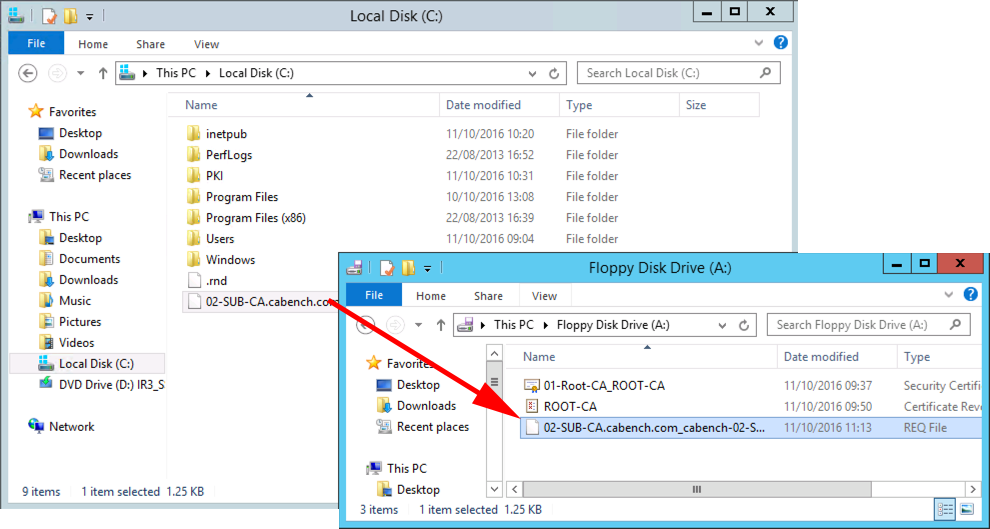
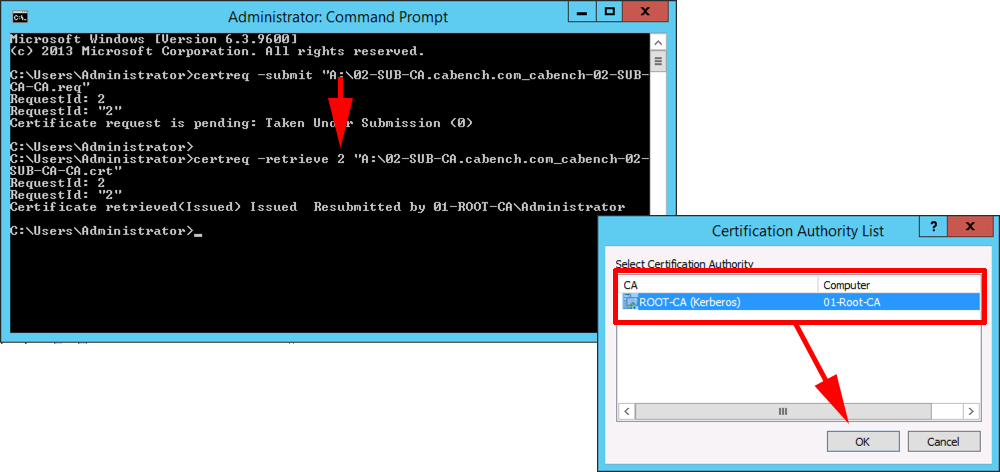
Copy your certificate request file, (ending .req) and put it on your floppy drive.
Note: I’m aware we are in the 21st century! I’m using virtual floppy drives.
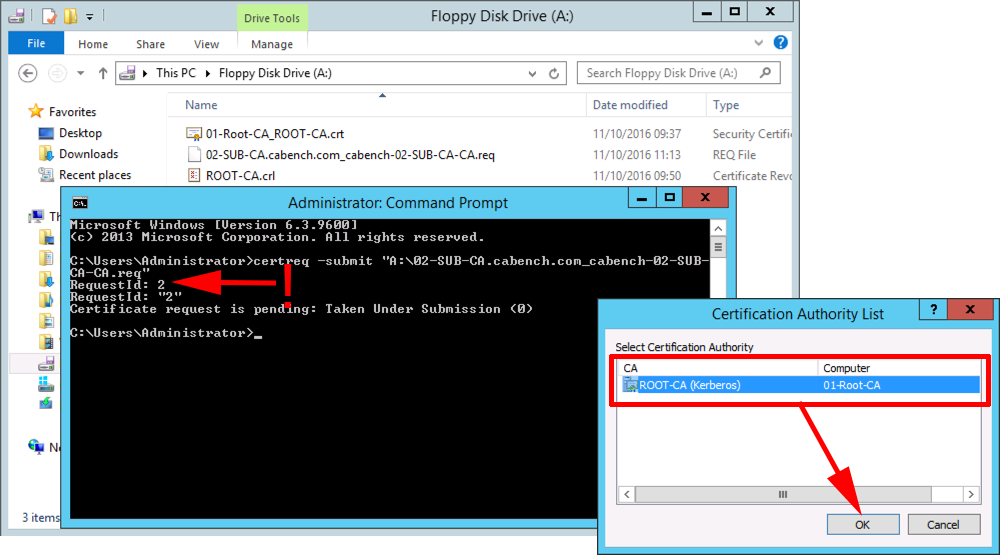
Present the floppy drive to your offline Root CA and execute the following command;
When prompted with the CA name > OK > Take a note of the RequestID you need this in a moment. (Leave the command window open!)
Open the Certificate Services Management Console > Server-name > Pending Requests > Locate your request > Issue the certificate.

Back at command line issue the following command;
When prompted with the CA name > OK.
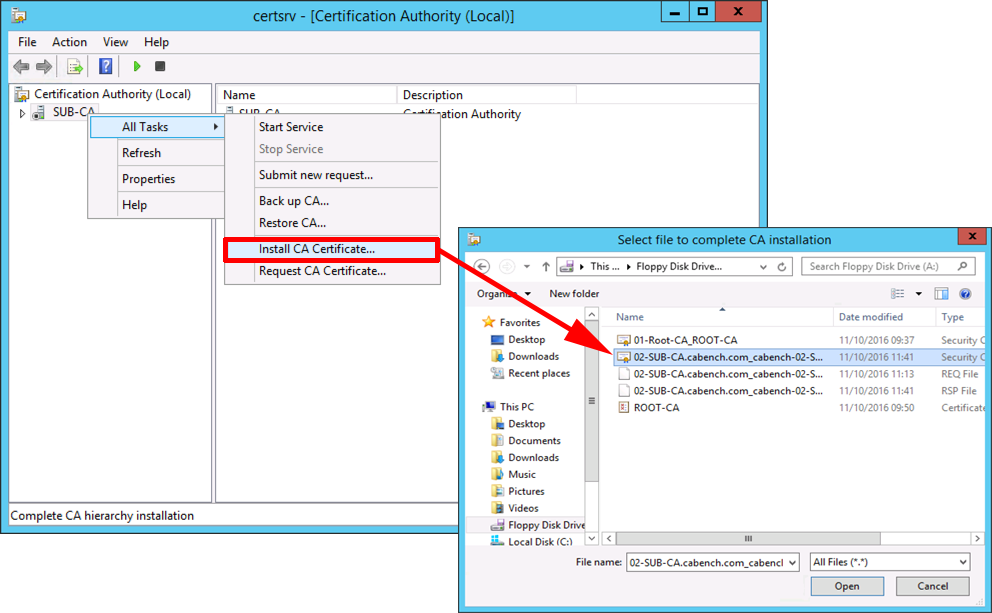
Check the certificate has appeared on your floppy drive, and present that back to your SubCA server > Open the Certificate Services Management console > Server-name > All Tasks > Install CA Certificate > Locate the cert > Open.
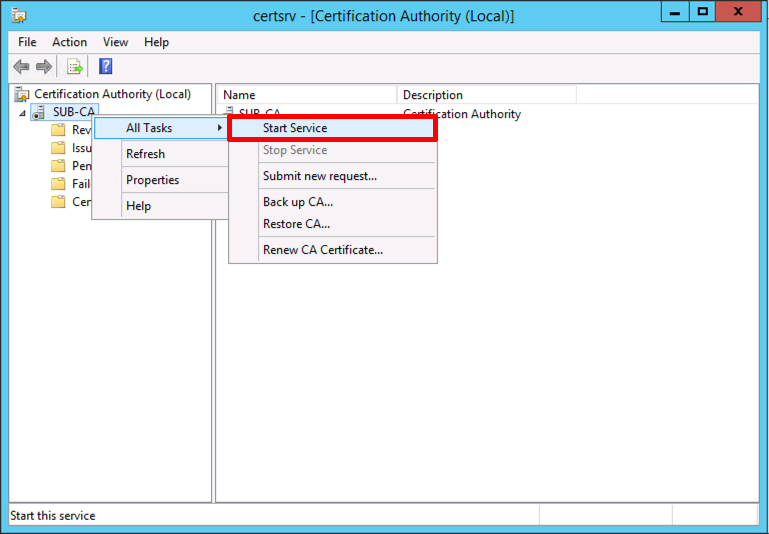
Start the Service (If it errors at this point you may have a problem with your CRL server see the following link for a temporary workaround until you can fix the CRL).
Certificate Services – Disable CRL Checking
Troubleshooting: Open an MMC Snap-in and Add the Enterprise PKI snap-in to point you towards problems.
At this point I like to copy the Sub CA Cert to C:\Windows\Sytem32\Certsrv\CertEnroll. You should see the CRL for the SubCA already there (and maybe a delta CRL like the image below).
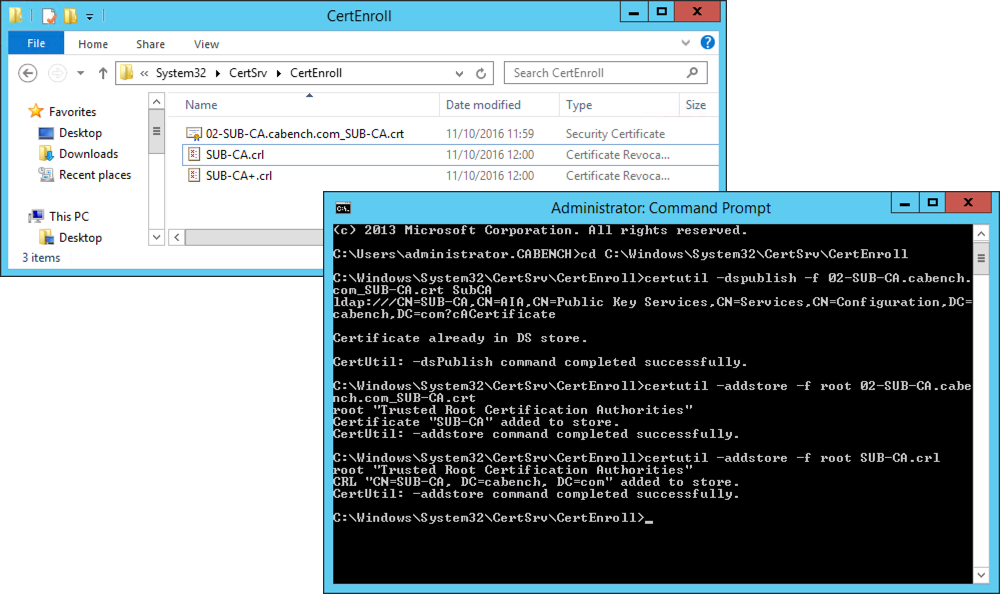
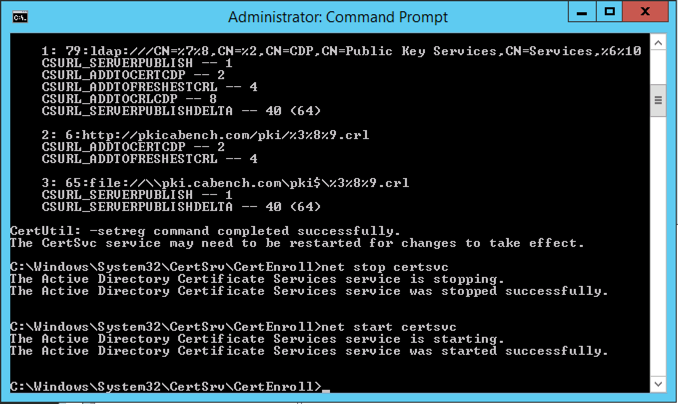
Now we are going to publish those into AD, open an administrative command window and issue the following commands;
cd  C:\Windows\Sytem32\Certsrv\CertEnroll
certutil -dspublish -f SubCA.crt SubCA
certutil –addstore –f root SubCA.crt
certutil –addstore –f root SubCA.crl
certutil -dspublish  SubCA.crl
Restart Certificate Services;
net stop certsvc
net start certsvc
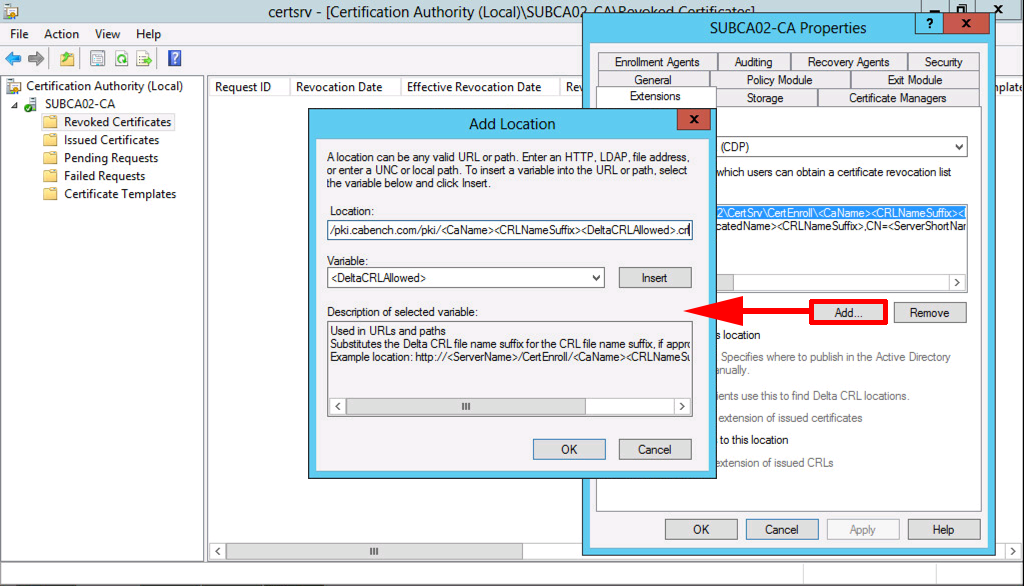
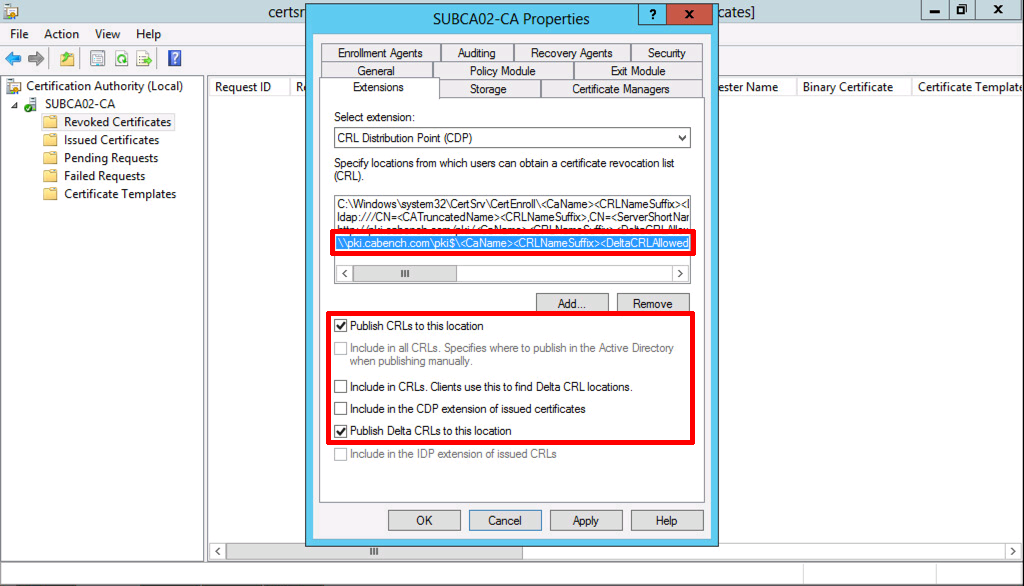
Back in Certificate Services > Properties > Extension > Remove the http and file entries. NOT the ldap or the one that’s pointing to C:\Windows.

With CRL Distribution Point showing > Add > Type in http://pki.{your-domain}/pki/<CaName><CRLNameSuffix><DeltaCRLAllowed>.crl
Note: You can add the variables in to avoid typing them, DON’T FORGET to put .crl on the end!
OK.
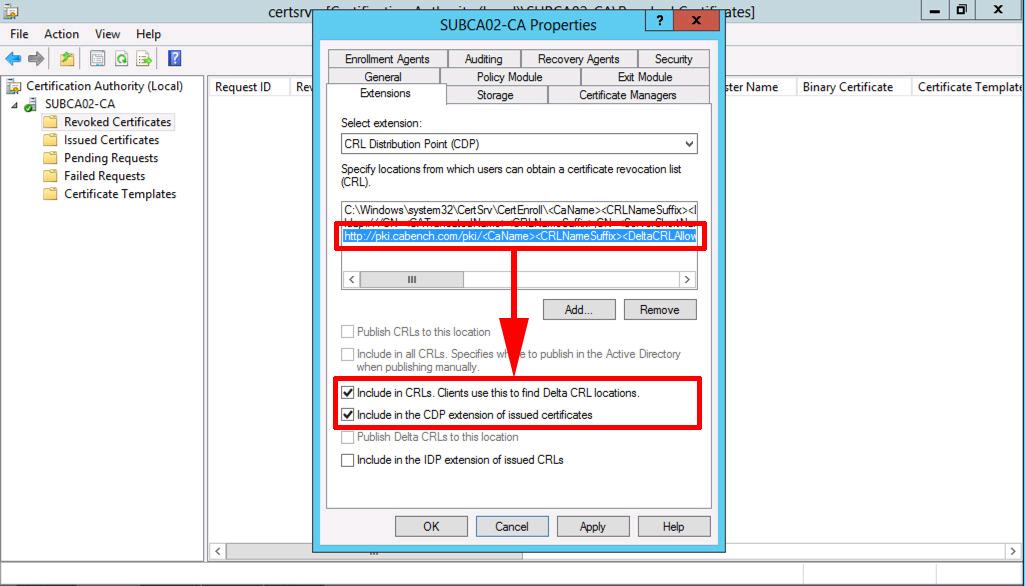
With your new URL selected, tick;
- Include in CRLs. Clients use this to find DeltaCRL locations.
- Include in the CDP extension of issued certificates.
Apply > OK > Services will Restart.
Once Again, click Add, this time type in the UNC path to your hidden PKI share on your CRL Server, e.g.
\\pki.{your-domain}\pki$\<CaName><CRLNameSuffix><DeltaCRLAllowed>.crl
Note: You can add the variables in to avoid typing them, DON’T FORGET to put .crl on the end!
OK.
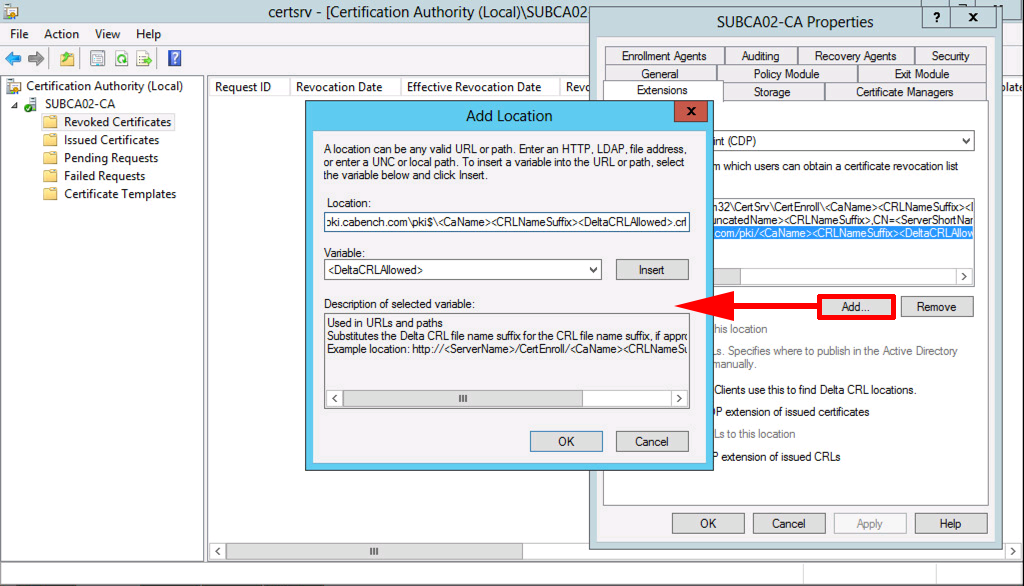
With your UNC path selected, tick;
- Publish CRLs to this location.
- Publish Delta CRLs to this location.
Apply > OK > Services will restart.
That’s your PKI environment stood up and ready to go, you may also want to setup OCSP, see the following article;
Microsoft Certificate Services Configuring OCSP
You can now issue certificates, some of the things you might want to consider setting up are;
Windows Server 2012 – Enable LDAPS
Deploying Certificates via ‘Auto Enrollment’
Windows Server 2012 – Secure RDP Access with Certificates
Install and Configure Certificate Enrolment Policy Web Service
Related Articles, References, Credits, or External Links
NA
22/02/2018
A wonderful articular! Was nice to see something that was descriptive and walked people though the process. This helped a greatly in my deployment!
I think the only thing I would add to the articular was that in the SubCA needs to be joined to the domain, and when you log in, a domain account needs to be used with Enterprise Admin rights. I created a dedicated a PKI “service account” with a complex password for the subCA to use. Not sure that was needed but did not want to use the admin account and have something mess up because of a PW change.
Thanks again!
23/02/2018
Hi Rick, Thanks for the feedback.
Pete
10/03/2020
Hi Pete, thanks for the guide. At the end of this i’m trying to follow your guide to setup OCSP but I’m getting confused regarding the address for it. I’m trying to run the responder from the same server you setup as a CRL server in this guide.
All the instructions for OCSP suggest putting http://pki.servername.com/ocsp however at no point does any guide suggest creating the /ocsp directory. Another guide makes it seem like this is automatically created, but that wasn’t the case for me.
Based off this guide should i actually be pointing it at /pki? or have i just missed a step?
13/03/2020
The directory will get created for you, (if you try and browse to it you might get an error though that’s fine), you would add the OCSP URL as an Extension (like a CRL entry) but you add it as a AIA.
P
01/10/2020
Hello again,
Your article helped me a lot.
I don’t know if I miss, but PKIView was showing an error in the CDP Container tab, because the Sub-CA CRL file was not in the PKI folder on the web server. I copied it there and everything is ok.
Thanx again.
05/05/2021
Thank you Pete, it is a great write.
I was following it and doing the configs to setup a 2019 issuing server, but publishing the SubCA cert in AD is failing. The other three commands are successful tho. I could not find anything helpful on MS forums as fix. Thanks for the help, below is the command and error messages:
certutil -dspublish -f SubCA.crt SubCA
CertUtil: -dsPublish command FAILED: 0x8007003a (WIN32: 58 ERROR_BAD_NET_RESP)
CertUtil: The specified server cannot perform the requested operation
10/06/2023
Thank you Pete for the write up, I have followed several of your articles in the past and they have helped me immensely. I know that this is an older article but I was wondering if you just left the AIA fields on the sub server with defaults or if those should be populated with similar values to the pub?
Thanks again!