
KB ID 0001260
Problem
I’ve covered Cisco IPSEC Remote VPNs a long time ago, and I’ve also blogged about the Cisco IPSEC VPN Client Software. Yes you can get the Cisco VPN Client Working on Windows 10, but can you imagine rolling that out to a few hundred users?
The bottom line is Remote Cisco IPSEC VPN is a dead technology, Cisco, (and Me!) want you to use AnyConnect. For a couple of users you can use the work arounds above, but that wont scale well. So if you don’t want to ditch IPSEC VPN, then you will have to go with third party software to connect to your device. In this example I will use the NCP Secure Entry Client.
Solution
Configure the ASA, I’ve done this to death in the past, (read the links above), so here’s the config (taken from a firewall running version 9.x) to copy and paste in.
!
crypto ikev1 policy 65535
 authentication pre-share
 encryption 3des
 hash sha
 group 2
 lifetime 86400
!
crypto ipsec ikev1 transform-set TS-IPSEC-VPN esp-3des esp-sha-hmac
!
ip local pool PNL-POOL-IPSEC 192.168.198.1-192.168.198.254 mask 255.255.255.0
!
access-list SPLIT-TUNNEL standard permit 192.168.100.0 255.255.255.0
!
group-policy IPSEC-VPN internal
group-policy IPSEC-VPN attributes
 vpn-tunnel-protocol ikev1
 split-tunnel-policy tunnelspecified
 split-tunnel-network-list value SPLIT-TUNNEL
 dns-server value 192.168.100.10
 vpn-simultaneous-logins 3
 default-domain value petenetlive.com
!
tunnel-group IPSEC-VPN type remote-access
tunnel-group IPSEC-VPN general-attributes
 address-pool PNL-POOL-IPSEC
 default-group-policy IPSEC-VPN
 authentication-server-group LOCAL
tunnel-group IPSEC-VPN ipsec-attributes
 ikev1 pre-shared-key Cisco123456
!
crypto dynamic-map DYNAMIC-CRYPTO-MAP 65535 set ikev1 transform-set TS-IPSEC-VPN
!
crypto map CRYPTO-MAP 65535 ipsec-isakmp dynamic DYNAMIC-CRYPTO-MAP
!
crypto map CRYPTO-MAP interface outside
!
crypto ikev1 enable outside
!
object network OBJ-IPSEC-SUBNET
 subnet 192.168.198.0 255.255.255.0
!
nat (inside,outside) source static any any destination static OBJ-IPSEC-SUBNET OBJ-IPSEC-SUBNET no-proxy-arp route-lookup
!
Points to Note:
- I’m using 3DES and SHA1 for Phase 1 (ISAKMP,) and phase 2 (IPSEC).
- The Network behind my ASA is 192.168.100.0/24.
- I’ve allocated 192.168.198.0/24 to my remote VPN clients. (If you have a complicated network, ensure this is routable from the LAN back to the firewall!)
- I’ve enabled split tunnelling.
- My interfaces are called inside and outside, yours might be different!
- Crypto Map Warning: If you already have a crypto map applied to the outside interface use the name of the existing one (i.e NOT CRYPTO-MAP,) or your exiting VPN’s will stop working! Issue a ‘show run crypto map‘ command to check.
- I have not enabled PFS. (If I had it would have been in the crypto map).
Configure NCP Entry Client
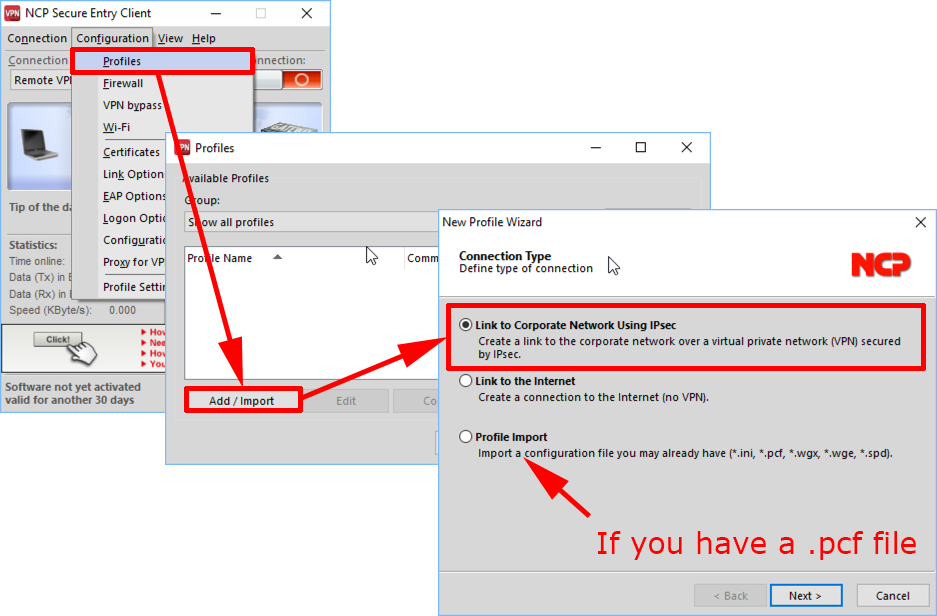
OK it’s not free, but you do get a 30 day trial to give it a test run an see if you like it. Once installed and rebooted launch the software. Configuration > Profiles > Add/Import > Link to Corporate Network Using IPSEC > Next
Note: As indicated below if you have a PCF file you can import that.
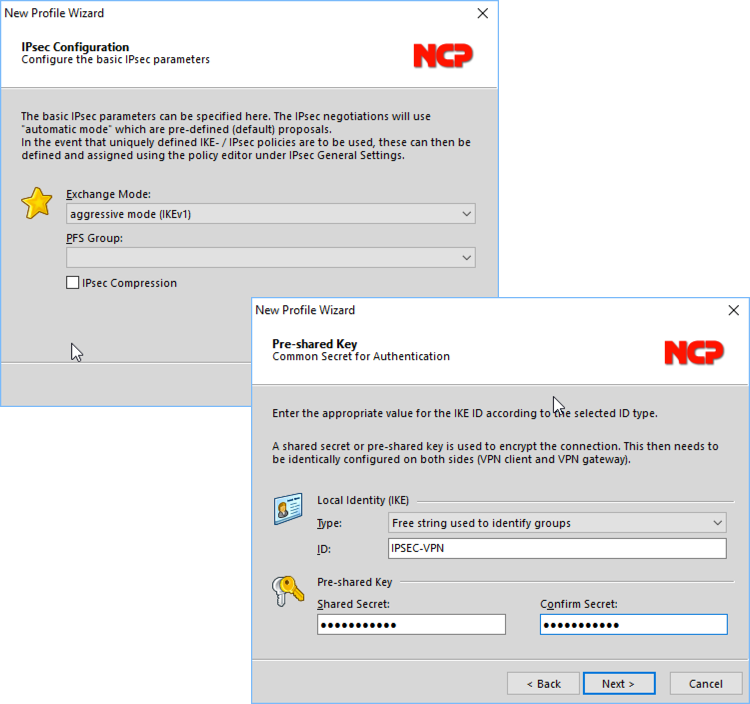
Give the profile a name i.e. ‘Connection to Office’ > Next > Communication Medium = LAN (over IP) > Next > Gateway = Public name or IP of your Cisco ASA > User ID details is the username and password that you need to enter to connect. (Note: Not the Group name and pre-shared key) > Next.
Usernames should be supplied by your firewall admin (tell them to issue a ‘show run | begin username’ command).

Exchange Mode = Aggressive Mode > PFS Group = {blank} > Next > Local Identity IKE Type = ‘Free string used to identify groups’ > ID = {Your Tunnel Group-Name} > Shared Secret = {Your Group Pre-Shared-Key} > Next.
Tunnel group name, and Pre-Shared Keys also need to be given to you by your firewall admin. Ask them to run ‘more system:running-config | begin tunnel-group‘ if they don’t know.
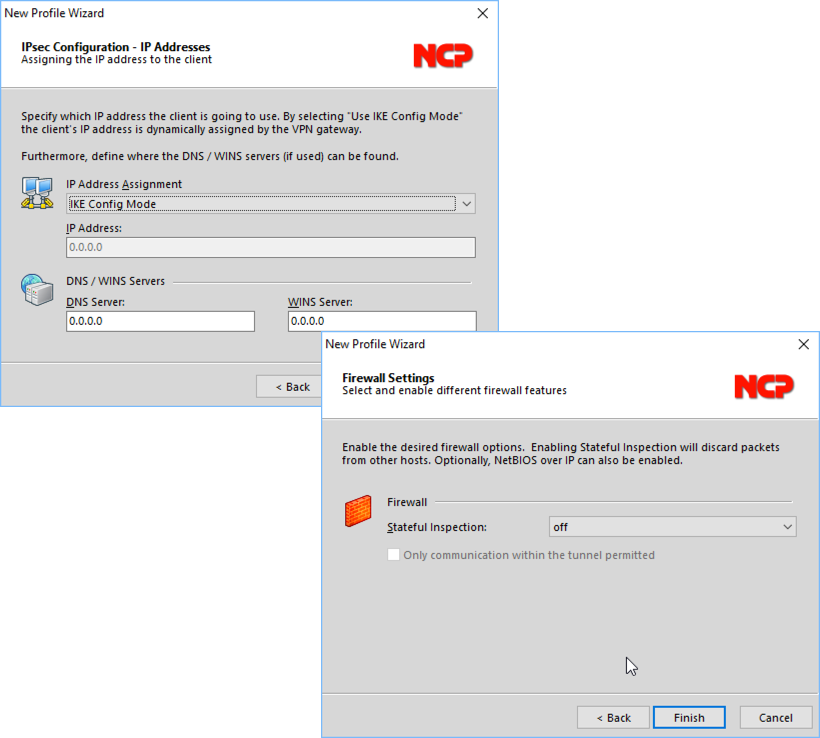
Change IP Address Assignment to IKE Config Mode > Next > Firewall (leave it off) > Finish.
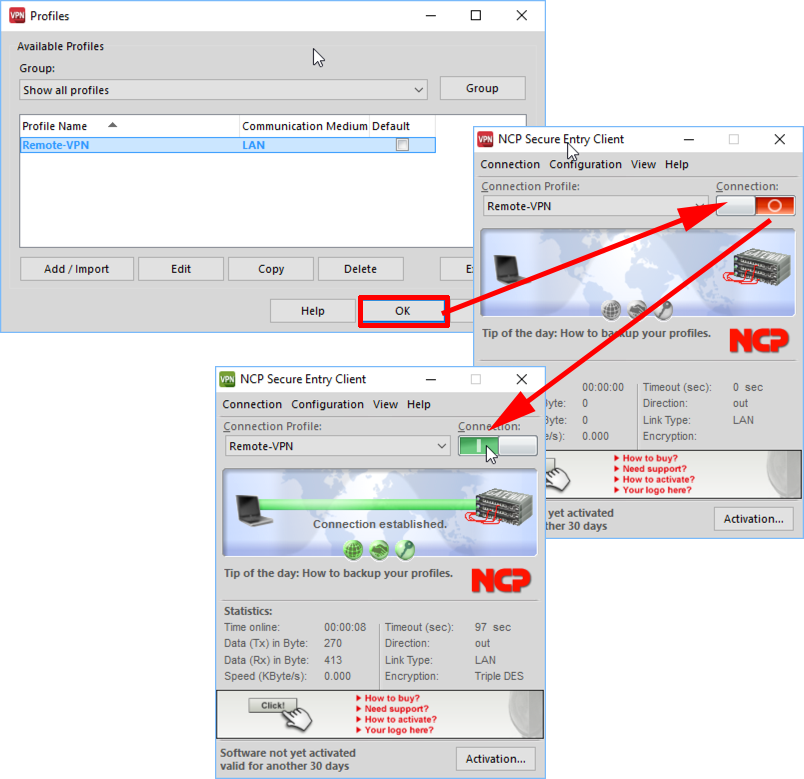
OK > Click switch to enable.
It Wont Work?
On the client you can go to Help > Logbook to see what the problem is.
On the firewall debug crypto isakmp 255 will debug phase 1 and debug crypto ipsec sa 255 will debug phase 2.
Related Articles, References, Credits, or External Links
NA
14/09/2017
HI kindly provide site to site vpn with phase 1 and phase 2 example and call out acls
14/09/2017
Use the search function (top right) See THIS ARTICLE