
KB ID 0001006
Problem
I got an email at work yesterday;
“Hello Pete
I have asked our ISP to give us two additional real IP addresses so that we can progress the following two projects:
- Microsoft DirectAccess
- Publishing documents to a web server from our internal DMS.
{ISP Name} have come back and said that they don’t have the next available numbers in our current IP address range, but they do have two other numbers we could have from another range.
Would that cause any problems with regard to the firewall configuration etc.”
I’ve been asked similar questions before and my answer was always, “No let’s get a bigger range and re-ip the public side of the network”. But I was sat next to my usual font of all routing knowledge Steve, so I asked him what he thought. “It will just work, just NAT the traffic on the ASA, and as long as the ISP has set the routing up properly, the ASA will just proxy-arp the new public IP. We’ve done that for a few clients”.
I’ve not done this before, so before I put my neck on the block, I decided to build it in GNS3 to prove the concept.
Solution
1. I’ve already got a few basic Labs built for testing, here is the one I will use for this.
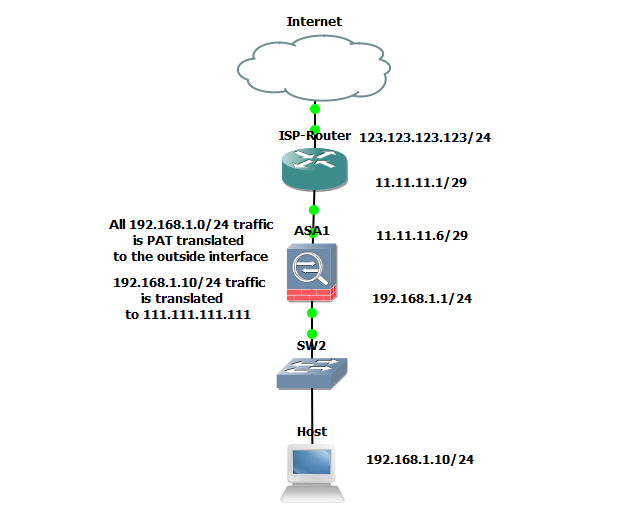
Note the ‘Host’ is really a router (this will become apparent later on). The ASA has a ‘public’ range of 11.11.11.1/29 this gives me 8 IP addresses (6 usable). Let’s assume we have exhausted all of those. and my ISP has given me 111.111.111.0/24 (generous eh!). I want to allocate 111.111.111.111 publicly to my host, (because I have OCD and it looks nice).
When I’ve finished I will test that it has worked by opening a TELNET session to my host from its outside IP 111.111.111.111.
2. Lets make sure that the host can get to the Internet, and then on the ASA observe what public IP address it’s getting.
InsideHost#ping 4.2.2.2
Type escape sequence to abort. Sending 5, 100-byte ICMP Echos to 4.2.2.2, timeout is 2 seconds: !!!!! Success rate is 100 percent (5/5), round-trip min/avg/max = 32/164/568 ms InsideHost#
Observe the results on the ASA
Petes-ASA(config)# show xlate 1 in use, 1 most used Flags: D – DNS, i – dynamic, r – portmap, s – static, I – identity, T – twice ICMP PAT from inside:192.168.1.10/0 to outside:11.11.11.6/41745 flags ri idle 0:00:05 timeout 0:00:30
3. Connect to the ASA > Allow telnet traffic to the host > Setup a One-to-One static NAT translation to the new public IP.
 Petes-ASA# configure terminal
Petes-ASA(config)# access-list inbound extended permit tcp any host 192.168.1.10 eq telnet
Petes-ASA(config)# access-group inbound in interface outside
Petes-ASA(config)# object network OBJ-TELNET-HOST
Petes-ASA(config-network-object)# host 192.168.1.10
Petes-ASA(config-network-object)# nat (inside,outside) static 111.111.111.111
Petes-ASA(config-network-object)# exit
Petes-ASA(config)#
4. Allow Telnet on the ‘host’ router.
5. At this point in a live environment you are reliant on your ISP to route those IP addresses to you. Here I’m going to achieve the same by adding a route on the ISP Router, and then (so I can connect to host), putting a static route on my laptop.

6. Now let’s clear the ‘translations’ on the ASA, and repeat the test we did earlier, hopefully the public IP of our internal host should have changed.
Petes-ASA(config)# clear xlate
On the ‘Host’ Router
InsideHost#ping 4.2.2.2
Type escape sequence to abort. Sending 5, 100-byte ICMP Echos to 4.2.2.2, timeout is 2 seconds: !!!!! Success rate is 100 percent (5/5), round-trip min/avg/max = 32/164/568 ms InsideHost#
Observe the results on the ASA
Petes-ASA(config)# show xlate 1 in use, 1 most used Flags: D – DNS, i – dynamic, r – portmap, s – static, I – identity, T – twice NAT from inside:192.168.1.10 to outside:111.111.111.111 flags s idle 0:00:46 timeout 0:00:00 Petes-ASA(config)#
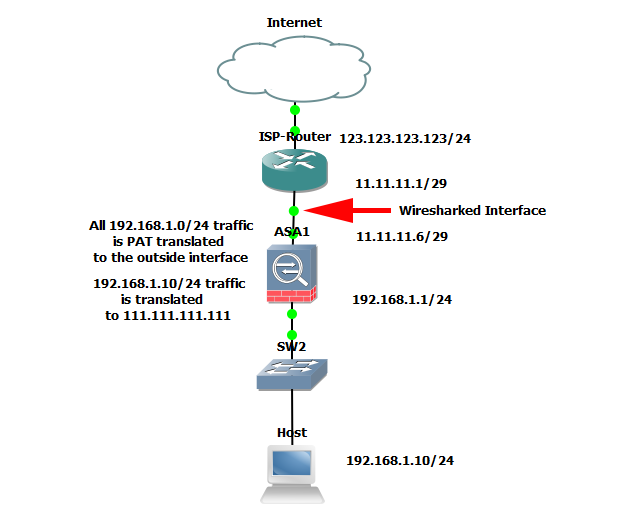
7. Let’s make sure that the correct IP address is being seen, to do that I setup Wireshark to sniff the traffic on the ISP Routers 11.11.11.1 interface.
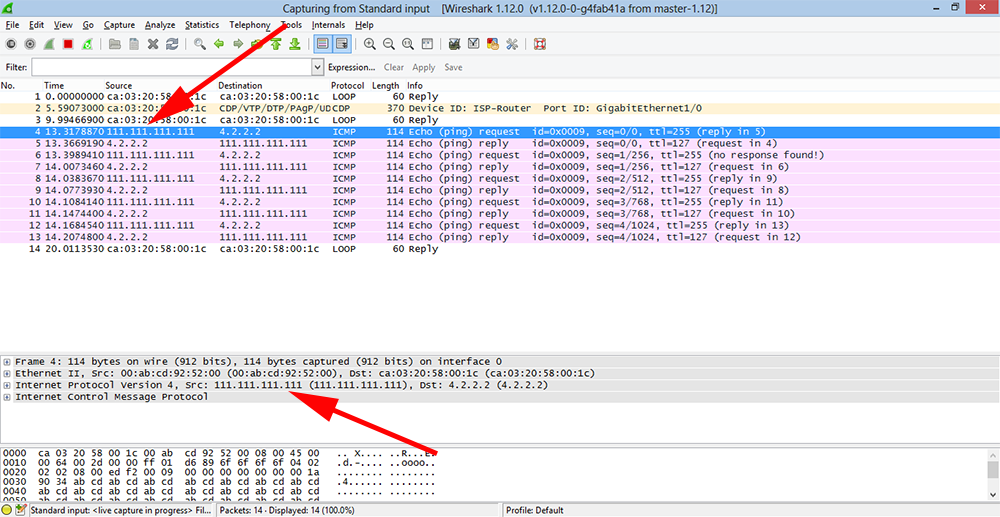
8. Then if I ping 4.2.2.2 from the internal host, and view the traffic capture, I should see the traffic coming from 111.111.111.111 (NOT 11.11.11.6).
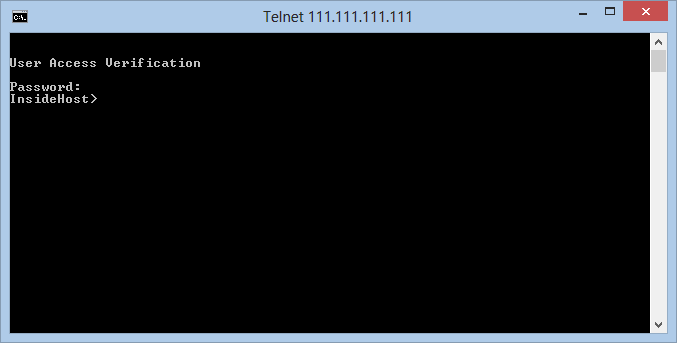
9. Finally I should now be able to telnet from my laptop to the new public IP.
Related Articles, References, Credits, or External Links
NA