
ASA Domain Authentication KB ID 0000973
Problem
I cringed this morning when I was asked about this, last time I had to get a client to authenticate to a domain through a firewall, it was ‘entertaining’. The problem is Windows loves to use RPC, which likes to use random ports, so to make it work you either had to open TCP ports 49152 and 65535 (Yes I’m Serious). Or you had to registry hack all your domain controllers and specify individual ports for RPC as per MS KB 224196, then allow those ports. I have a client that’s got a separate domain in their DMZ and I need to setup a trust with their internal domain, so I started writing the firewall config. Then when I asked the ‘Do you want to open all these ports or simply lock RPC down on all the domain controllers?’ Question, my colleague found ‘dcerpc’ inspection.
Dcerpc has been available since at least ASA version 7.2, I had never heard of it! Cisco Says;
DCERPC is a protocol widely used by Microsoft distributed client and server applications that allows software clients to execute programs on a server remotely.
DCERPC inspection maps inspection for native TCP communication between a server called the Endpoint Mapper (EPM) and client on the well-known TCP port 135. Map and lookup operations of the EPM are supported for clients. Client and server can be located in any security zone. The embedded server IP address and port number are received from the applicable EPM response messages. Because a client can attempt multiple connections to the server port returned by EPM, creation of multiple pinholes is allowed
Heres how to do it with the following topology;
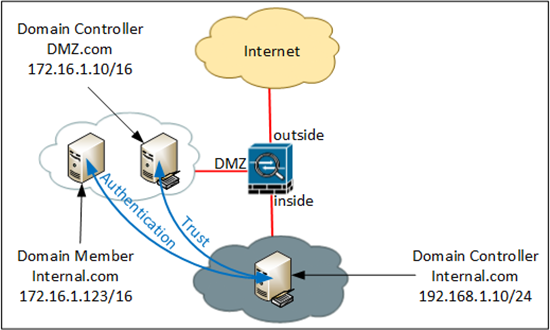
Note: Setting up a ‘Trust’ or allowing a client to ‘Authenticate’ requires the same configuration, but below I will use the IP of the Domain controller, rather than the IP of the client.
Solution : ASA Domain Authentication
I’m assuming you ALREADY have access-lists from your internal network, and from your DMZ, you may need to replace the names of the ACL’s I use below with your own, ‘show run access-group’ will tell you.
1. There are a myriad of ports, (both TCP and UDP) that you are required to open, those being;
- TCP 135 For The Microsoft Endpoint Mapper.
- TCP 464 For Kerberos Password Change.
- UDP 464 For Kerberos Password Change.
- TCP 389 For LDAP
- UDP 389 For LDAP
- TCP 636 For LDAPS (Secure LDAP).
- TCP 3268 For LDAP (Global Catalog).
- TCP 3269 For LDAP (Global Catalog Secure).
- TCP 53 For DNS.
- UDP 53 For DNS.
- TCP 88 For Kerberos.
- UDP 88 For Kerberos.
- TCP 445 For SMB.
So connect to the ASA, Go to enable mode, then global configuration mode, and add the ACL’s to open the ports above. BE AWARE the last line enables ICMP/ping (just for testing you can remove it later and you will need to have ICMP inspection on for it to work).
Type help or '?' for a list of available commands.
PetesASA> enable
Password:**********
PetesASA# configure terminal
PetesASA(config)#access-list outbound permit tcp host 192.168.1.10 host 172.16.1.10 eq 135
PetesASA(config)#access-list outbound permit tcp host 192.168.1.10 host 172.16.1.10 eq 464
PetesASA(config)#access-list outbound permit udp host 192.168.1.10 host 172.16.1.10 eq 464
PetesASA(config)#access-list outbound permit tcp host 192.168.1.10 host 172.16.1.10 eq 389
PetesASA(config)#access-list outbound permit udp host 192.168.1.10 host 172.16.1.10 eq 389
PetesASA(config)#access-list outbound permit tcp host 192.168.1.10 host 172.16.1.10 eq 636
PetesASA(config)#access-list outbound permit tcp host 192.168.1.10 host 172.16.1.10 eq 3268
PetesASA(config)#access-list outbound permit tcp host 192.168.1.10 host 172.16.1.10 eq 3269
PetesASA(config)#access-list outbound permit tcp host 192.168.1.10 host 172.16.1.10 eq 53
PetesASA(config)#access-list outbound permit udp host 192.168.1.10 host 172.16.1.10 eq 53
PetesASA(config)#access-list outbound permit tcp host 192.168.1.10 host 172.16.1.10 eq 88
PetesASA(config)#access-list outbound permit udp host 192.168.1.10 host 172.16.1.10 eq 88
PetesASA(config)#access-list outbound permit tcp host 192.168.1.10 host 172.16.1.10 eq 445
PetesASA(config)#access-list outbound permit icmp host 192.168.1.10 host 172.16.1.10
2. Then we need to allow the traffic from the other direction, again here my ACL is called ‘DMZ’, check and change yours accordingly.
PetesASA(config)#access-list DMZ permit tcp host 172.16.1.10 host 192.168.1.10 eq 135
PetesASA(config)#access-list DMZ permit tcp host 172.16.1.10 host 192.168.1.10 eq 464
PetesASA(config)#access-list DMZ permit udp host 172.16.1.10 host 192.168.1.10 eq 464
PetesASA(config)#access-list DMZ permit tcp host 172.16.1.10 host 192.168.1.10 eq 389
PetesASA(config)#access-list DMZ permit udp host 172.16.1.10 host 192.168.1.10 eq 389
PetesASA(config)#access-list DMZ permit tcp host 172.16.1.10 host 192.168.1.10 eq 636
PetesASA(config)#access-list DMZ permit tcp host 172.16.1.10 host 192.168.1.10 eq 3268
PetesASA(config)#access-list DMZ permit tcp host 172.16.1.10 host 192.168.1.10 eq 3269
PetesASA(config)#access-list DMZ permit tcp host 172.16.1.10 host 192.168.1.10 eq 53
PetesASA(config)#access-list DMZ permit udp host 172.16.1.10 host 192.168.1.10 eq 53
PetesASA(config)#access-list DMZ permit tcp host 172.16.1.10 host 192.168.1.10 eq 88
PetesASA(config)#access-list DMZ permit udp host 172.16.1.10 host 192.168.1.10 eq 88
PetesASA(config)#access-list DMZ permit tcp host 172.16.1.10 host 192.168.1.10 eq 445
PetesASA(config)#access-list DMZ permit icmp host 172.16.1.10 host 192.168.1.10
3. Now create a class-map and set it to inspect TCP port 135.
PetesASA(config)# class-map CM-DCERPC
PetesASA(config-cmap)# match port tcp eq 135
4. Then create a policy-map to use that class map to perform dcerpc inspection.
PetesASA(config-cmap)# policy-map PM-DCERPC
PetesASA(config-pmap)# class CM-DCERPC
PetesASA(config-pmap-c)# inspect dcerpc
PetesASA(config-pmap-c)# exit
5. Finally apply the policy-map to the interfaces with a service-policy.
PetesASA(config)# service-policy PM-DCERPC interface inside
PetesASA(config)# service-policy PM-DCERPC interface DMZ
6. Give it a test, make sure the machines can ping each other, and you may at this point want to remove the ICMP lines from the ACL. Once you are happy, save the changes.
PetesASA# write mem
Building configuration...
Cryptochecksum: 4d7f7ccd 5c55a9e1 6ced12c4 46728bc7
[OK]
PetesASA#
Related Articles, References, Credits, or External Links
NA