
KB ID 0000791
Problem
While putting in a New Exchange 2010 server today, I test moved a mailbox to this new site, and could not get mail to flow to the Exchange 2010 server at the clients main site.

451 4.4.0 Primary target IP address responded with: “451 5.7.3 Cannot achieve Exchange Server authentication.” Attempted failover to alternate host , but that did not succeed. Either there are no alternative hosts, or delivery failed to all alternative hosts.
Mail flowed from the main site to this new site, and internal mail at the new site was fine, but any mail destined for the main site, or going external (because the main site has the only server that can use the Exchange organization send connector) would fail with this error.
Solution
I did a lot of trawling to try and find the answer to this, and discovered lots of reasons for this to happen, so rather than just posting what fixed mine, from the most popular to the most obscure try these in order, and attempt to send mail after each step.
Note: Any change on an Exchange Server’s Receive Connectors should be followed by you restarting the Microsoft Exchange Transport Service (on the server you made the change on) before you try again.
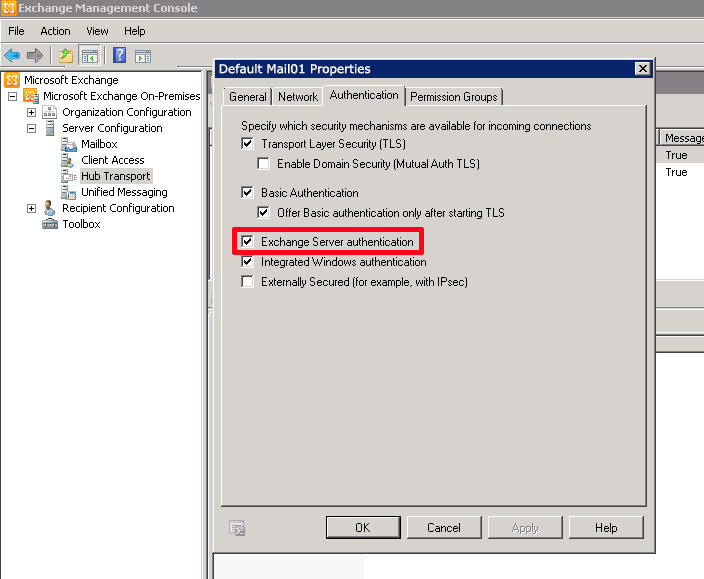
1. On the server you are trying to send TO, check the properties of the Default receive connector and ensure ‘Exchange Server authentication’ is selected.
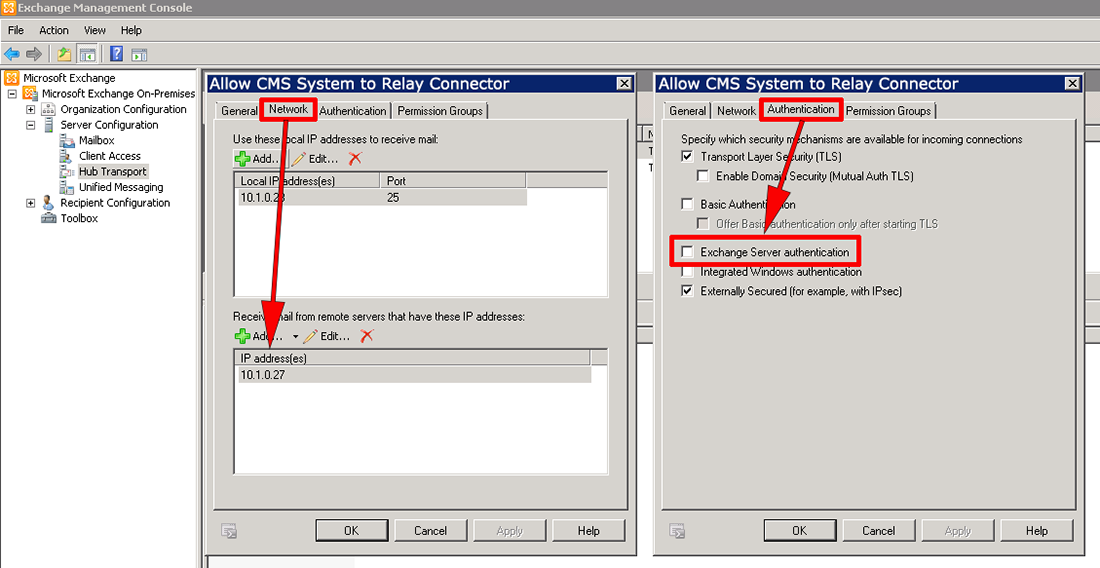
2. On the server you are trying to send TO, If you have a connector configured to ‘relay’ mail, make sure that the server(s) or network specified DOES NOT include the IP address of the server you cannot send FROM. Also Make sure on the authentication tab ‘Exchange Server authentication’ is NOT selected.
3. If you have Cisco PIX Firewalls between these two mail servers (running version 6 or earlier) make sure smtp fixup is disabled.
Petes-PIX>
Petes-PIX> enable
Password: *******
Petes-PIX# configure terminal
Petes-PIX(config)# no fixup protocol smtp 25
Petes-PIX(config)# write mem

Building configuration...
Cryptochecksum: f59a9bd3 3129b8bc 474b2415 52f2db0f

1049 bytes copied in 0.430 secs
[OK]
4. If you have Cisco ASA Firewalls between these two mail servers, then remove esmtp from the default inspection map.
Cisco ASA Disable ESMTP Inspection
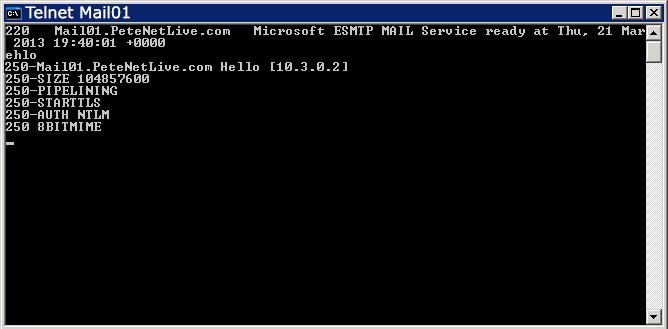
At this point I admitted defeat and picked up the phone and called Microsoft. One of their support engineers looked at the connectors and settings, and tested the DNS, had me create a new connector, still mail refused to flow. He did however get me pointed in the right direction. When attempting to Telnet to the Exchange server on the main site this is what we saw;
This is what we should be seeing;
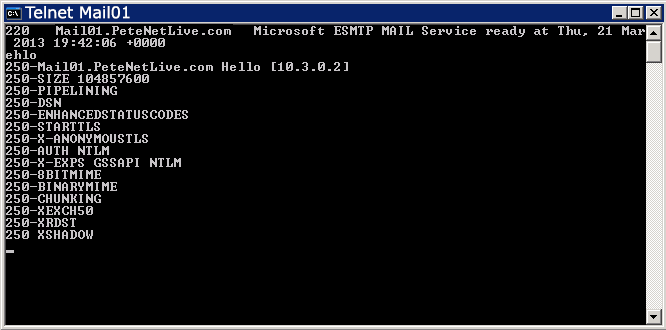
Eureka!
I put all the firewalls in, so I know how they are configured, and I know this client has a CSC module in the ASA 5510 at the mail site, I managed to get the output above by rebooting that module, as soon as it was back online we reverted to the short list again. Also while the CSC was rebooting all the mails stuck on the outbound queue cleared.
Enabling CSC Bypass for a Remote Mail Server
Note: Your class-maps, and access-lists may have different names but this should point you in the right direction.
1. Connect to the ASA, view the policy-maps in use.
Petes-ASA# show run policy-map
!
policy-map type inspect dns preset_dns_map
parameters
message-length maximum 512
policy-map global_policy
class inspection_default
inspect dns preset_dns_map
inspect ftp
inspect h323 h225
inspect h323 ras
inspect rsh
inspect rtsp
inspect sqlnet
inspect skinny
inspect sunrpc
inspect xdmcp
inspect sip
inspect netbios
inspect tftp
inspect icmp
inspect pptp
inspect ip-options
class global-class <<<<< Here we go
csc fail-open <<<< This is the one we are looking for
!
Petes-ASA#
2. We can see the class-map the CSC is using is called ‘global-class’, let’s take look at that.
Petes-ASA# show run class-map global-class
!
class-map global-class
match access-list global_mpc <<<< Here's how its being applied
!
3. Now we know that’s being applied with an access-list called global_mpc, let’s see what that’s doing.
Petes-ASA# show run access-list global_mpc
access-list global_mpc extended deny ip host 10.1.0.253 any
access-list global_mpc extended permit tcp any any object-group DM_INLINE_TCP_1
Petes-ASA#
Note: Remember permit means inspect and deny means don’t inspect, you can see mine’s set not to scan the CSC update traffic because that’s good practice;
Cisco CSC Module – Stop it scanning its own update traffic
4. So I just need to add in the IP of the Exchange server I cannot send from to make its traffic bypass the CSC Module. Remember to put it at the top so it gets processed before the permit or it will get ignored.
Petes-ASA# configure terminal
Petes-ASA(config)# access-list global_mpc line 1 extended deny ip host 10.3.0.2 any
5. Finally save the changes.
Petes-ASA(config)# write memory
Building configuration...
Cryptochecksum: aab5e5a2 c707770d f7350728 d9ac34de
[OK]
Petes-ASA(config)#
Related Articles, References, Credits, or External Links
Thanks to Jeebu Mathew at Microsoft for his assistance, and pointing me in the right direction.