
KB ID 0000525
Problem
Today, I am pleased to say we have the work of guest poster Hesan Javed, who runs through an Exchange 2007 CCR to Exchange 2010 HA Migration.
Solution
Steps Required.
Exchange 2007 HUBCAS Upgrade to SP3
Exchange 2007 Mailbox Upgrade to SP3
Installing Exchange 2010 SP1 HUBCAS after Upgrading Exchange 2007 to SP3
Uninstalling Exchange 2007 from the Passive node in the Cluster
Installing Exchange 2010 SP1 Mailbox Server
Migrating from Exchange 2007 to Exchange 2010
Implementing DAG (Database Availability Group)
Installing HAProxy in VMware Environment
Hello and Welcome to All who are reading this page. Many administrators out there are looking for guides to migrate their current CCR (Exchange 2007) environment to High Availability in Exchange 2010 SP1. In this article of mine, I will be covering the complete migration steps from Exchange 2007 Environment to Exchange 2010 environment with Existing Hardware. At the end, I will be showing how to configure the Exchange 2010 CAS Array with the help of the free Load Balancer (HAPROXY). Even though a good article is present on their website, I thought that if you will find everything in one place will be a bit stress release.
First of all, a brilliant article series is written by Mr. Henrik Walther about how to implement the CCR Cluster which can be found here, please go through this article series and you will be able to implement and understand the CCR operation. The HAProxy free OVF for the VMware Environment can be found here, download this and extract the zip file, it will give you two files, one will be with the name (Exchange 2010 HAProxy Virtual Load Balancer.ovf) and the second file will be with the name of (Exchange 2010 HAProxy Virtual Load Balancer.vmdk). Once extracted you have to import these files into your VMware Infrastructure I will show you how.
My whole Lab Environment is based on VMware ESXi 5.0, so if you would like to have your environment with VMware as well, you can download the Free version of ESXi 5.0 available on the VMware download site. You will have to register once (free registration) and download the .iso file. A license key will be emailed to your provided email address.
First of all let me show you my Environment
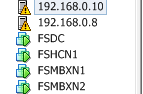
This is my current environment, with 2 ESXi hosts and 4 VM’s. Let me tell you the Roles installed on each machine.
- FSDC – Active Directory Server (Windows 2008 SP2)
- FSHCN1 – HUB Transport and Client Access Server. (Windows 2008 SP2)
- FSMBXN1 and FSMBXN2 – The Mailbox Servers. (CCR CLUSTER). (Windows 2008 SP2)
I will be upgrading the existing environment to Exchange 2010, but now you will think that I don’t have a second Exchange 2010 HUBCAS Server, so how will I maintain the HUBCAS uptime. We need to add a new virtual machine in our environment with Windows 2008 R2 SP1, join it to the domain, and we will install the HUBCAS Role of Exchange 2010 SP1 on this VM.
Before installing the role of Exchange 2010 HUBCAS we have to prepare the active directory by issuing following commands.
To run this command you mount the DVD of Exchange 2010 on the Domain controller or our newly created EX2010HCN1 VM. I ran it on the EX2010HCN1 machine and the output is as follows:

As you can see, that the status is failed, it failed because, this machine is not a domain controller and to update the schema it needs the ldifide.exe which can only be achieved by adding the feature RSAT-ADDS as shown in the powershell below.
After you have installed the required role and restarted the machine, run the command again and this time it should complete. Once this is done, now is the time to run the setup for Exchange 2010 HUBCAS Server installation on our Windows 2008 R2 machine. But before you can start the Exchange 2010 Installation you have to (MUST) upgrade all the Exchange 2007 Servers to SP2 at least, in my case I will be upgrading all the Servers to SP3. So lets have a look at the process of upgrading the Exchange 2007 Servers to SP3. But I will be writing about some errors also which I faced during the Upgrade. These errors are very common and many times my Colleagues also face them so I thought of listing them down.
Exchange 2007 HUBCAS Upgrade to SP3
So now we have to install SP3 on our Exchange 2007 HUBCAS Server. This can take up to 1 hour, depending on the machine you are working on. In my case it took about an hour.
NOTE: Once the installation is completed, you might get an error on the Finalization part; the error could be on MSExchange Transport Service not coming to running state. (This happens mostly when you did not disable IPv6 at the beginning of the Exchange 2007 Installation). Good technique would be to follow the guide from Microsoft to Disable IPv6 or this, behavior is normal, you just have to restart the machine and the service will come to the running state. It just needs some time to discover the exchange environment. (As it is said, many problems from Microsoft are resolved after a reboot).
Exchange 2007 Mailbox Upgrade to SP3
Before we start upgrading our Mailbox Servers, we have to make sure that the Clustered Mailbox is on the active node (FSMBXN1) in the cluster, as we will start working with Passive Node (FSMBXN2) Upgrade. This is to be done, because you don’t want your management to call you and start complaining about the Email services unavailability. Any normal IT Admin like me would just double click the setup.exe file and think that the upgrade can be done like that, (I am not sure about if it could be done through GUI), but the only way that I found out is through the command prompt.
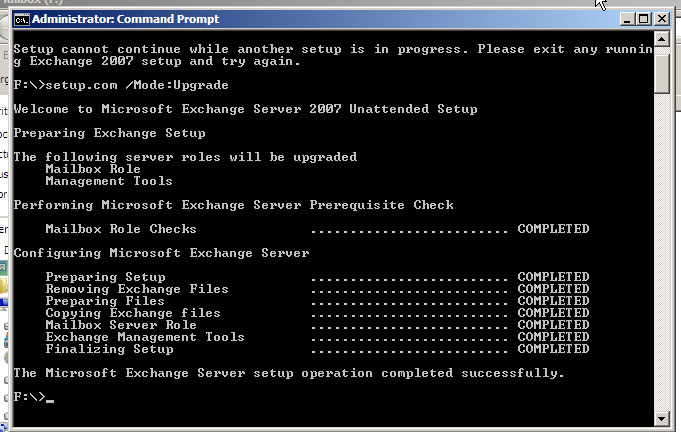
Open the command prompt and type the drive letter name where the SP3 is extracted, in my case (d:) and press enter. The prompt will change and now you should be in your drive. Once there you should run the following command:
The end result will be like this: (FSMBXN2-Passive Upgraded to SP3)
Now is the time to shut down the Cluster. This can be achieved by going on the Passive Node (FSMBXN2) which was just upgraded and issuing the following command from the exchange PowerShell:
You can get the name of your CMS name by typing the following command:
Once you run the Stop Command you will get a message to confirm to perform the action, just enter Y and press Enter.
After Stopping the CMS on the node, we have to move it to the Upgraded Node (FSMBXN2) (in offline mode Don’t bring it online, it should come online automatically). To move the CMS from one Node to the other Node we have to run the following command:
Press Yes at the warning.
Now, our CMS is on the Upgraded Node (FSMBXN2) and we have to upgrade our CMS we can achieve this by issuing the following Command:
In my environment it took around 15 minutes and after this the Cluster was online on FSMBXN2. Now we have to upgrade the Second node (FSMBXN1) which was active. Again I issued the same command (Setup /mode:upgrade). It upgraded my node and then after the upgrade I had an error.
Note: During the upgrade of the second node in CCR your upgrade might fail and you will get error like this:
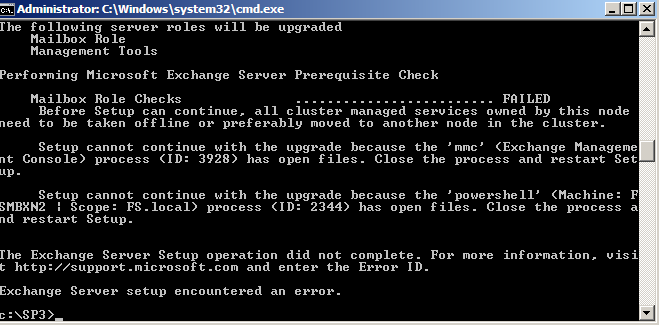
Don’t worry, just close the exchange management console if you have that opened and the exchange management shell as well and then re-run the upgrade. If after closing the exchange management console and the Shell, you still get the error you have two options here:
- Either move the Quorum Owner by command to the Upgraded Node.
- Or restart the machine that you are about to upgrade, this restart will automatically move the Quorum owner to the upgraded Node. (Easy and effective).
Installing Exchange 2010 SP1 HUBCAS after Upgrading Exchange 2007 to SP3
Insert the Exchange 2010 DVD into DVD drive. When the DVD Auto Plays , click Run Setup.exe under Install or run program. If Auto Play is disabled, navigate to the root of the DVD and run Setup.exe. Alternatively, browse to the location of your Exchange 2010 installation files and run Setup.exe. On the Introduction page, click next.
On the License Agreement page, review the license terms. select I accept the terms in the license agreement, next.
On the Error Reporting page, select Yes / No (as required) to enable the Exchange Error Reporting feature, next.
On the Installation Type page, select Custom Exchange Server Installation. (Note: For Exchange 2010 SP1, you can select to automatically install all required Windows roles and features for this server). You can also change the installation path for Exchange 2010, click Browse, locate the target folder, and then click OK. Click Next.
On the Server Role Selection page, select Client Access Role, and Hub Transport Role click Next. The Management Tools , which installs the Exchange Management Console and Exchange Management Shell, will also be selected and installed.
Now, as our Exchange 2007 Environment is with SP3, and we have installed our Exchange 2010 HUBCAS Server in the environment, is the time to Uninstall the Exchange 2007 SP3 from the Passive Node and Evict this node from the Cluster and install a fresh Windows 2008 R2 on this Machine.
Uninstalling Exchange 2007 from the Passive node in the Cluster
For the purpose of this Uninstallation I have moved the Cluster on FSMBXN1 and our Passive node is FSMBXN2.
Uninstallation Steps are pretty much easy. You have to go to Control Panel > Program and Features > Click Exchange 2007 and Click Uninstall. Uncheck all the items installed and after some time the Un-Installation will be complete.
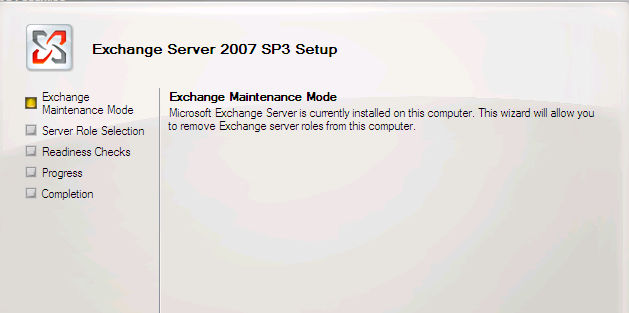
On the maintenance page click Next.

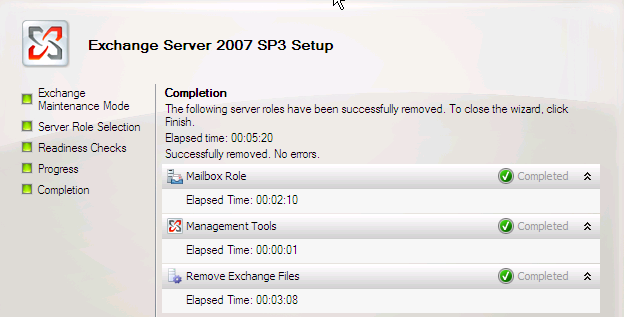
On the Server Role Selection page, uncheck the Passive Clustered Mailbox Role and Management Tools, and Click Next and then click Uninstall. The uninstallation will take some time and at the end this is what you will get
Now we have to stop the cluster service and remove the Node from the Cluster (We have to do this from the Failover Cluster Manager). And then we can format the machine and install windows 2008 R2 on that.

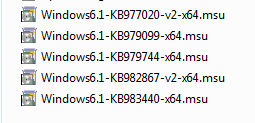
Right-Click the node and first stop the cluster service and Right-Click again on the same node and click Evict. Than you can format the Machine and install Windows 2008 R2. Prepare the Newly formatted machine with all the Updates required for the installation of Exchange 2010 SP1. The updates required are as follows:
Installing Exchange 2010 SP1 Mailbox Server
We uninstalled Exchange 2007 from FSMBXN2 and formatted that Server with Windows 2008 R2. Now is the time to install Exchange 2010 Sp1 Mailbox Server. The steps are pretty simple:
- Put the Exchange 2010 SP1 DVD in the Server.
- Run the Setup
- Accept the License Agreement.
- Select the only the Mailbox Role to be installed.
- It will take around 20 to 30 minutes for the Installation (depending on the Machine you are working on).
- Once done just click finish and Restart the Server.
Migrating from Exchange 2007 to Exchange 2010
To start the migration, we have to move the mailboxes from Exchange 2007 to Exchange 2010. This can be achieved from the following steps:
- Go to Recipient Configuration
- Click Mailbox, on the right hand side you will see the list of users.
- Right Click the users one by one or Select all the users with Ctrl-A and then Right Click and select local move request.
- When you will click local move request, you will be given option for the mailboxes where to move. Select the Mailbox which resides on Exchange 2010 Sp1. And go through the rest of the options.
- If you feel that there might be some corrupted messages in the mailbox, you can set the count for the corrupted messages.
Once the mailbox move has been completed we have to do move the Offline Address Book Generation to this New Exchange 2010 Server. To do this:
- Go to Organization Configuration.
- Click Mailbox and on the right hand side you will see the tab for Offline Address Book.
- You will see, Offline Address book listed there. Right Click on the address book and select Move.
- Once you click Move, you will be given the options for Servers that you want to move the generation on. Select the Exchange 2010 Server.
- After moving click Update.
Once the generation has been shifted to Exchange 2010 Server, now is the time to Replicate you Public Folders if any to Exchange 2010 Servers. To do this:
- Click Tool book in Exchange 2010 Management Console.
- Double Click Public Folder Management Console and follow the pictures below.
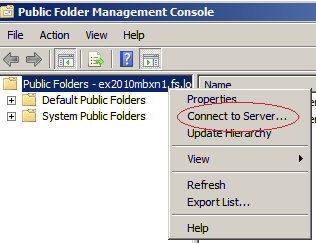
- After clicking the connect server type the Name of the Exchange 2007 CCR Cluster (FSMBX1) and click connect.
- Once connected you will be on a page like below:
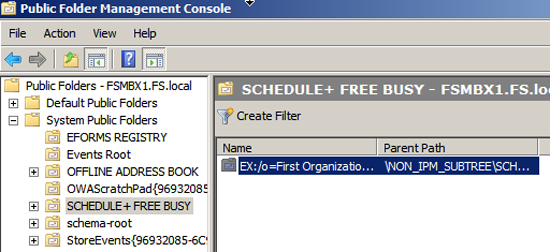
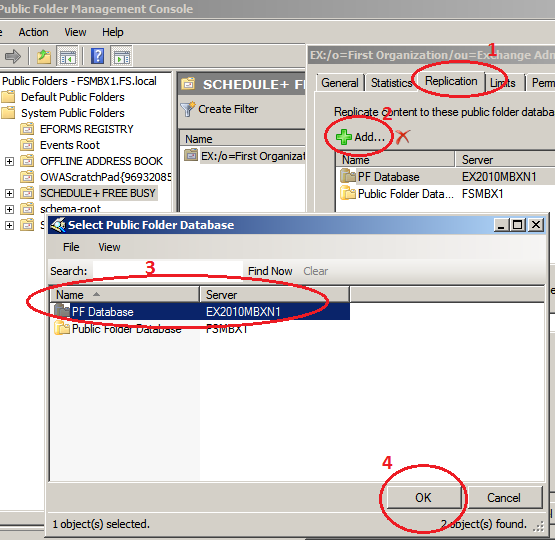
As I am not having public folders, my only concern is the Schedule + Free Busy information to be replicated to Exchange 2010. To do this Right click on the Folder being shown in the right hand console and click Properties, you will be brought to the page below:
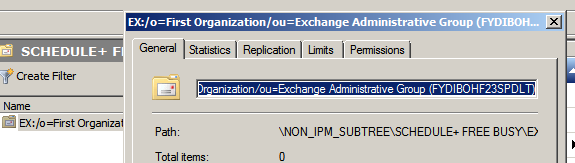
Click on the Replication Tab and click ADD and then select the Exchange 2010 Mailbox Server Name:
It’s better if you follow the rest of the Article from here.
Now I am assuming that our Exchange Mailboxes have been migrated from 2007 to 2010 and are working fine. Now is the time to uninstall Exchange 2007 from our environment. So let’s do that. To uninstall Exchange 2007 from our Environment we have to go to our node FSMBXN1 and open the command prompt and issue the following command:
or be specific as shown in the command prompt below
This will take some time and you will be getting the result as follows:

Now, our uninstallation is complete and we can carry on to un-join the Server from the domain and format it. Once your new machine with Windows 2008 R2 is up and running we have to rename the machine as you like, join it to the domain and install all the necessary updates for the installation of Exchange 2010 SP1 and at the end install Exchange 2010 SP1 Mailbox role.
Now let me give you a brief of my Exchange 2010 Environment.
I have the following servers having Exchange 2010 Installed:
- EX2010FSHCN1 (IP = 192.168.0.7)
- EX2010FSHCN2 (Will be added later)
- EX2010FSMBXN1 (Public=192.168.0.8 and Private=11.11.11.1)
- EX2010FSMBXN2 (Public=192.168.0.9 and Private=11.11.11.2)
- HAPROXY (Management IP=192.168.0.12 and Load Balanced IP=192.168.0.13)
Implementing DAG (Database Availability Group)
As we have finished installing Exchange 2010 SP1 Mailbox Role on the Second node as well, now is the time to create DAG (Database Availability Group). A good article from Mr. Henrik Walther is present at this Site. Follow this article and you will have complete and better understand how DAG can be Implemented and Managed.
I will just be covering the steps of creating the DAG:
- Under Organization configuration go to Mailbox.
- When you have selected mailbox, on your right hand side, you will see, Database Availability Group Tab. Select this TAB.
- Then you will see the option of New DAG on extreme right hand side. Click this.
- When you will click the option, you have to type the Name of the DAG. Not necessary to type the Witness server and witness directory, as the setup will automatically locate a HUBCAS Server and create the Directory in that. You can make sure of this, by going to the properties of your newly created DAG.
- Now, we need to assign a Static IP Address for the DAG. This can be done by going to the properties of DAG and click the IP Address Tab and click ADD and type the IP address that you want to use for DAG.
- Once that is done, you have to close the EMC or go back to Database TAB and refresh. Once refreshed, you have to add a Database Copy to the Second Member for the High Availability.
- To add a database copy to the second server in the DAG, you have to right click the Database for which you want a second copy, and click Add Database Copy. The wizard will ask you for the Target Server, click browse and then select the server where you want the copy to be created.
- The wizard will take some time to create the copy and once that is done, you are up with your Exchange Mailbox Servers and your mailboxes are on Full availability.
Installing HAProxy in VMware Environment
In the beginning of the article I have mentioned the links from where you can download the OVF file for VMware. If you have downloaded that, now is the time to add that OVF file into VMware Environment and finish our job. Usually Client Access Servers High Availability is obtained by NLB (Network Load Balancing), But if we deploy HAProxy in our Environment, we don’t have to create the CAS Array based on NLB. We just have to deploy the CAS Servers in our Environment and Add the IP Addresses of all the CAS Servers in the HAProxy Management and HAProxy will automatically load balance the CAS Servers.
After downloading the HAProxy OVF file, open the VSpehre Client and connect to the ESXI Server where you want to import the VM. I have a VMware High Availability Cluster in my environment so I will be deploying the OVF in the cluster. Of Corse in the cluster also you have to choose on which ESXi Server I should be hosting the Machine.
Click File -> Deploy OVF Template:
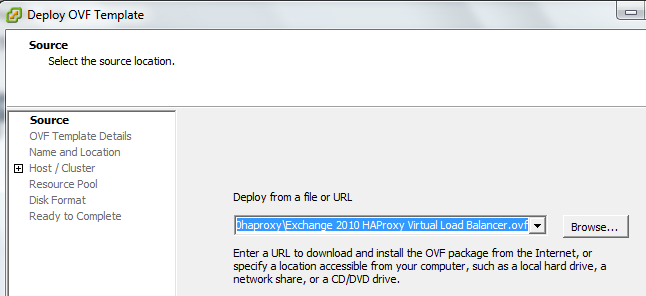
When you will click OVF Template
- You have to browse to the location on your local machine where you have extracted the Zip file.
- Once you are at the location click Next, Accept the license agreement and click Next.
- Type the name of the Virtual Machine and click the Server where you want the Machine to be placed.
- Then in one step it will ask you where to keep the VM files, you have select the Datastore where you want the VM to be. It will be better if you place it in a Volume accessible by all the hosts in a Cluster.
- Select the Disk Format of the Storage, i selected thin format.
- Click next and you are done.
Once the machine is imported you can power it on.
Once you start the machine you have to login with Username (root) and Password (setup). Login and configure the Management IP address, give the password for the user (admin). Give a load balanced IP Address and give the IP Address for the First CAS Server in the Site. Later when you will add more CAS Server you can add the IP Addresses of those CAS Servers as well.
Related Articles, References, Credits, or External Links
Download Hesan’s Outstanding article in .pdf format.
Migrating from Exchange 2007 to Exchange 2010 Sp1