
KB ID 0000249
Problem
I’ve had my trusty Reatogo Boot CD in the back of my CD wallet for a few years now, I thought it was about time I put that sort of functionality on a flash drive, and as we have Windows PE 3.0 now I though that was the best option.
Solution
Before you start you are going to need…
1. A flash drive (obviously), I’m using a 16GB flash drive, but you can get away with 4GB, though to be honest I’d recommend you start at about 8GB.
2. A copy of the Windows 7 WAIK download it here.
3. A copy of Nu2menu download it here.
Step 1 Make your USB Drive “bootable”
1. On your PC, while logged on as an administrator, Start > cmd {enter}
2. Enter the following commands,
diskpart
list disk
select disk *
clean
create partition primary
select partition 1
active
format quick fs=fat32
assign
exit
Note REPLACE the asterisk above with the disk number for your USB drive (see example below), in that case it is “disk 5”.

Step 2 Install Windows PE on your USB Drive.
1. Download and install the Windows Automated Install Kit for Windows 7 (link).
2. Click Start > All Programs > Microsoft Windows AIK > “Deployment Tools Command Prompt.”
3. Decision time: Do you want x32 or x64 Bit Windows PE? You can install either, but as I work on some OLD PC’s sometimes, so I’m going to stick with x32, here’s the commands to set up either,
For x32 bit (x86)
copype.cmd x86 c:winpe_x86
copy c:winpe_x86winpe.wim c:winpe_x86ISOsourcesboot.wim
Dism /Mount-Wim /WimFile:C:winpe_x86ISOsourcesboot.wim /index:1 /MountDir:C:winpe_x86mount
Dism /image:C:winpe_x86mount /Add-Package /PackagePath:"C:Program FilesWindows AIKToolsPEToolsx86WinPE_FPswinpe-wmi.cab"
Dism /image:C:winpe_x86mount /Add-Package /PackagePath:"C:Program FilesWindows AIKToolsPEToolsx86WinPE_FPswinpe-hta.cab"
Dism /image:C:winpe_x86mount /Add-Package /PackagePath:"C:Program FilesWindows AIKToolsPEToolsx86WinPE_FPswinpe-scripting.cab"
copy "C:Program FilesWindows AIKToolsx86imagex.exe" C:winpe_x86mountWindowsSystem32imagex.exe
Dism /unmount-Wim /MountDir:C:winpe_x86mount /Commit
For x64 bit
copype.cmd amd64 c:winpe_amd64
copy c:winpe_amd64winpe.wim c:winpe_amd64ISOsourcesboot.wim
Dism /Mount-Wim /WimFile:C:winpe_amd64ISOsourcesboot.wim /index:1 /MountDir:C:winpe_amd64mount
Dism /image:C:winpe_amd64mount /Add-Package /PackagePath:"C:Program FilesWindows AIKToolsPEToolsamd64WinPE_FPswinpe-wmi.cab"
Dism /image:C:winpe_amd64mount /Add-Package /PackagePath:"C:Program FilesWindows AIKToolsPEToolsamd64WinPE_FPswinpe-hta.cab"
Dism /image:C:winpe_amd64mount /Add-Package /PackagePath:"C:Program FilesWindows AIKToolsPEToolsamd64WinPE_FPswinpe-scripting.cab"
copy "C:Program FilesWindows AIKToolsamd64imagex.exe" C:winpe_amd64mountWindowsSystem32imagex.exe
Dism /unmount-Wim /MountDir:C:winpe_amd64mount /Commit
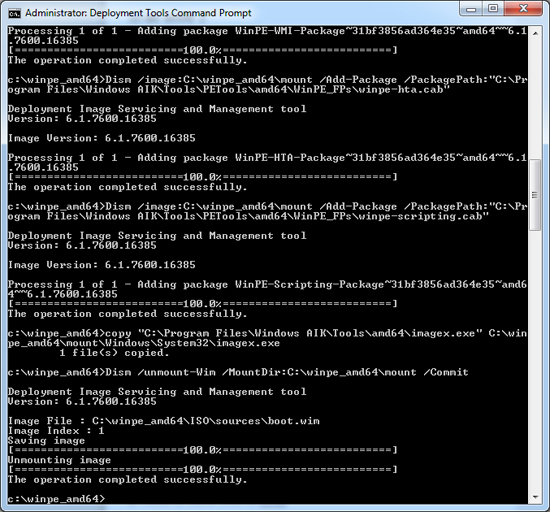
4. Finally copy the contents or either c:winpe_amd64iso or c:winpe_x86iso to your flash drive.
Step 3 Test it!
Make sure you have a machine that can boot to USB and make sure the drive works.
OK, so it’s not very exiting, to start making it a bit more useful i’m going to use Nu2Menu.
Step 4 – Working with your Windows PE Drive.
The way your drive works is, it mounts a Windows image (called boot.wim) when it loads, so to make changes you need to alter that image. You do that in a 3 STEP process, you Mount the image (which puts a copy in a folder on your computer), then you edit the COPY of the image that’s in that folder, and finally you UNMOUNT the image and COMMIT your changes.
1. I’m assuming your USB drive has the drive letter G: (yours will probably be something else). Mount your windows image by doing the following > Click Start > All Programs > Microsoft Windows AIK > Deployment Tools Command Prompt.
2. Execute the following commands,
mkdir c:TEMP_IMG
imagex /mountrw G:sourcesboot.wim 1 c:TEMP_IMG

3. Now navigate to c:TEMP_IMG folder, Open Windows > System32 > Create a new file and call it “winpeshl.ini”
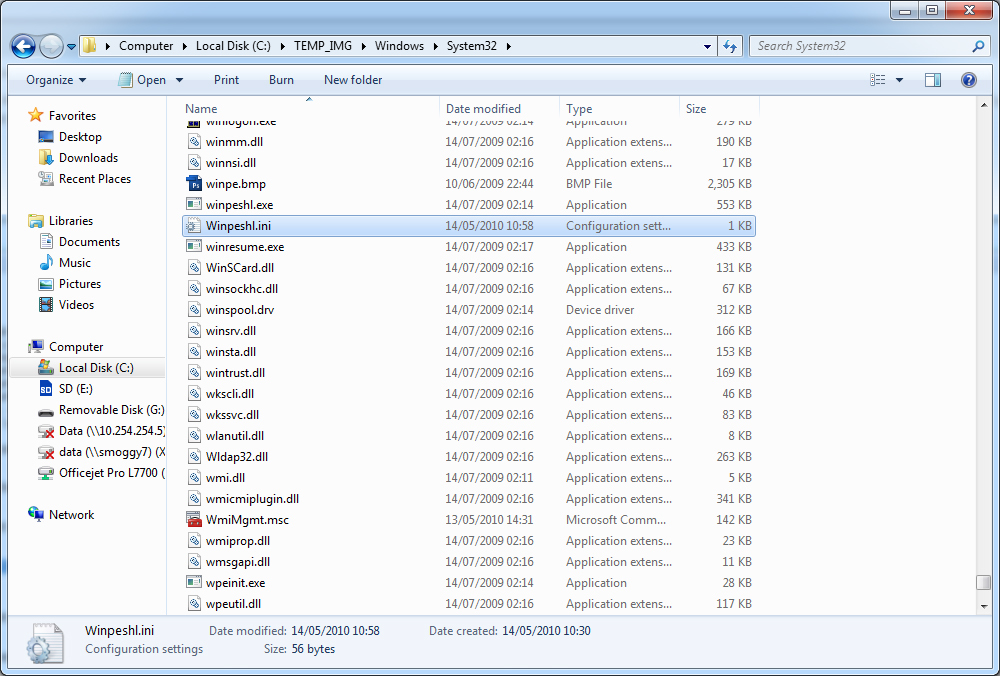
4. Edit the file using notepad so it looks like this, (The first command loads TCP/IP Networking).
[LaunchApps]
%SYSTEMDRIVE%Windowssystem32startnet.cmd
%SYSTEMDRIVE%Programsnu2menunu2menu.exe
5. Navigate to c:TEMP_IMG and create a folder called Programs > In that folder create a folders called nu2menu > Download your Nu2Menu files to this folder.

6. In that folder you will notice there is a file called nu2menu.xml > Open it with notepad > Replace the text in that file with this text,
<?xml version="1.0" encoding="utf-8"?>
<nu2menu id="Nu2MenuSystem001">
<menu id="mainmenu">
		<mitem type="SEPARATOR"></mitem>
		<mitem type="POPUP" menuid="admin">Admin</mitem>
		<mitem type="SEPARATOR"></mitem>
		<mitem type="ITEM" cmd="RUN" func="@Null( @ChangeDir('c:')@ChangeDir('c:')@ChangeDir('c:') )cmd.exe">Cmd</mitem>
</menu>
<menu id="admin">
	<mitem type="ITEM" cmd="RUN" func="@GetWinDir()system32notepad.exe">Notepad</mitem>
	</menu>
</nu2menu>
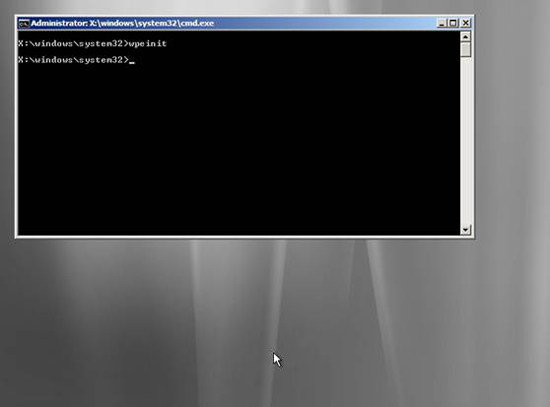
7. Save the file and close ALL your windows except the Deployment Tools Command Prompt window. execute the following command,
8. Now when you boot you should see,

Again, not very thrilling, all it can do is launch notepad and open a command window.
Step 5 Adding useful stuff.
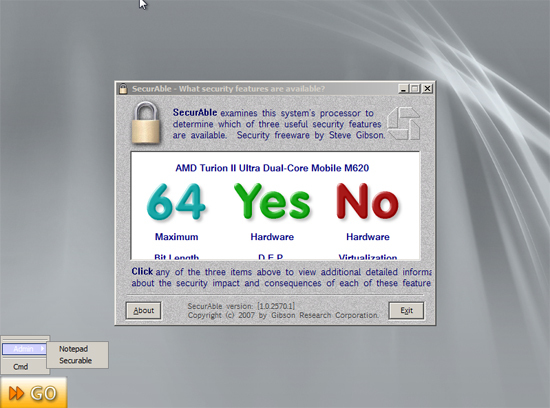
For this example I’m going to use a small standalone application called securable, it tells you if your processor is x64 bit capable (and some other stuff).
1. Download securable.exe
2. Mount your USB drives wim image.
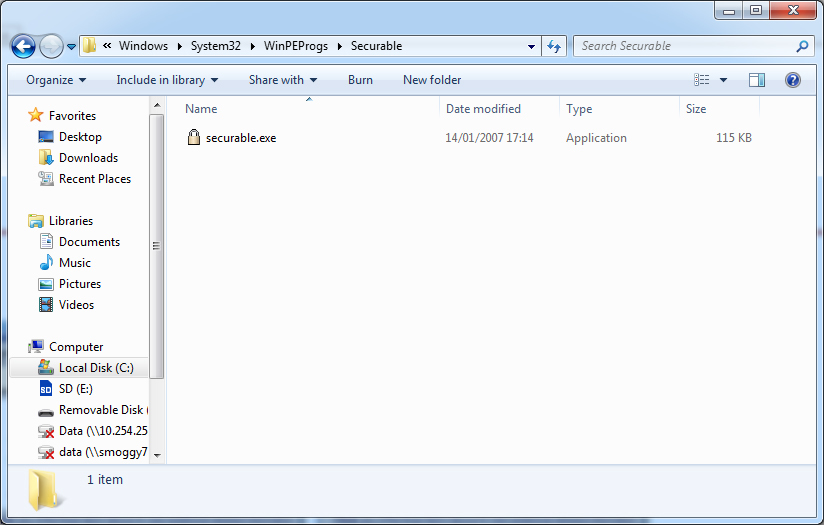
3. Navigate to C:TEMP_IMGWindowsSystem32 > Create a folder called “WinPEProgs” > In that folder create a folder called “Securable” > Drop securable.exe in there.
Note: I know it would be more elegant for it for go in Programs or Program files, but I can’t get the nu2m2nu.xml to run stuff from there – feel free to email me if you have some working code.
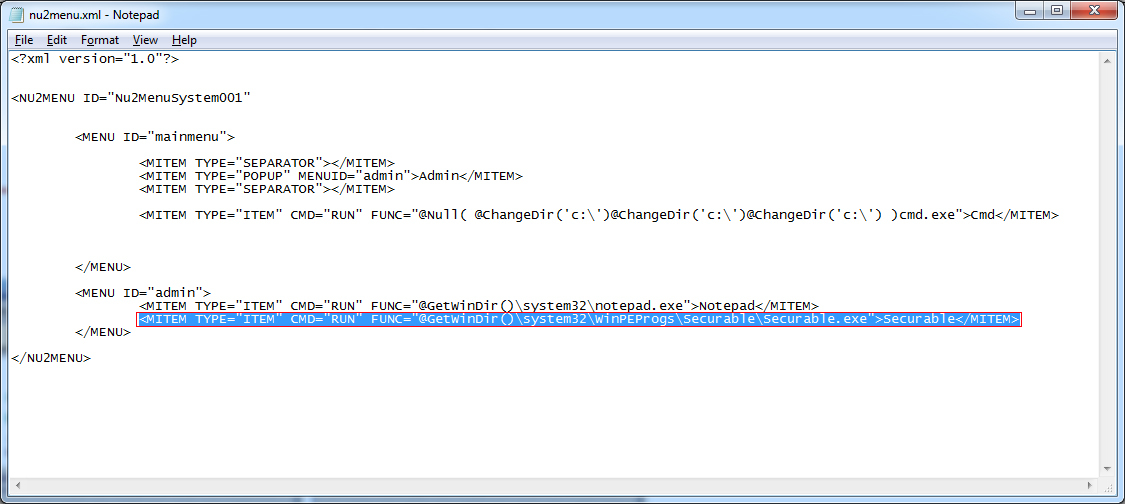
4 Open C:TEMP_IMGProgramsnu2menu using notepad edit the nu2menu.xml file and add the following line (see diagram for where it goes.
<mitem type="ITEM" cmd="RUN" func="@GetWinDir()system32WinPEProgsSecurableSecurable.exe">Securable</mitem>
5. Save and close the xml file, then close ALL your windows except the Deployment Tools Command Prompt window. execute the following command,
6. Now you can launch that application from your “Admin” menu.
You now should have enough information to put any further applications you require, if you find any particularly cool ones, email me and let me know.
Related Articles, References, Credits, or External Links
NA