
KB ID 0000109
Problem
OK to be honest, before I went to work for my current employer I didn’t even know Symantec made hardware firewall’s, and at the time of writing they no longer make “Low End” firewall’s and corporate support for them has all but ended. With this in mind there are a load of them currently being replaced with newer firewall’s and they are either getting thrown in cupboards “In case of emergency” ending up on eBay, or worst of all going in the skip.
So why would you want one then?
Because in true Petenetlive fashion you can pick them up for nothing, or for a few pounds on eBay, and they make an excellent firewall for your Home PC, Home network or Small business.
Fair enough but what’s the difference between the two?
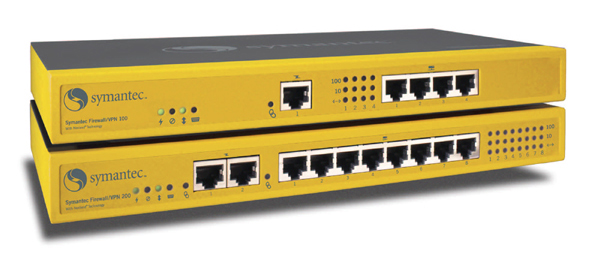
Basically both firewall’s can function as a hardware firewall and do site to site VPNS, the FW200 however can have 2 WAN connections and the 200R supports client to gateway VPN connections using the Symantec Client VPN software. Both appliances have a built in switch, on the FW100 its a four port and on the FW200 its an eight port.
FW100 (Top) and FW200 (Bottom)
To see what the Warning Lights and Symbols mean CLICK HERE
Right I’ve bought one now what the hell do I do with it?
That depends on what you want it for, there are a number of things a firewall can do, you can simply run through the basic setup and it will protect you PC/Network, or you might want to set up a permanent connection from home to your office (Site to Site VPN). Or you might want to access your PC’s at home or in the office from anywhere in the world with an internet connection (Client to Gateway VPN – FW200R only) You may have a server at home or an Xbox and want to Port forward particular traffic to a particular PC/Server or games console.
You can do as much or as little as you like with it, Ill outline the basic things you may want to do below
2. Connect to the firewall for administration
4. Basic Setup
Solution
Reset to Factory Settings
If you have got an appliance of ebay or been given it by work then chances are you wont know its settings and the password to get in an manage it so before you do anything you need to reset the appliance back to its factory settings. Read the ENTIRE procedure before you do anything!
Factory Settings
1. Inside IP address set to 192.168.0.1
2. Inside Subnet Mask set to 255.255.255.0
3. Password is set to {Blank} – That’s NO Password.
4. Outside Interface(s) set to obtain their IP address dynamically.
5. Appliance turns on its internal DHCP server and leases addresses from its switch ports.
6. All traffic will be allowed out
7. No traffic will be allowed in (unless its a reply to traffic instigated inside).
On the back of the alliance you will see a row of “dip” switches, you can turn on (down) and off (up) With the unit powered off make use a pen, or paperclip and have a couple of practice flicks on switch 1

Procedure
1. Power off the appliance
2. Drop dip swich1 to ON
3 Power on the appliance and watch the backup/active LED Light come on (This one ![]() )
)
4. As soon as the LED goes out flip dip switch 1 up(off) , down (on), and up(off) again – note you only get 12 seconds!
5. If you have carried out the procedure correctly then the Error LED will come on (This one ![]() )and then alternate with the LAN/WAN Status LED (This one
)and then alternate with the LAN/WAN Status LED (This one ![]() ).
).
6. The Appliance will reboot let it do so then remove the power, wait a few seconds, and power it up again.
Connect to the Firewall for Administration
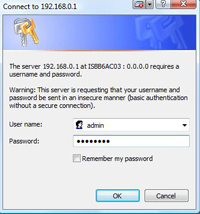
Assuming you have just reset the firewall then its internal IP address will be 192.168.0.1, then simply connect your PC or Laptop to the firewall using a standard ethernet cable to any of the ports labelled LAN ![]()
Your PC should be set to get an IP address dynamically – Or Manually set an IP address in the 192.168.0.2 to 254 range. Then open a web browser and go to http://192.168.0.1
Standard front Page here on a FW100
And here on a FW200 (note the second WAN settings)
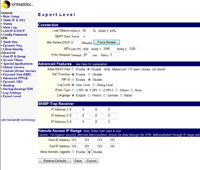
Note: You can manage these firewall’s from outside for example from work, BUT you need to enter the IP range that you will be administering from, to do this Select the “Expert Level” section and enter the range (note if you only have 1 IP add it in the start and End IP address section. you then access the device from http://public_IP_address:8088
Remember this is a firewall always set a password for access, select the “Config Password” Section then type and re-type a password. Then Press Save
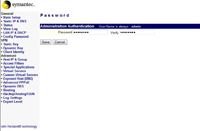
Now to access the firewall the username is admin and the password you set above.
Upgrade the Firmware
You might wonder why bother – well I’ve used these firewall’s in anger on corporate networks, and I’ve seen strange problems with VPN’s and other bugs that have been fixed by simply upgrading the firmware – remember these are old firewall’s so the last version of firmware released for them (Called 18F was released Nov 2005) The FW100 firmware is here vpn100_build18f and the FW200 firmware is here vpn200r_build18f. You will also need the nxtftpw.exe program you can download that here nxtftpw.
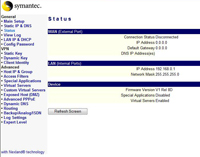
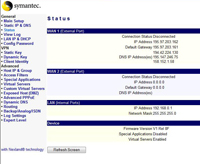
To check your Firewall’s Firmware version connect to the firewall as above and Select the Status section > Then the Device section. here you will see the firmware revision. This one says V1 Rel 8D so its version 18D we are going to upgrade it to 18F.
To Prepare the firewall for firmware updating, Power it off and drop dip switches 1 and 2 on the back. Then Power the firewall back on again.
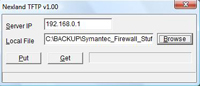
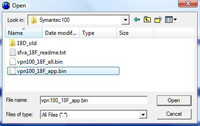
On your PC launch nxtftpw.exe and enter the following information, under Server IP enter the IP address of the firewall. An in Local file navigate to the firmware file on your PC.
Warning: there are two versions of the firmware file, one looks like vpn100_18F_app.bin the other looks like vpn100_18Fall.bin use app.bin the all.bin will erase the configuration as well!
Click PUT.
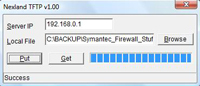
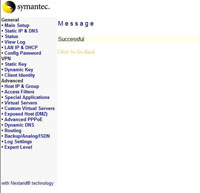
It might take a while and say its re tying a few times, be patient, when its finished it will say SUCCESS at the bottom.
Wait a couple of minutes, when the lights on the appliance all return to normal shut it down. Lift all the dip switches again and power back up.
Log back into the firewall and Check the firmware revision on the Status Tab > Device Section to make sure the version is correct, it should say V1 Rel 8F.
Basic Setup
For a simple home user you will want to set an external IP with a default gateway, some DNS settings. Then set your internal IP.
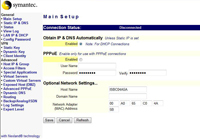
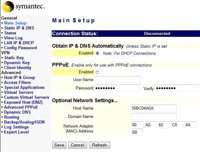
Main Setup Tab
If your ISP supplies your IP address via DHCP you don’t need to do anything that’s the default – note if you have a router that needs PPPoE settings these can be set up on this tab as well. Click Save when finished
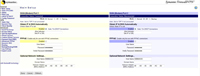
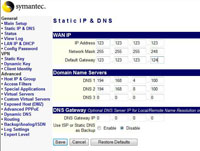
Static IP & DNS Tab
Or if you have a static IP address enter it here with the subnet mask and the default gateway supplied by your ISP. Also note you can statically assign DNS servers here too, then your internal clients can point directly to the Symantec Firewall for their DNS settings. Click Save when finished
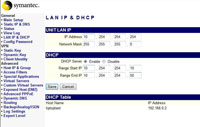
LAN IP & DHCP
Set your inside interface here – Note you can also set the firewall up as a DHCP server for your network as well. Click Save when finished.
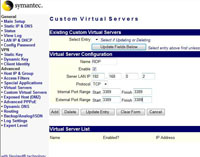
Not all port forwarding is used for servers and complicated communications, simply downloading torrent software or playing online games may require you to forward a port to one of your clients. For this example I’ll port forward TCP Port 3389 (that’s RDP for the non tech’s do you can connect to your PC and server from outside – note doing this in the real world has security implications and is done at your own risk).
Custom Virtual Servers Tab
You need to give the protocol you are forwarding a name, like RDP, Tick Enable, Enter the IP address you want to forward it to, Then enter the port number into ALL FOUR box’s. When done click “Add.”
This is what you want to be seeing 🙂
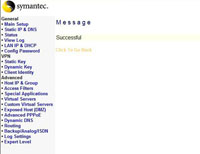
You will see the rule added at the bottom of the page – Note: As I said this is quite a security hole, so you can tick and un tick enable, then tick update to turn on and off as required.

A site to site VPN connects one network to another securely, across an insecure network (in almost every case the insecure network is the public internet) So you can connect two offices together, or connect your home PC(s) to the office network. You need a device at both ends that can terminate a VPN. At our end we have the Symantec the other can be your corporate firewall or a VPN server.
To form a VPN you need both ends to agree a “Policy” as there are different methods of forming a VPN, the device at the other end must use the SAME settings as you do.
OK what do I need to know?
Encryption method: We will use 3DES Hashing Method: We will use SHA1 Diffie Hellman Group: we will use Group 2 IP address of the other Firewall: We will use 123.123.123.123 Network address of the Other network (the far one you are connecting to): We will use 10.1.0.0 Subnet Mask of the Other network (the far one you are connecting to): We will use 255.255.0.0 A Pre shared Key: we will use qwertyuiop123
Note: This firewall uses a system called PFS. Tell the Firewall administrator at the other end of the tunnel to make sure that end has it enabled.
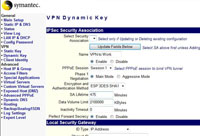
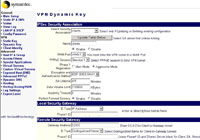
VPN Dynamic Key Tab
Give it a descriptive name > Tick Enable > PPPoE Session set to Session 1 > Select Main Mode > ESP 3DES SHA1 > SA Lifetime to 475 > Data Volume Limit to 2100000 > PFS enable
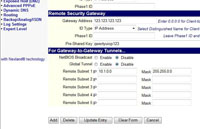
Gateway Address set to the IP of the other firewall > ID Type to IP Address > Pre Shared Key to qwertyuiop123 > NETBIOS Broadcast to Disable > Global Tunnel to Disable > Remote subnet to the network at the other end of the tunnel > Remote Mask to the mask at the other end of the tunnel. > Click Add
Hopefully you will see this.
You will then see the tunnel appear at the bottom of the screen.
![]()
And the connection will change colour and say “Connected” when the tunnel comes up.
![]()
Client to Gateway VPN (200R Only)
In a client to gateway scenario, you install the client software on a laptop or remote PC, you then use that software to connect to your network behind the firewall. With this method you can securely connect many clients to one firewall.
OK What Do I need to Know?
A username: We will use Jane A shared secret: We will use 1234567890qwertyuiop
VPN Dynamic Key Tab
This sets the levels and method of encryption used by your remote clients, Type the name clients into the name box > Enable > Session 1 > Aggressive mode > ESP 3DES SHA1 > 475 Mins > 2100000 > PFS enable > Gateway Address to 0.0.0.0 > ID Type to Distinguished Name. Click Add
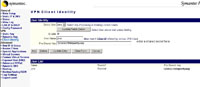
VPN Client Identity Tab
Enter the username > Tick Enable > Type in the shared secret > Tick Add > The user will be displayed at the bottom.
Obviously this procedure is carried out on the remote PC/Laptop
Once you have the software installed (Note you need to le a local system administrator to this bit – or the software wont let you in) Fire up the software and give yourself a username and password (This can be anything – its just to log into the software NOT bring up the VPN). You will be asked to confirm the password.
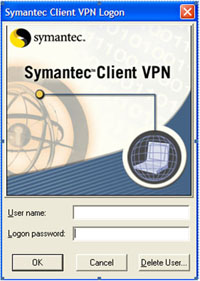
This is the main screen, you can save many tunnels to many firewalls, but we are just dealing with one, click new.
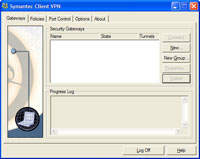
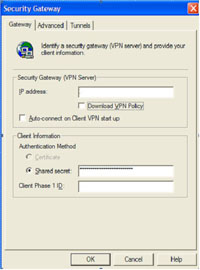
On the gateway tab, in IP address enter the IP of the outside of the firewall > Make sure download VPN policy is NOT checked > enter your shared secret 1234567890qwertyuiop (as set up on the firewall > Your client phase 1 ID is the name on the firewall – in the example above that’s “jane”
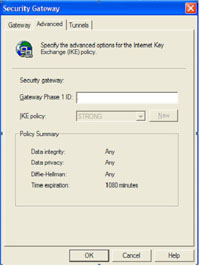
Click the Advanced Tab > Under Gateway Phase 1 ID re-enter the IP address of the outside of the firewall.
Click the Tunnels Tab > Click New.
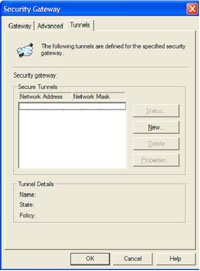
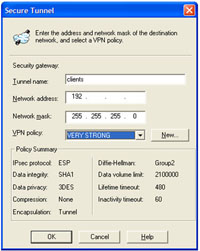
Tunnel name HAS TO match the policy you created on the firewall (in out case “clients”) Then enter the network address and subnet mask of the network BEHIND the firewall you are connecting to. > OK > OK.
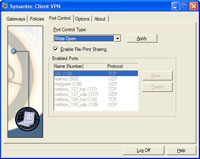
Back at the main screen click the Policies Tab > Set “Port Control Type” to “Wide Open”.
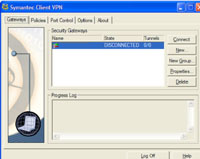
Click the Gateways Tab > Log Off > Close and restart the client software > Select the tunnel and click connect > In the progress log when you see a message stating “security gateway connected”.
Related Articles, References, Credits, or External Links
NA