
KB ID 0000077
Problem
Note: This is for Cisco ASA 5500, 5500-x, and Cisco Firepower devices running ASA Code.
Note2: If your firewall is running a version older than 8.3 you will need to scroll down the page.
Port forwarding on Cisco firewalls can be a little difficult to get your head around, to better understand what is going on remember in the “World of Cisco” you need to remember two things…..
1. NAT Means translate MANY addresses to FEW Addresses
2. PAT Means translate MANY addresses to ONE Address.
Why is that important you ask? Well most networking types assume NAT is translating one address to many, BUT on a Cisco device this is PAT, and it uses (as the name implies) port numbers to track everything. e.g. the first connection outbound might be seen on the firewall as 123.123.123.123:1026 and the second connection outbound might be seen as 123.123.123.123:2049 so when the traffic comes back the firewall knows where to send it.
Fair enough but what has that got to do with Port Forwarding? Well you can use the exact same system to lock a port to an IP address – so if only one port can go to one IP address then that’s going to give you port forwarding 🙂
To make matters more confusing (sorry) you configure PAT in the NAT settings, for this very reason it confuses the hell out of a lot of people, and the GUI is not intuitive for configuring port forwarding, (the ADSM is better than the old PIX PDM) but most people, (me included,) prefer to use command line to do port forwarding.
Below you will find;
Option 1 (Use ASDM)
Option 2 Use Command Line Interface
Option 3 Use PDM (PIX v6 Only)
Option 1: Port Forwarding Using ASDM
Note: This option uses ASDM Version 7.9(2) If yours is older see below;
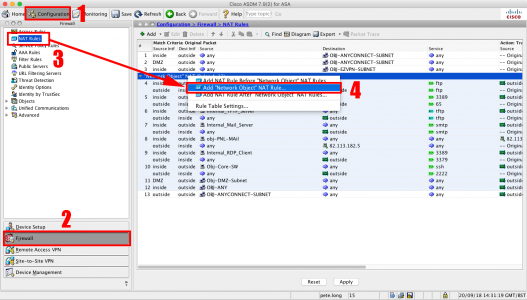
Connect to the ASDM, Configuration > Firewall > NAT Rules > Right Click ‘Network Object Nat Rules’ > Add ‘Network Object’ Nat Rule.
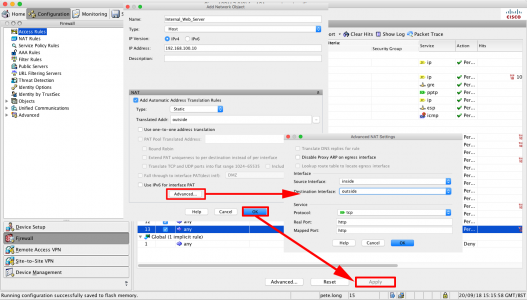
Name = “Give the internal server/host a sensible name” > Type = Host > IP Address = The internal / private IP address > Type = Static > Translated address = Outside > Advanced > Source Interface = Inside > Destination Interface = Outside > Protocol = TCP > Real port = http > Mapped Port = http > Ok > OK > Apply.
Note: This assumes your Outside interface is called outside, Inside interface is called inside and you want to port TCP port 80 (http).
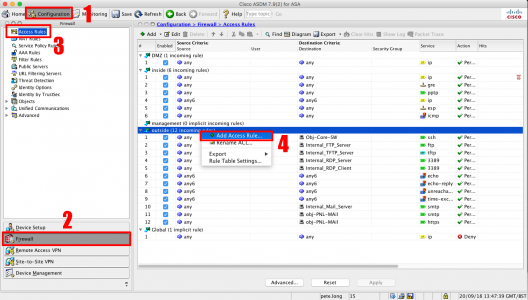
Configuration > Firewall > Access Rules > Right Click ‘Outside Interface” > Add Access Rule.
Interface = Outside > Action = Permit > Source = Any > Destination {Browse} > Locate the object you created earlier > Add to Destination > OK.
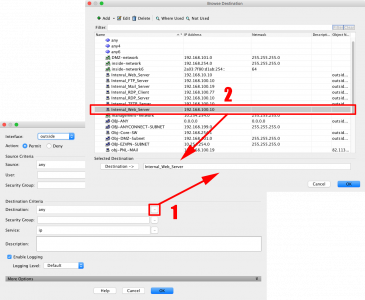
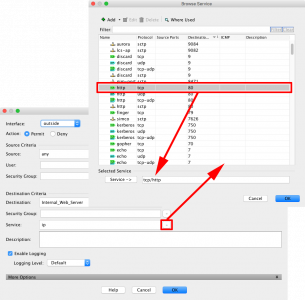
Service {Browse} > Select the Port you require (i.e. http) > OK.
OK > Apply > When you have tested it works, save the changes.

Using Older ASDM (PIX V7 and ASA5500) 1 Port to 1 IP Address
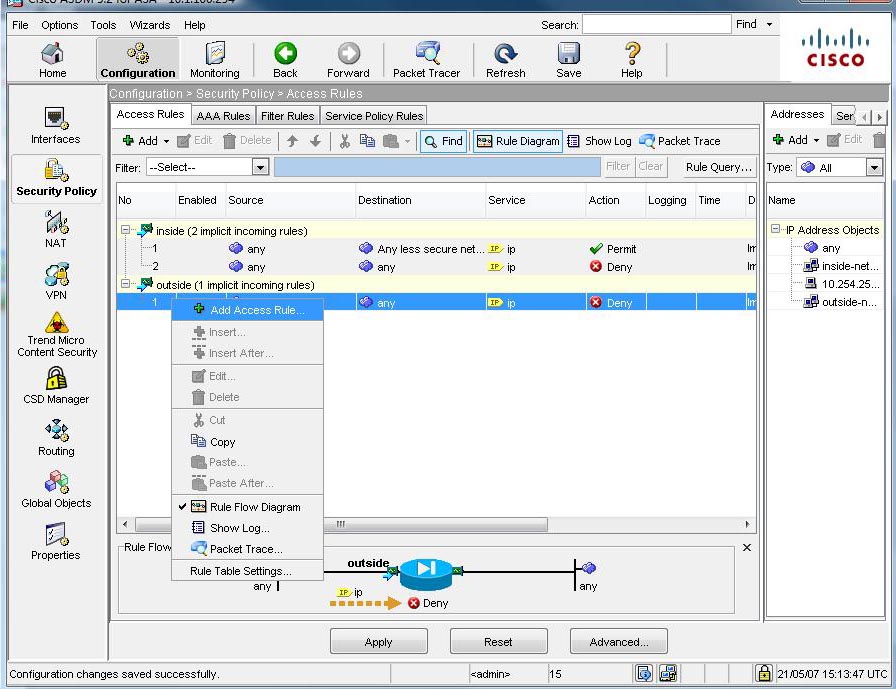
1. As above you will need to know the port and the IP to forward it to, Launch the ASDM, Select Configuration > Security Policy > Then either Rule Add, or right click the incoming rules and select “Add Access Rule.”
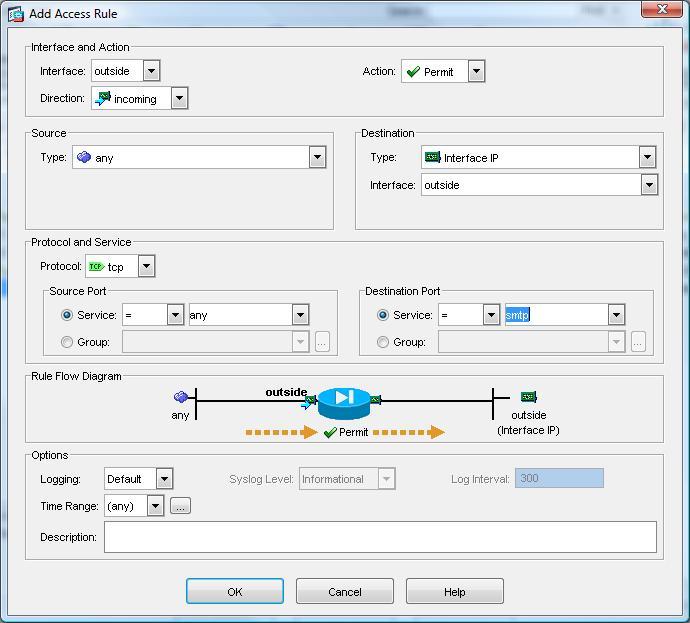
2. Interface = Outside > Direction = Incoming > Action = Permit > Source = Any > Destination, Type = Interface IP, Interface = Outside > Protocol = TCP > Destination Port Source = smtp (for example) > OK > Apply.
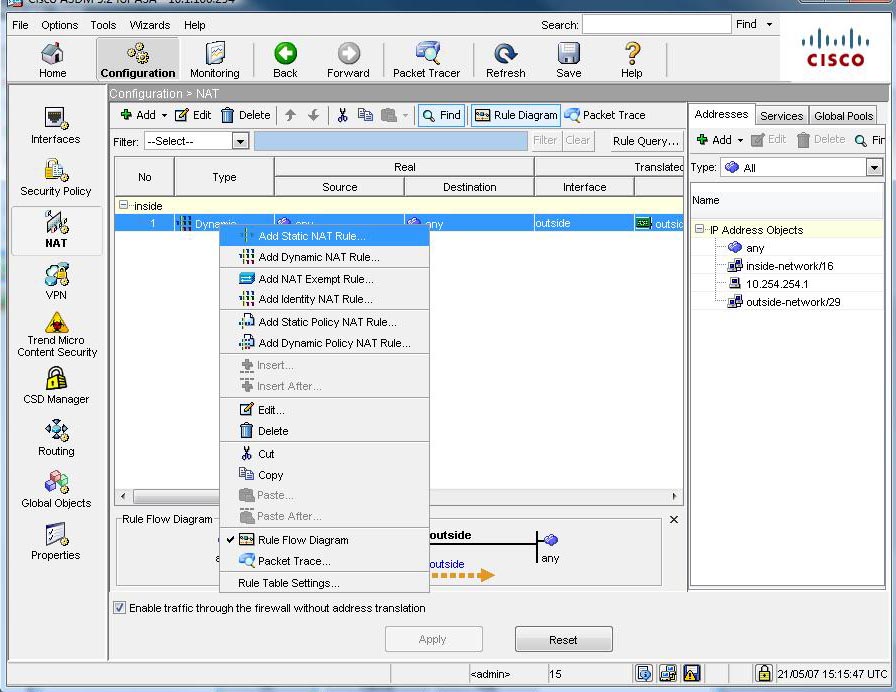
3. Back at the main screen select Configuration > NAT > Add, or Right Click an Existing mapping and click “Add Static NAT Rule.”
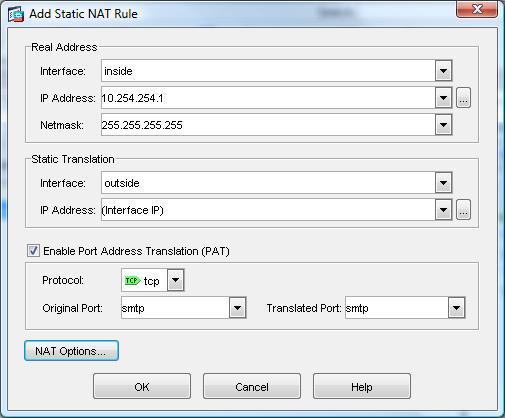
4. Real Address Interface = Inside > IP Address = 10.254.254.1 > Netmask = 255.255.255.255 > Static Translation Interface = outside > IP Address = (Interface IP) > Tick “Enable Port Translation (PAT) > Protocol = TCP > Original Port = smtp > Translated Port = smtp (for example) > OK > Apply.
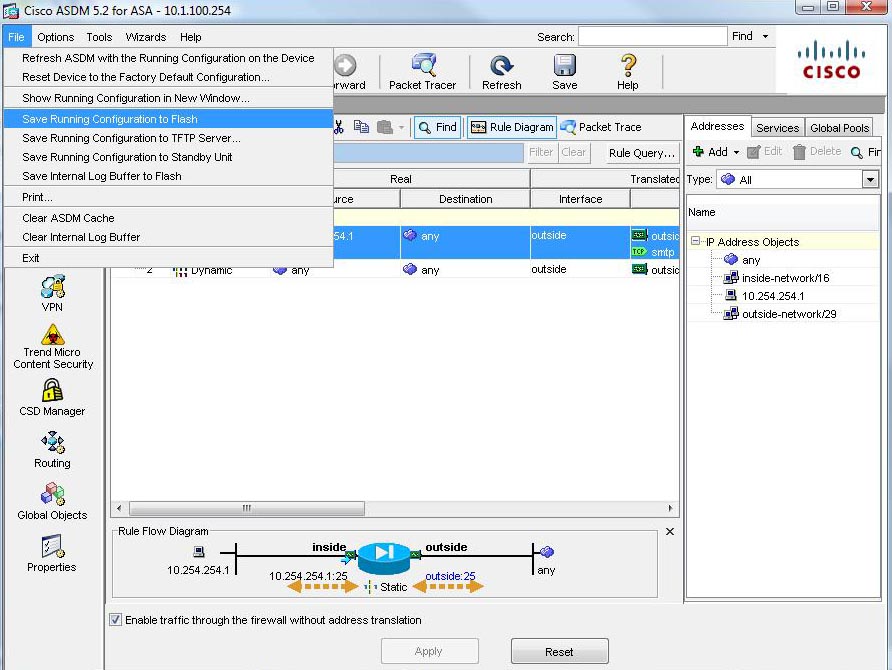
5. File > “Save Running Configuration to Flash.”
Option 2 Use the Command Line to Port Forward (Post Version 8.3)
Note: Port forwarding changed on PIX/ASA devices running OS 8.3 and above, in regards to port forwarding. There is no longer a global command, for a full run-down of the changes click here.
If you issue a global command after version 8.3 you will see this error,

ERROR: This syntax of nat command has been deprecated.
Please refer to “help nat” command for more details.
1. First things first, you will need to know what port you want to forward, and where you want to forward it, for this example We will assume I’ve got a server at 10.254.254.5 and it’s a mail server so I want to Forward all TCP Port 80 traffic (HTTP) to it. Connect to the Firewall via Console/Telnet or SSH.
Warning Notice
User Access Verification#
Password:********
Type help or '?' for a list of available commands.
Petes-ASA>
2. Enter enable mode, and enter the enable mode password.
Petes-ASA> enable
Password:********
Petes-ASA#
3. Now we need to go to configuration mode.
Petes-ASA# configure terminal
Petes-ASA(config)#
4. Create an object for the web server that the traffic is going to be forwarded to.
Petes-ASA(config)# object network Internal_Web_Server
Petes-ASA(config-network-object)# host 10.254.254.5
5. Then create a NAT translation for the port to be forwarded. Then you can exit the network object prompt.
Petes-ASA(config-network-object)# nat (inside,outside) static interface service tcp http http
Petes-ASA(config-network-object)# exit
6. Now you need to allow the http traffic in. Before you can add an ACL you need to see if you already have one. We are applying an ACL to the outside interface for traffic going in (I call this inbound for obvious reasons). To see if you already have an ACL applied, issue the following command;
Petes-ASA# show run access-group
access-group inbound in interface outside
access-group outbound in interface inside
Note: In the example above we have an ACL called inbound that we MUST use. (If you added a new one, all the access list entries for the old one get ‘Un-applied’). If yours has a different name (e.g. outside_access_in then use that instead of the ACL name I’m using here). If you DONT have an access-group entry for inbound traffic then we will do that at the end!
Petes-ASA(config)# access-list inbound permit tcp any object Internal_Web_Server eq http
7. Then: Only carry out the following command if you DO NOT HAVE an ACL applied for incoming traffic.
Petes-ASA(config)# access-group inbound in interface outside
Petes-ASA(config)#
8. Don’t forget to save your hard work. (write memory).
Petes-ASA(config)# write memory
Building configuration...
Cryptochecksum: aab5e5a2 c707770d f7350728 d9ac34de
[OK]
Petes-ASA(config)#
All the commands to Copy & Paste (Post v 8.3);
object network Internal_Web_Server
 host 10.254.254.5
nat (inside,outside) static interface  service tcp http http
access-list inbound permit tcp any object Internal_Web_Server eq http
access-group inbound in interface outside
Use the Command Line to Port Forward (pre version 8.3) 1 Port to 1 IP Address
1. First things first, you will need to know what port you want to forward, and where you want to forward it, for this example we will assume I’ve got a server at 10.254.254.1 and it’s a mail server so I want to forward all TCP Port 25 traffic to it. Connect to the Firewall via Console/Telnet or SSH.
Warning Notice

User Access Verification
Password:*******

Type help or '?' for a list of available commands.
Petes-ASA>
2. Enter enable mode, and enter the enable mode password.
Petes-ASA> enable
Password: ********
Petes-ASA#
3. Now we need to go to configuration mode.
Petes-ASA# configure terminal
Petes-ASA(config)#
4. Now you need to allow the http traffic in. Before you can add an ACL you need to see if you already have one. We are applying an ACL to the outside interface for traffic going in (I call this inbound for obvious reasons). To see if you already have an ACL applied, issue the following command;
Petes-ASA#show run access-group
access-group inbound in interface outside
access-group outbound in interface inside
Note: In the example above we have an ACL called inbound that we MUST use. (If you added a new one, all the access list entries for the old one get ‘Un-applied’). If yours has a different name (e.g. outside_access_in then use that instead of the ACL name I’m using here). If you DON’T have an access-group entry for inbound traffic then we will do that at the end!
5. Then: Only carry out the following command if you DO NOT HAVE an ACL applied for incoming traffic.
Petes-ASA(config)# access-group inbound in interface outside
Petes-ASA(config)#
6. Lastly the command that actually does the port forwarding, (static command). And allow the traffic in.
Petes-ASA(config)# static (inside,outside) tcp interface smtp 10.254.254.1 smtp netmask 255.255.255.255
Petes-ASA(config)# access-list inbound extended permit tcp any interface outside eq smtp
7. Don’t forget to save your hard work. (write memory).
Petes-ASA(config)# write memory
Building configuration...
Cryptochecksum: aab5e5a2 c707770d f7350728 d9ac34de
[OK]
Petes-ASA(config)#
Option 3 Use the PIX Device Manager (PIX Version 6 Only)1 Port to 1 IP Address
1. As above you will need to know the port and the IP to forward it to, Launch the PIX Device manager, Select Configuration > Access Rules > Then either click “Rule”s > Add or Right click an incoming rule and select > “Insert Before” or “Insert After”.
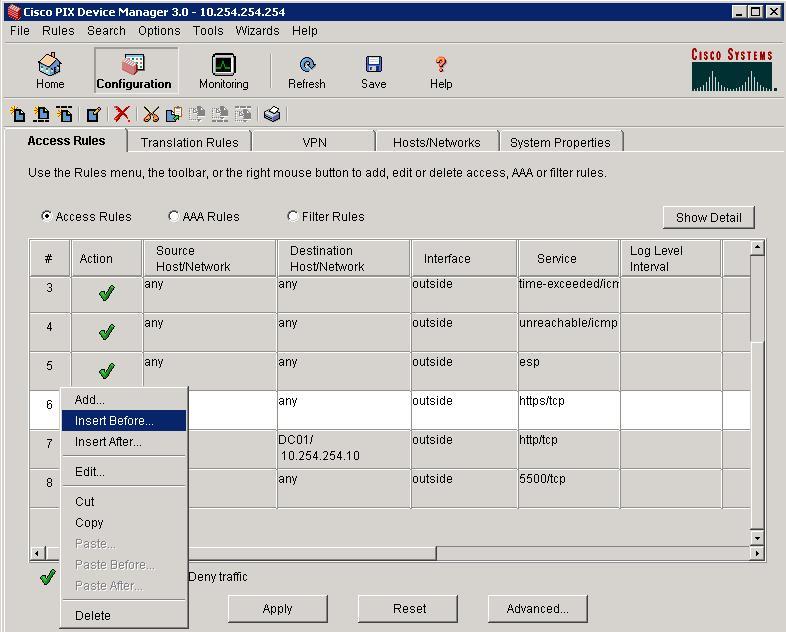
2. Under the “Action” select “Permit”, Under Source Host/Network Select “Outside”, and all the zeros, Under Destination Host/Network Select “Inside” and all the zeros then set the “Destination Port” to smtp > OK > Apply.

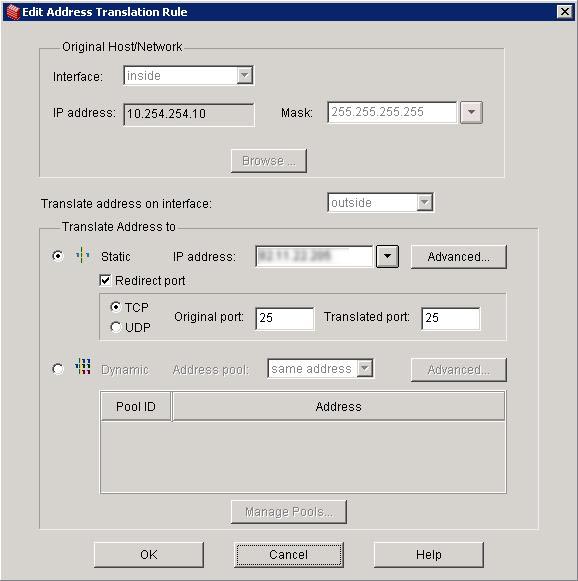
3, Now select the “Translation Rules” tab, Rules Add or Right click a rule and select “Insert before” or “Insert After”.

4. In this example I’ve set it to forward all TCP Port 25 traffic to 10.254.254.10 (NOTE: I’ve blurred out the public IP Address you will need to add this also) > OK > Apply.
5. Finally save your work > File > “Save Running Configuration to Flash.” > Exit.

Related Articles, References, Credits, or External Links
ASA 5500 – Port Forwarding To A Different Port
Cisco ASA – Port Forward a ‘Range of Ports’
Add a Static (One to One) NAT Translation to a Cisco ASA 5500 Firewall