
KB ID 0000869
Problem
I had to set this up for a client this week, I’ve setup a DMZ on a 5505 before and I’ve setup other VLANs to do other jobs, e.g. visitor Internet access. But this client needed a secondary VLAN setting up for IP Phones. In addition I needed to route traffic between both the internal VLANs.
I did an internet search and tried to find some configs I could reverse engineer, the few I found were old (Pre version 8.3) ones and the little info I got were more people in forums asking why theirs did not work. So I built a firewall with 8.2 code, then worked out how to do it, then upgraded the firewall to version 9.1. Finally I picked out the relevant parts of the upgraded config.
Here’s the scenario I’m going to use for this example.
Solution
Before we start, yes I know the ASA is a firewall not a router! A better solution would be to have either a router behind the firewall or, (as is more common) a switch that is layer 3 capable, i.e it can route.
Your ASA MUST have a Security Plus licence to be able to do this. Check your license version.
The commands you use will be different if your firewall is running an operating system earlier than 8.3, check your ASA version and proceed to the correct set of commands.
For Firewalls running an Operating System OLDER than 8.3 go here
How to Setup VLAN Routing on an ASA 5505 (Version 8.3 and Newer)
1. Connect to the firewall, go to enable mode, then go to configure terminal mode.
User Access Verification

Password:
Type help or '?' for a list of available commands.
Petes-ASA> enable
Password: ********
Petes-ASA# configure terminal
Petes-ASA(config)#
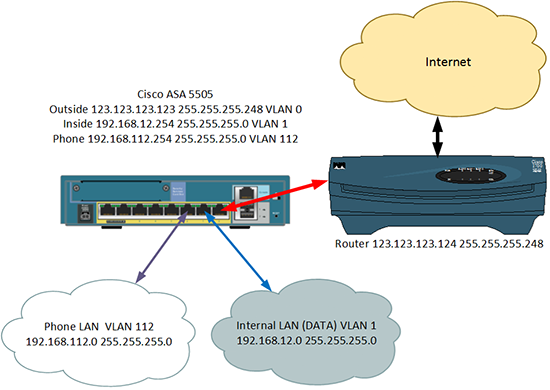
2. As in the diagram (above) I have three VLANs, VLAN 0 is outside and will be connected to Ethernet 0/0. VLAN 1 is inside and will be connected to Ethernet 0/1. VLAN 112 is for my phones and will be connected to Ethernet 0/2. Here I setup the IP addresses, and add the VLANs to the physical interfaces.
Note: I don’t need to Add VLAN 1 to Ethernet 0/1, because all ports are in VLAN 1 by default.
Petes-ASA(config)# interface Ethernet0/0
Petes-ASA(config-if)# switchport access vlan 2
Petes-ASA(config-if)# interface Ethernet0/2
Petes-ASA(config-if)# switchport access vlan 112
Petes-ASA(config-if)# interface Vlan1
Petes-ASA(config-if)# nameif inside
Petes-ASA(config-if)# security-level 100
Petes-ASA(config-if)# ip address 192.168.12.254 255.255.255.0
Petes-ASA(config-if)# interface Vlan2
Petes-ASA(config-if)# nameif outside
Petes-ASA(config-if)# security-level 0
Petes-ASA(config-if)# ip address 123.123.123.123 255.255.255.248
Petes-ASA(config-if)# interface Vlan112
Petes-ASA(config-if)# nameif PHONE_VLAN_112
Petes-ASA(config-if)# security-level 100
Petes-ASA(config-if)# ip address 192.168.112.254 255.255.255.0
3. To get traffic working to the internet you will need to specify a ‘route’ to your outside router.
Petes-ASA(config)# route outside 0.0.0.0 0.0.0.0 123.123.123.1244. Turn on ‘Hair Pinning’ (the ability to route traffic back out of the same interface it came in through) and allow traffic to pass between interfaces.
Petes-ASA(config)# same-security-traffic permit inter-interface
Petes-ASA(config)# same-security-traffic permit intra-interface
5. Out of the box, if you have not configured any access-lists then you can skip this step, as traffic will flow from a more secure interface (the inside and the phone one) to a less secure interface (the outside one). Here I’m going to use an ACL and allow all traffic anyway.
 Petes-ASA(config)# access-list VLAN112_outbound extended permit ip 192.168.112.0 255.255.255.0 any
Petes-ASA(config)# access-list outbound extended permit ip 192.168.12.0 255.255.255.0 any
Petes-ASA(config)# access-group outbound in interface inside
Petes-ASA(config)# access-group VLAN112_outbound in interface PHONE_VLAN_112
6. Now setup ‘dynamic’ NAT so that all traffic leaving both the inside VLAN and the Phone VLAN network get NATTED to the public IP address.
Petes-ASA(config)# object network obj_any
Petes-ASA(config-network-object)# subnet 0.0.0.0 0.0.0.0
Petes-ASA(config-network-object)# nat (inside,outside) dynamic interface
Petes-ASA(config-network-object)# object network obj_any-01
Petes-ASA(config-network-object)# subnet 0.0.0.0 0.0.0.0
Petes-ASA(config-network-object)# nat (PHONE_VLAN_112,outside) dynamic interface
7. Now setup ‘static’ NAT so that traffic travelling between the inside VLAN and the phone VLAN does NOT get NATTED.
Petes-ASA(config)# object network obj-192.168.12.0
Petes-ASA(config-network-object)# subnet 192.168.12.0 255.255.255.0
Petes-ASA(config-network-object)# nat (inside,PHONE_VLAN_112) static 192.168.112.0
Petes-ASA(config-network-object)# object network obj-192.168.112.0
Petes-ASA(config-network-object)# subnet 192.168.112.0 255.255.255.0
Petes-ASA(config-network-object)# nat (PHONE_VLAN_112,inside) static 192.168.112.0
8. Enable routing, and set the MTU for all three VLANs.
Petes-ASA(config)# router eigrp 500
Petes-ASA(config-router)# network 192.168.12.0 255.255.255.0
Petes-ASA(config-router)# network 192.168.112.0 255.255.255.0
Petes-ASA(config-router)# passive-interface outside
Petes-ASA(config-router)# exit
Petes-ASA(config)# mtu inside 1500
Petes-ASA(config)# mtu outside 1500
Petes-ASA(config)# mtu PHONE_VLAN_112 1500
9. Save the changes, and give it a test.
Petes-ASA(config)# write memory
Building configuration...
Cryptochecksum: aab5e5a2 c707770d f7350728 d9ac34de
[OK]
Petes-ASA(config)#
Full Config for you to Copy and Paste;
interface Ethernet0/0
switchport access vlan 2
!
interface Ethernet0/1
!
interface Ethernet0/2
switchport access vlan 112
!
interface Vlan1
nameif inside
security-level 100
ip address 192.168.12.254 255.255.255.0
!
interface Vlan2
nameif outside
security-level 0
ip address 123.123.123.123 255.255.255.248
!
interface Vlan112
nameif PHONE_VLAN_112
security-level 100
ip address 192.168.112.254 255.255.255.0
!
same-security-traffic permit inter-interface
same-security-traffic permit intra-interface
!
access-list VLAN112_outbound extended permit ip 192.168.112.0 255.255.255.0 any
access-list outbound extended permit ip 192.168.12.0 255.255.255.0 any
!
object network obj-192.168.12.0
subnet 192.168.12.0 255.255.255.0
nat (inside,PHONE_VLAN_112) static 192.168.112.0
object network obj-192.168.112.0
subnet 192.168.112.0 255.255.255.0
nat (PHONE_VLAN_112,inside) static 192.168.112.0
object network obj_any
subnet 0.0.0.0 0.0.0.0
nat (inside,outside) dynamic interface
object network obj_any-01
subnet 0.0.0.0 0.0.0.0
nat (PHONE_VLAN_112,outside) dynamic interface
!
mtu inside 1500
mtu outside 1500
mtu PHONE_VLAN_112 1500
!
access-group outbound in interface inside
access-group VLAN112_outbound in interface PHONE_VLAN_112
!
router eigrp 500
network 192.168.12.0 255.255.255.0
network 192.168.112.0 255.255.255.0
passive-interface outside
!
route outside 0.0.0.0 0.0.0.0 123.123.123.124
How to Setup VLAN Routing on an ASA 5505 (Pre Version 8.3)
1. Connect to the firewall, go to enable mode, then go to configure terminal mode.
User Access Verification

Password:
Type help or '?' for a list of available commands.
Petes-ASA> enable
Password: ********
Petes-ASA# configure terminal
Petes-ASA(config)#
2. 2. As in the diagram (above) I have three VLANs, VLAN 0 is outside and will be connected to Ethernet 0/0. VLAN 1 is inside and will be connected to Ethernet 0/1. VLAN 112 is for my phones and will be connected to Ethernet 0/2. Here I setup the IP addresses, and add the VLANs to the physical interfaces.
Note: I don’t need to Add VLAN 1 to Ethernet 0/1 because all ports are in VLAN 1 by default.
Petes-ASA(config)# interface Ethernet0/0
Petes-ASA(config-if)# switchport access vlan 2
Petes-ASA(config-if)# interface Ethernet0/2
Petes-ASA(config-if)# switchport access vlan 112
Petes-ASA(config-if)# interface Vlan1
Petes-ASA(config-if)# nameif inside
Petes-ASA(config-if)# security-level 100
Petes-ASA(config-if)# ip address 192.168.12.254 255.255.255.0
Petes-ASA(config-if)# interface Vlan2
Petes-ASA(config-if)# nameif outside
Petes-ASA(config-if)# security-level 0
Petes-ASA(config-if)# ip address 123.123.123.123 255.255.255.248
Petes-ASA(config-if)# interface Vlan112
Petes-ASA(config-if)# nameif PHONE_VLAN_112
Petes-ASA(config-if)# security-level 100
Petes-ASA(config-if)# ip address 192.168.112.254 255.255.255.0
3. To get traffic working to the internet you will need to specify a ‘route’ to your outside router.
Petes-ASA(config)# route outside 0.0.0.0 0.0.0.0 123.123.123.1244. Turn on ‘Hair Pinning’ (the ability to route traffic back out of the same interface it came in through). and allow traffic to pass between interfaces.
Petes-ASA(config)# same-security-traffic permit inter-interface
Petes-ASA(config)# same-security-traffic permit intra-interface
5. Out of the box, if you have not configured any access-lists then you can skip this step, as traffic will flow from a more secure interface (the inside and the phone one) to a less secure interface (the outside one). Here I’m going to use an ACL and allow all traffic anyway.
Petes-ASA(config)# access-list VLAN112_outbound extended permit ip 192.168.112.0 255.255.255.0 any
Petes-ASA(config)# access-list outbound extended permit ip 192.168.12.0 255.255.255.0 any
Petes-ASA(config)# access-group outbound in interface inside
Petes-ASA(config)# access-group VLAN112_outbound in interface PHONE_VLAN_112
6. Enable NAT so that all traffic leaving both the inside VLAN and the Phone VLAN network get NATTED to the public IP address.
Petes-ASA(config)# global (outside) 1 interface
Petes-ASA(config)# nat (inside) 1 0.0.0.0 0.0.0.0
Petes-ASA(config)# nat (PHONE_VLAN_112) 1 0.0.0.0 0.0.0.0
7. Now setup ‘static’ NAT so that traffic travelling between the inside VLAN and the phone VLAN does NOT get NATTED.
Petes-ASA(config)# static (inside,PHONE_VLAN_112) 192.168.112.0 192.168.12.0 netmask 255.255.255.0
Petes-ASA(config)# static (PHONE_VLAN_112,inside) 192.168.112.0 192.168.112.0 netmask 255.255.255.0
8. Enable routing, and set the MTU for all three VLANs.
Petes-ASA(config)# router eigrp 500
Petes-ASA(config-router)# network 192.168.12.0 255.255.255.0
Petes-ASA(config-router)# network 192.168.112.0 255.255.255.0
Petes-ASA(config-router)# passive-interface outside
Petes-ASA(config-router)# exit
Petes-ASA(config)# mtu inside 1500
Petes-ASA(config)# mtu outside 1500
Petes-ASA(config)# mtu PHONE_VLAN_112 1500
9. Save the changes, and give it a test.
Petes-ASA(config)# write memory
Building configuration...
Cryptochecksum: aab5e5a2 c707770d f7350728 d9ac34de
[OK]
Petes-ASA(config)#
Full Config for you to Copy and Paste;
interface Vlan1
nameif inside
security-level 100
ip address 192.168.12.254 255.255.255.0
!
interface Vlan2
nameif outside
security-level 0
ip address 123.123.123.123 255.255.255.248
!
interface Vlan112
nameif PHONE_VLAN_112
security-level 100
ip address 192.168.112.254 255.255.255.0
!
interface Ethernet0/0
switchport access vlan 2
!
interface Ethernet0/1
!
interface Ethernet0/2
switchport access vlan 112
!
same-security-traffic permit inter-interface
same-security-traffic permit intra-interface
!
access-list VLAN112_outbound extended permit ip 192.168.112.0 255.255.255.0 any
access-list outbound extended permit ip 192.168.12.0 255.255.255.0 any
!
mtu inside 1500
mtu outside 1500
mtu PHONE_VLAN_112 1500
!
global (outside) 1 interface
nat (inside) 1 0.0.0.0 0.0.0.0
nat (PHONE_VLAN_112) 1 0.0.0.0 0.0.0.0
!
static (inside,PHONE_VLAN_112) 192.168.112.0 192.168.12.0 netmask 255.255.255.0
static (PHONE_VLAN_112,inside) 192.168.112.0 192.168.112.0 netmask 255.255.255.0
!
access-group outbound in interface inside
access-group VLAN112_outbound in interface PHONE_VLAN_112
!
router eigrp 500
network 192.168.12.0 255.255.255.0
network 192.168.112.0 255.255.255.0
passive-interface outside
!
route outside 0.0.0.0 0.0.0.0 123.123.123.124
Related Articles, References, Credits, or External Links
NA