
KB ID 0000173
Problem
Quite a while ago I wrote the “Connecting to and managing Cisco firewalls” article, which is still pretty complete, but I’ve been asked on a few occasions, “How do I actually configure the firewall to allow remote administration via, SSH, or HTTPS/ASDM, or Telnet
If you have no network connection to the firewall, then you will need to connect via console cable (CLICK HERE).
Solution
Cisco ASA Allow SSH – Via Command Line
1. Log on to the firewall > Go to enable mode > Go to configure terminal mode.
User Access Verification

Password:*******
Type help or '?' for a list of available commands.
PetesASA> enable
Password: ********
PetesASA# configure terminal
PetesASA(config)#
2. Now you can either allow access for one machine, or a whole network, the syntax is “ssh {ip address} {subnet mask} {interface that you will be connecting to}.
The following will just allow one external host (123.123.123.123).

PetesASA(config)# ssh 192.168.1.10 255.255.255.255 outside
The following will just allow a whole internal network 192.168.1.1 to 254

PetesASA(config)# ssh 192.168.1.0 255.255.255.0 inside
3. You will need to create a username and password for SSH access, then set SSH to use the LOCAL database to check of usernames and passwords, (unless you are using LDAP, RADIUS, TACACS, or Kerberos for authentication.)
PetesASA(config)# username admin password Password123 privilege 15
PetesASA(config)# aaa authentication ssh console LOCAL
4. By default the SSH session times out after 5 mins, I prefer to change this to 45 minutes.
PetesASA(config)# ssh timeout 45
5. To encrypt the SSH access you need to have an RSA keypair on the firewall, (Note: this is generated from the firewall’s host name, and its domain name, if you ever change either, the keypair will break, and SSH access will cease until the keypair is re-created). To create a key issue a “crypto key generate rsa” command;
PetesASA(config)# crypto key generate rsa mod 2048
INFO: The name for the keys will be: <Default-RSA-Key>
Keypair generation process begin. Please wait...
PetesASA(config)#Note: I set the key size to 2048, this is considered good practice
7. Lastly, save the changes with a “write mem” command;
PetesASA# write mem
Building configuration...
Cryptochecksum: 79745c0a 509726e5 b2c66028 021fdc7d

424 bytes copied in 1.710 secs (7424 bytes/sec)
[OK]
PetesASA#
Cisco ASA Allow SSH – Via ASDM (version shown 6.4(7))
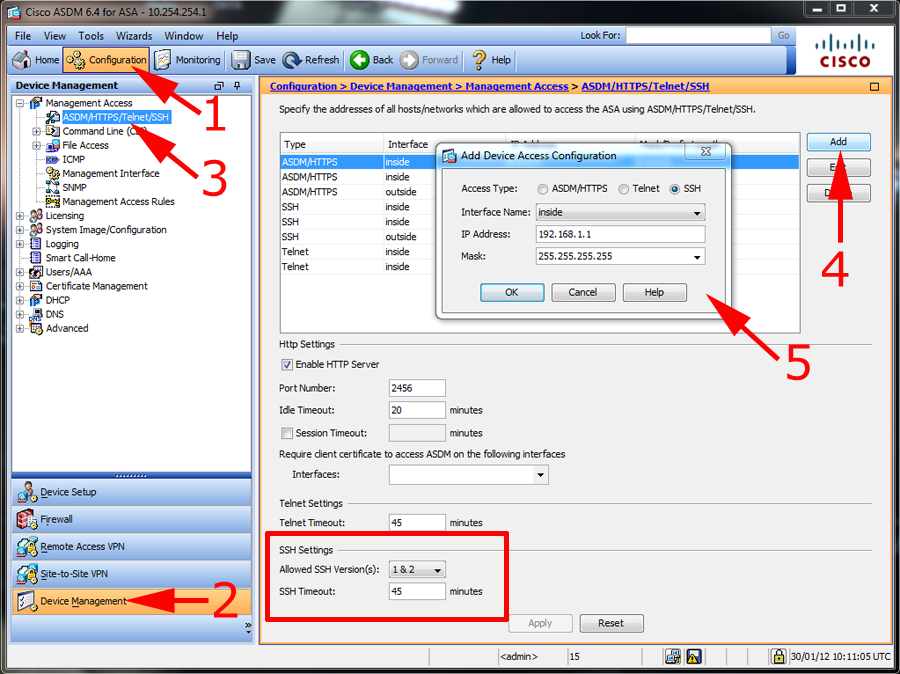
1. Connect via ASDM > Navigate to Configuration > Device Management > Management Access > ASDM/HTTPS/Telnet/SSH > Add > Select SSH > Supply the IP and subnet > OK. (Note you can set both the timeout, and the SSH versions you will accept, on this page also). Note you still need to generate the RSA Key (See step 5 above, good luck finding that in the ASDM – see the following article).
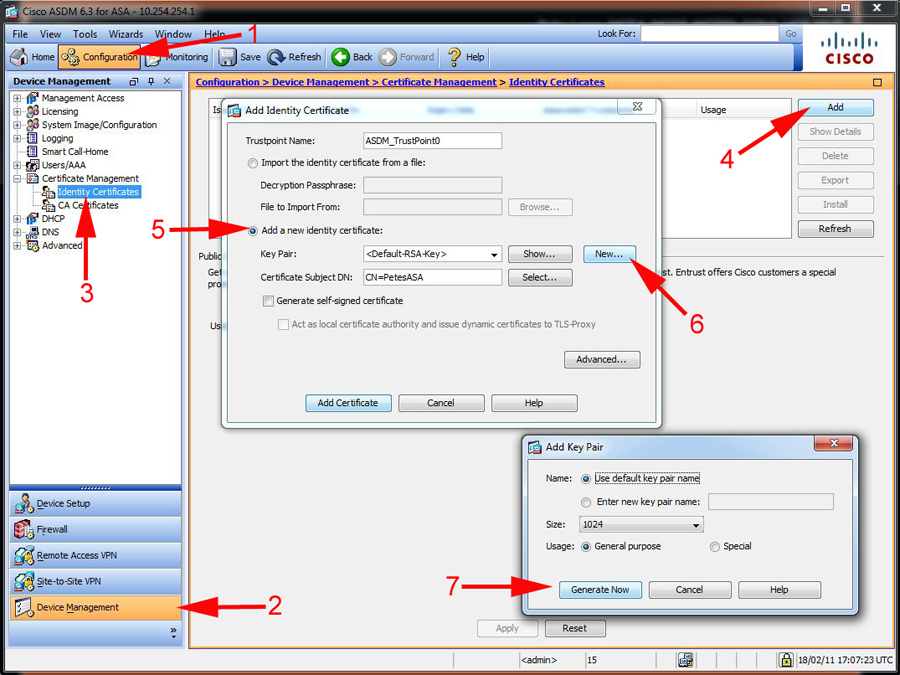
Cisco ASA – Gernerate RSA Keypair From ASDM
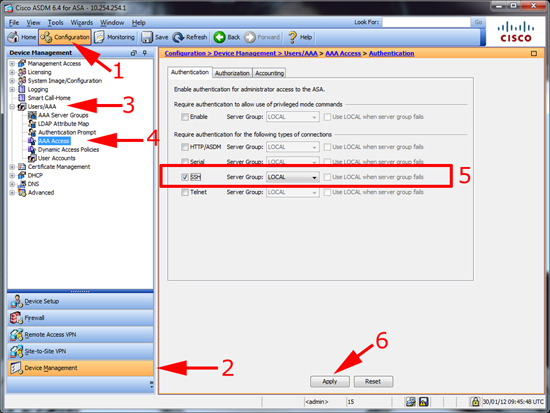
Cisco ASA – Enable AAA for SSH (Local Database) ASDM version 6.4(7)
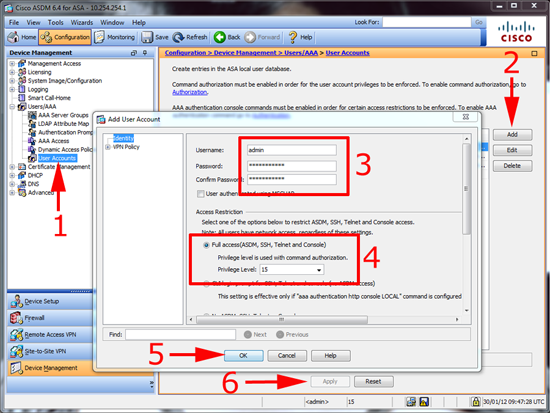
Cisco ASA – Add a User to the Local Database
Cisco ASA – Allow HTTPS/ASDM – Via Command Line
1. Log on to the firewall > Go to enable mode > Go to configure terminal mode.
User Access Verification

Password: *******
Type help or '?' for a list of available commands.
PetesASA> enable
Password: ********
PetesASA# configure terminal
PetesASA(config)#
2. Now you can either allow access for one machine or a whole network, the syntax is “http {ip address} {subnet mask} {interface that it’s connected to}.
The following will just allow one host (192.168.1.10).

PetesASA(config)# http 192.168.1.10 255.255.255.255 inside

The following will just allow a whole network 192.168.1.1 to 254

PetesASA(config)# http 192.168.1.0 255.255.255.0 inside
3. Unlike telnet and SSH, HTTPS/ADSM access is via the firewalls enable password (Unless you have enabled AAA logon). this password is set with the “enable password {password}” command. (Note: You will already have entered this password in step 1, only do this if you wish to change it).
PetesASA(config)# enable password PASSWORD123
4. You need to make sure that HTTPS access is enabled with a “http server enable” command.
PetesASA(config)# http server enable

Note: if your port forwarding https on your firewall you will NOT be able to get access externally unless you put it on a different port (i.e.1234).

PetesASA(config)# http server enable 1234
5. Lastly, save the changes with a “write mem” command.
PetesASA# write mem
Building configuration...
Cryptochecksum: 79745c0a 509726e5 b2c66028 021fdc7d

424 bytes copied in 1.710 secs (7424 bytes/sec)
[OK]
PetesASA#
Cisco ASA – Allow HTTPS/ASDM – Via ASDM (version shown 6.4(7))
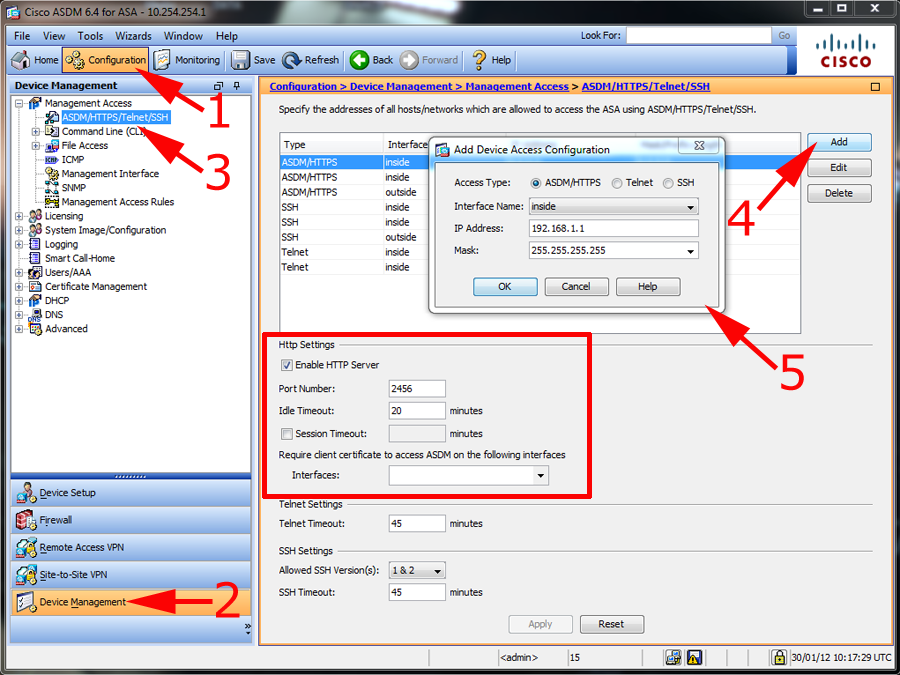
OK, the title of this might raise an eyebrow, but if you have access to the ASDM and you want to grant access to another IP/Network them you might want to do this. Connect via ASDM > Navigate to Configuration > Device Management > Management Access > ASDM/HTTPS/Telnet/SSH > Add > Select ASDM/HTTPS > Supply the IP and subnet > OK. (Note: You can also enable and disable the http Server here and change its port number).
Cisco ASA Allow Telnet – Via Command Line
WARNING: Telenet is insecure, if possible don’t use it, (usernames and password are sent unencrypted.)
1. Log on to the firewall > Go to enable mode > Go to configure terminal mode.
User Access Verification

Password: *******
Type help or '?' for a list of available commands.
PetesASA> enable
Password: ********
PetesASA# configure terminal
PetesASA(config)#
2. Now you can either allow access for one machine, or a whole network, the syntax is “telnet {ip address} {subnet mask} {interface that its connected to}.
The following will just allow one host (192.168.1.10).

PetesASA(config)# telnet 192.168.1.10 255.255.255.255 inside

The following will just allow a whole network 192.168.1.1 to 254

PetesASA(config)# telnet 192.168.1.0 255.255.255.0 inside
3. To set the password you use the “passwd” command (yes that’s spelled correctly).
PetesASA(config)# passwd PASSWORD123
4. By default the telnet session times out after 5 mins, I prefer to change this to 45 minutes.
PetesASA(config)# telnet timeout 455. Lastly, save the changes with a “write mem” command.
PetesASA# write mem
Building configuration...
Cryptochecksum: 79745c0a 509726e5 b2c66028 021fdc7d

7424 bytes copied in 1.710 secs (7424 bytes/sec)
[OK]
PetesASA#
Allow Telnet – Via ASDM (version shown 6.4(7))
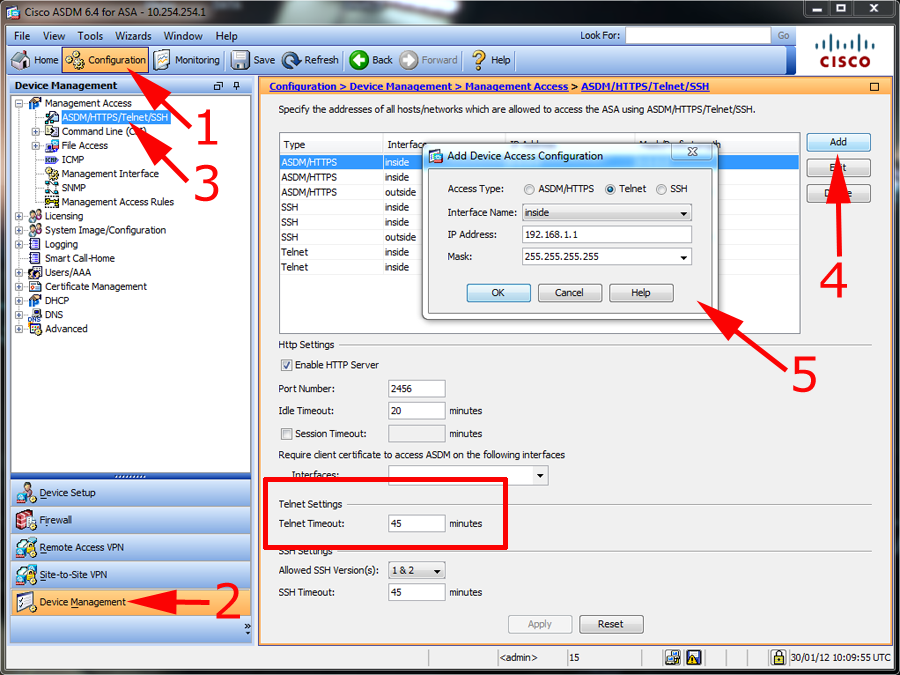
1. Connect via ASDM > Navigate to Configuration > Device Management > Management Access > ASDM/HTTPS/Telnet/SSH > Add > Select Telnet > Supply the IP and subnet > OK. (Note you can set the timeout on this page also).
Related Articles, References, Credits, or External Links
Connecting to and Managing Cisco Firewalls
Cisco ASA – Allow Remote Management over a VPN
Original Article Written 30/01/11