
KB ID 0000065
Problem
Note: PIX 515E and above, can still be upgraded to version 8.0(4) click here for details
Some people will wonder why I’m bothering to write this up, but the truth is, there are LOADS of older PIX firewalls out there in the wild, and all the PIX 501’s and 506E’s that are being retired from corporate use are being bought on ebay, or being put on IT departments test benches. This page deals with PIX version 6 if you are upgrading to version 7 or above,then you need to be on a PIX 515E (or a 525/535) and DO NOT follow these instructions, CLICK HERE. The “Smaller” PIX firewalls (501 and 506E) can only be upgraded to version 6.3(5) and the PDM can only be upgraded to 3.0(4).
Pre-Requisites
1. Before you do anything you will need a TFTP server and have it set up accordingly, for instructions CLICK HERE.
2. I suggest you backup your firewall configuration also, for instructions CLICK HERE.
3. You need to be able to get the Image and PDM versions from Cisco, you will need a valid support contract to be eligible for updates.
4. You will need a CCO Login to the Cisco Site (this is free to set up.
Solution
1. First things first; lets download the software you need CLICK HERE
2. Log in with your CCO username and password

Remember a CCO login is free of charge and simple to set up but to download software you need a valid Cisco contract or SmartNet.
3. For this example I’m upgrading a PIX 501 so I’m going to need a system image and a PDM file.
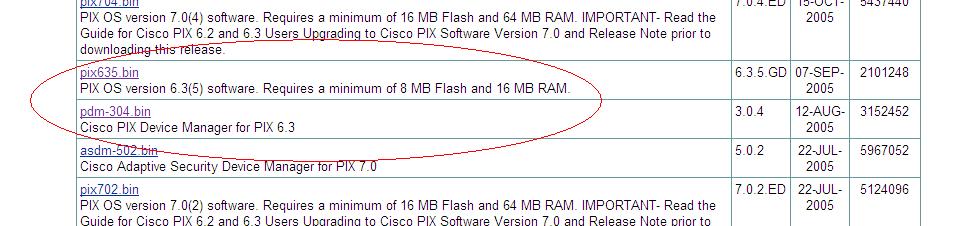
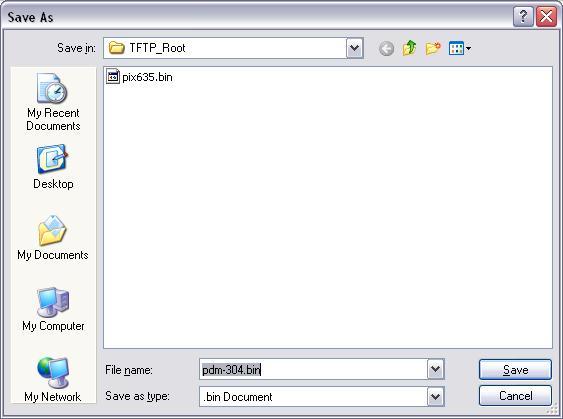
4. Download the files above and put then in your TFTP server root directory, then start your TFTP Server.
5. Log into your PIX firewall via the console cable, Telnet, or SSH, then enter enable mode, supply the firewall with the enable password.
User Access Verification

Password:
Type help or '?' for a list of available commands.

Pix> enable

Password: ********

Pix#
6. Now you need to copy in the new system file you do this with a “Copy tftp flash” command NOTE you can use copy tftp flash:image but it defaults to that anyway 🙂
Pix# copy tftp flash
7. You will need to give it the IP address of your TFTP server and the name of the image file to copy over.
Address or name of remote host [0.0.0.0]? 10.254.254.51
Source file name [cdisk]? pix635.bin
copying tftp://10.254.254.51/pix635.bin to flash:image
8. You will be asked to confirm, do so by typing yes and pressing enter, the file will then upload and the old image file will be erased from the firewalls memory.
[yes|no|again]? yes
!!!!!!!!!!!!!!!!!!!!!!!!!!!!!!!!!!!!!!!!!!!!!!!!!!!!!!!!!!!!!!!!!!!!!!!!!!!!!!!!
!!!!!!!!!!!!!!!!!!!!!!!!!!!!!!!!!!!!!!!!!!!!!!!!!!!!!!!!!!!!!!!!!!!!!!!!!!!!!!!!
!!!!!!!!!!!!!!!!!!!!!!!!!!!!!!!!!!!!!!!!!!!!!!!!!!!!!!!!!!!!!!!!!!!!!!!!!!!!!!!!
!!!!!!!!!!!!!!!!!!!!!!!!!!!!!!!!!!!!!!!!!!!!!!!!!!!!!!!!!!!!!!!!!!!!!!!!!!!!!!!!
!!!!!!!!!!!!!!!!!!!!!!!!!!!!!!!!!!!!!!!!!!!!!!!!!!!!!!!!!!!!!!!!!!!!!!!!!!!!!!!!
!!!!!!!!!!!
Received 2101248 bytes
Erasing current image
Writing 1978424 bytes of image
!!!!!!!!!!!!!!!!!!!!!!!!!!!!!!!!!!!!!!!!!!!!!!!!!!!!!!!!!!!!!!!!!!!!!!!!!!!!!!!!
!!!!!!!!!!!!!!!!!!!!!!!!!!!!!!!!!!!!!!!!!!!!!!!!!!!!!!!!!!!!!!!!!!!!!!!!!!!!!!!!
!!!!!!!!!!!!!!!!!!!!!!!!!!!!!!!!!!!!!!!!!!!!!!!!!!!!!!!!!!!!!!!!!!!!!!!!!!!!!!!!
!!!!!!!!!!!!!!!!!!!!!!!!!!!!!!!!!!!!!!!!!!!!!!!!!!!!!!!!!!!!!!!!!!!!!!!!!!!!!!!!
!!!!!!!!!!!!!!!!!!!!!!!!!!!!!!!!!!!!!!!!!!!!!!!!!!!!!!!!!!!!!!!!!!!
Image installed
Pix#
9. The quickest way to load the new image into memory is to restart the firewall do this with a reload command, then press enter to confirm.
Pix# reload
Proceed with reload? [confirm]
10 After the firewall has restarted log in, enter enable mode and issue a “show version” command, and you will see the new version displayed.
User Access Verification

Type help or '?' for a list of available commands.
Pix> enable
Password: ********
Pix# show version

Cisco PIX Firewall Version 6.3(5) Cisco PIX Device Manager Version 3.0(2)

{{{rest of output omitted}}}}
Upgrade Procedure Step 2 PDM Image
1. The procedure for upgrading the PDM is almost identical, again have the new PDM image on your TFTP server’s root directory, and the TFTP server running. Log into your PIX firewall via the console cable, Telnet or SSH, then enter enable mode, and then supply the firewall with the enable password.
User Access Verification
Password:
Type help or '?' for a list of available commands.
Pix> enable
Password: ********
Pix#
2. This time the command is copy tftp flash:pdm
3. You will need to give it the IP address of your TFTP server and the name of the file to copy over.
Address or name of remote host [0.0.0.0]? 10.254.254.51
Source file name [cdisk]? pdm-304.bin
copying tftp://10.254.254.51/pdm-304.bin to flash:pdm
4. You will be asked to confirm, do so by typing yes and pressing enter, the file will then upload and the old pdm file will be erased from the firewalls memory.
[yes|no|again]? yes
Erasing current PDM file
Writing new PDM file
!!!!!!!!!!!!!!!!!!!!!!!!!!!!!!!!!!!!!!!!!!!!!!!!!!!!!!!!!!!!!!!!!!!!!!!!!!!!!!!!
!!!!!!!!!!!!!!!!!!!!!!!!!!!!!!!!!!!!!!!!!!!!!!!!!!!!!!!!!!!!!!!!!!!!!!!!!!!!!!!!
!!!!!!!!!!!!!!!!!!!!!!!!!!!!!!!!!!!!!!!!!!!!!!!!!!!!!!!!!!!!!!!!!!!!!!!!!!!!!!!!
!!!!!!!!!!!!!!!!!!!!!!!!!!!!!!!!!!!!!!!!!!!!!!!!!!!!!!!!!!!!!!!!!!!!!!!!!!!!!!!!
!!!!!!!!!!!!!!!!!!!!!!!!!!!!!!!!!!!!!!!!!!!!!!!!!!!!!!!!!!!!!!!!!!!!!!!!!!!!!!!!
!!!!!!!!!!!!!!!!!!!!!!!!!!!!!!!!!!!!!!!!!!!!!!!!!!!!!!!!!!!!!!!!!!!!!!!!!!!!!!!!
!!!!!!!!!!!!!!!!!!!!!!!!!!!!!!!!!!!!!!!!!!!!!!!!!!!!!!!!!!!!!!!!!!!!!!!!!!!!!!!!
!!!!!!!!!!!!!!!!!!!!!!!!!!!!!!!!!!!!!!!!!!!!!!!!!!!!!!!!
PDM file installed.
Pix#
5. Unlike an Image file a PDM upgrade does not require a reboot you can check its worked straight away by issuing a show version command.
Pix# show version
Cisco PIX Firewall Version 6.3(5) Cisco PIX Device Manager Version 3.0(4)

{{{rest of output omitted}}}}
6. View of both files being copied out from your TFTP Server.
![]()
7. All done! – Time for a coffee – just make sure everything is up and working.
Related Articles, References, Credits, or External Links
NA