
KB ID 0000048
Problem
You want to deploy 2 Cisco ASA 55xx Series firewalls in an Active/Standby failover configuration.
Solution
Assumptions.
Hardware on both ASA firewalls is identical.
The correct license’s for failover are installed on both firewalls.
The same software versions are installed on both firewalls.
You have your PRIMARY firewall set up and running correctly (Everything works!).
In this example the firewalls were ASA5510’s and all interfaces were being used, so the Management port was used as the “Failover Link” (That needs a security plus license!).
This Link will use a crossover cable (Only available after version 7.0(2) before that you had to use a switch – I think!).
Also I’m using the same link for LAN Based failover (heartbeat) AND Stateful replication.
IP Addresses
Each interface will need its existing IP address, and an address to use whilst in “Standby”. In this example I will use the following,
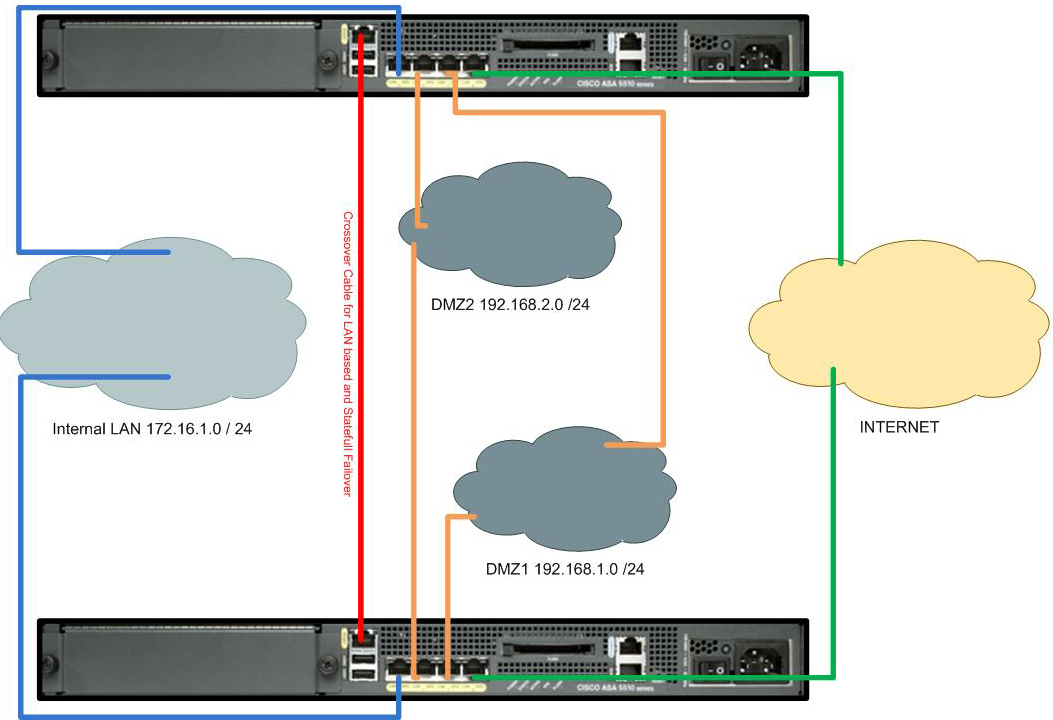
Outside Interface (Ethernet 0/0) 123.123.123.123 255.255.255.0
Outside Interface STANDBY 123.123.123.124 255.255.255.0
DMZ1 Interface (Ethernet0/1) 192.168.1.1 255.255.255.0
DMZ1 Interface STANDBY 192.168.1.254 255.255.255.0
DMZ2 Interface (Ethernet0/2) 192.168.2.1 255.255.255.0
DMZ2 Interface STANDBY 192.168.2.254 255.255.255.0
Inside Interface (Ethernet 0/3) 172.16.1.1 255.255.255.0
Inside Interface (STANDBY) 172.16.1.254 255.255.255.0
Failover Interface (Management0/0) 172.16.254.254 255.255.255.0
Failover Interface STANDBY 172.16.254.250 255.255.255.0
Step 1 Carry Out this procedure on the PRIMARY (Already configured and working) firewall.
1. Backup the running config on the primary firewall.
PetesASA# copy run flash:/before_failover.cfg

Source filename [running-config]?

Destination filename [before_failover.cfg]?
Cryptochecksum: babed83d 62a5fba7 e5ea368d 642157bd

8549 bytes copied in 3.670 secs (2849 bytes/sec)
PetesASA#
2. Blow away the config on the interface you are going to use for failover.
PetesASA(config)# clear configure interface GigabitEthernet1/7
PetesASA(config)# int GigabitEthernet1/7
PetesASA(config-if)# no shut
PetesASA(config)#
3. Change the interface IP addresses – (to add the standby addresses for each interface).
PetesASA(config)#
PetesASA(config)# interface GigabitEthernet1/1
PetesASA(config-if)# speed 1000
PetesASA(config-if)# duplex full
PetesASA(config-if)# nameif outside
PetesASA(config-if)# security-level 0
PetesASA(config-if)# ip address 123.123.123.123 255.255.255.0 standby 123.123.123.124
PetesASA(config-if)# interface GigabitEthernet1/2
PetesASA(config-if)# speed 1000
PetesASA(config-if)# duplex full
PetesASA(config-if)# nameif DMZ1
PetesASA(config-if)# security-level 50
PetesASA(config-if)# ip address 192.168.1.1 255.255.255.0 standby 192.168.1.254
PetesASA(config-if)# interface GigabitEthernet1/3
PetesASA(config-if)# speed 1000
PetesASA(config-if)# duplex full
PetesASA(config-if)# nameif DMZ2
PetesASA(config-if)# security-level 55
PetesASA(config-if)# ip address 192.168.2.1 255.255.255.0 standby 192.168.2.254
PetesASA(config-if)# interface GigabitEthernet1/4
PetesASA(config-if)# speed 1000
PetesASA(config-if)# duplex full
PetesASA(config-if)# nameif inside
PetesASA(config-if)# security-level 100
PetesASA(config-if)# ip address 172.16.1.1 255.255.255.0 standby 172.16.1.254
PetesASA(config-if)# exit
PetesASA(config)#
4. Set up the failover LAN interface (In config mode!).
PetesASA(config)#
PetesASA(config)# failover lan interface FAIL-OVER Gigabitethernet1/7
INFO: Non-failover interface config is cleared on Management0/0 and its sub-interfaces
PetesASA(config)#
5. Setup failover link IP address.
PetesASA(config)#
PetesASA(config)# failover interface ip FAIL-OVER 192.168.254.1 255.255.255.0 standby 192.168.254.2
PetesASA(config)#
6. Setup a shared key.
PetesASA(config)#
PetesASA(config)# failover key 666999
PetesASA(config)#
7. Set it as the primary firewall.
PetesASA(config)#
PetesASA(config)# failover lan unit primary
PetesASA(config)#
8. Turn on failover.
PetesASA(config)#
PetesASA(config)# failover
PetesASA(config)#
9. Now we need to enable stateful failover.
PetesASA(config)#
PetesASA(config)# failover link FAIL-OVER
PetesASA(config)#
10. Save the config.
PetesASA(config)#
PetesASA(config)# write mem
Building configuration...
Cryptochecksum: 5c8dfc45 ee6496db 8731d2d5 fa945425

8695 bytes copied in 3.670 secs (2898 bytes/sec)
[OK]
PetesASA(config)#
NOW CONFIGURATION IS FINISHED ON THE PRIMARY FIREWALL, ENSURE THE CABLING IS IN PLACE ON BOTH FIREWALLS THEN CONNECT TO THE STANDBY FIREWALL
Step 2 Carry Out this procedure on the Standby Firewall.
11. Enter enable mode .
ciscoasa>
ciscoasa> enable
Password:********
ciscoasa#
12. Clear the configuration on the failover interface (Management 0/0 in this example), then open the failover link and issue a “no shut” command.
ciscoasa#
ciscoasa# conf terminal
ciscoasa(config)# clear configure interface GigabitEthernet1/7
ciscoasa(config)# interface GigabitEthernet1/7
ciscoasa(config-if)# no shut
ciscoasa(config-if)# exit
ciscoasa(config)#
13. Turn on LAN interface for failover.
ciscoasa(config)#
ciscoasa(config)# failover lan interface FAIL-OVER Gigabitethernet1/7
INFO: Non-failover interface config is cleared on Management0/0 and its sub-interfaces
ciscoasa(config)#
YES: that’s the same as the primary firewall there WON’T be a conflict).
ciscoasa(config)#
ciscoasa(config)# failover interface ip FAIL-OVER 192.168.254.1 255.255.255.0 standby 192.168.254.2
ciscoasa(config)#
15. Give it the same key you used above (In step 6).
ciscoasa(config)#
ciscoasa(config)# failover lan key 666999
ciscoasa(config)#
16. Set it as the secondary (standby firewall).
ciscoasa(config)#
ciscoasa(config)# failover lan unit secondary
ciscoasa(config)#
17. Turn on failover.
ciscoasa(config)#
ciscoasa(config)# failover
ciscoasa(config)#
18. You should see……
Detected an Active mate
Beginning configuration replication from mate.
19. When is says that is has ended replication On the secondary firewall, issue a “show failover” (Note: the hostname will have changed to the one on the primary firewall).
PetesASA(config)#
PetesASA(config)# show failover
Failover On
Failover unit Secondary
Failover LAN Interface: failover Management0/0 (up)
Unit Poll frequency 1 seconds, holdtime 15 seconds
Interface Poll frequency 5 seconds, holdtime 25 seconds
Interface Policy 1
Monitored Interfaces 4 of 250 maximum
Version: Ours 7.2(2), Mate 7.0(5)
Last Failover at: 14:49:43 UTC May 4 2007
This host: Secondary - Standby Ready
Active time: 0 (sec)
slot 0: ASA5510 hw/sw rev (1.1/7.2(2)) status (Up Sys)
Interface Outside (123.123.123.124): Link Down (Waiting)
Interface DMZ1 (192.168.1.254): Link Down (Waiting)
Interface DMZ2 (192.168.2.254): Link Down (Waiting)
Interface Inside (172.16.1.254): Link Down (Waiting)
slot 1: empty
Other host: Primary - Active
Active time: 514 (sec)
slot 0: ASA5510 hw/sw rev (1.1/7.0(5)) status (Up Sys)
Interface Outside (123.123.123.123): Link Down (Waiting)
Interface DMZ1 (192.168.1.1): Link Down (Waiting)
Interface DMZ2 (192.168.1.1): Link Down (Waiting)
Interface Inside (172.16.1.1): Link Down (Waiting)
slot 1: empty
20. To double check go back to the PRIMARY firewall and issue the same command.
PetesASA(config)# show failover
Failover On
Failover unit Primary
Failover LAN Interface: failover Management0/0 (up)
Unit Poll frequency 1 seconds, holdtime 15 seconds
Interface Poll frequency 15 seconds
Interface Policy 1
Monitored Interfaces 4 of 250 maximum
Version: Ours 7.0(5), Mate 7.2(2)
Last Failover at: 13:21:42 UTC May 4 2007
This host: Primary - Active
Active time: 616 (sec)
slot 0: ASA5510 hw/sw rev (1.1/7.0(5)) status (Up Sys)
slot 1: empty
Interface Outside (123.123.123.123): Link Down (Waiting)
Interface DMZ1 (192.168.1.1): Link Down (Waiting)
Interface DMZ2 (192.168.2.1): Link Down (Waiting)
Interface Inside (172.16.1.1): Link Down (Waiting)
Other host: Secondary - Standby Ready
Active time: 0 (sec)
slot 0: ASA5510 hw/sw rev (1.1/7.2(2)) status (Up Sys)
slot 1: empty
Interface Outside (123.123.123.124): Link Down (Waiting)
Interface DMZ1 (192.168.1.254): Link Down (Waiting)
Interface DMZ2 (192.168.2.254): Link Down (Waiting)
Interface Inside (172.16.1.254): Link Down (Waiting)
21. The failover time out of the box is a bit pants, to nail it down a little, on the PRIMARY ASA
PetesASA(config)#
PetesASA(config)# failover poll 1 hol 3
PetesASA(config)# failover poll interface 3
PetesASA(config)# int GigabitEthernet 1/7
PetesASA(config-if)# failover poll interface 3
PetesASA(config)#
22. Save the config. (Note: config changed WILL be replicated to the standby firewall).
PetesASA(config)#
PetesASA(config)# write mem
Building configuration...
Cryptochecksum: 6650f6c9 09bbb5f0 0dafa0d1 8fc08aba

8756 bytes copied in 3.680 secs (2918 bytes/sec)
[OK]
PetesASA(config)#
23. When done pull the power on ASA 1 to fail. With a constant ping running you usually will only lose 1 ping packet.
Failover Commands to Copy and Paste
Note: This assumes you have already added ‘standby’ IP addresses to all you interfaces and is using GigabitEthernet0/4 as the failover interface. Change the values in bold to match your requirements.
Primary Firewall Config


clear configure interface GigabitEthernet0/4
interface GigabitEthernet0/4
no shut
exit
!
failover lan interface failover GigabitEthernet0/4
failover interface ip failover 192.168.255.9 255.255.255.252 standby 192.168.255.10
failover lan key 666999
failover lan unit primary
failover
failover link failover GigabitEthernet0/4
!
failover poll 1 hol 3
failover poll interface 3
interface GigabitEthernet0/4
failover poll interface 3
exit
!

Standby Firewall Config

clear configure interface GigabitEthernet0/4
interface GigabitEthernet0/4
no shut
exit
!
failover lan interface failover GigabitEthernet0/4
failover interface ip failover 192.168.255.9 255.255.255.252 standby 192.168.255.10
failover lan key 666999
failover lan unit secondary
failover
failover link failover GigabitEthernet0/4
!
Related Articles, References, Credits, or External Links
Thanks to Barry van Dijk for correcting up my syntax mistake 🙂
Cisco ASA 5500 Active/Standby – Zero Downtime Upgrade