
KB ID 0000040
Problem
You have multiple sites protected by Cisco Firewalls, you establish a remote connection VPN to one of your sites, but cannot get to the others.
Solution
Normally your remote workers will establish a VPN, with a VPN client (though this principle will also work for remote users with a hardware firewall). In this example we will stick with a remote client using VPN Client software (either using an IPSEC version 3 (or above) VPN client, or the AnyConnect VPN Client).

In this example a remote VPN client (10.0.99.1) connects to the main site (10.0.0.0), this site has an existing site to site VPN to a remote site (10.0.3.0).

In normal operation, the client can talk to the “File Server” (10.0.0.1), on the main site, BUT it cannot contact the “Web Server” (10.0.3.1), on the secondary site, to do that we need to employ “VPN Hair Pinning.”

With a Hair Pinned VPN the original remote VPN will still work, but we can also send and receive traffic to the remote site, over the same VPN.
Prerequisites
1. All firewalls must be Cisco ASA or PIX 500 Version 7 or above (sorry no PIX 501’s or 506E’s).
2. The sites in question must already be connected by a site to site VPN.
Cisco ASA 5500 Site to Site VPN (From CLI)
3. There must be an existing working Remote VPN (Client to Gateway) VPN to the main Site.
Cisco ASA 5500 AnyConnect Setup From Command Line
Start On the Firewall at the MAIN SITE
Step 1: Add the Subnet of the Remote Site to the “Split Tunnel” for the remote VPN
Note: This obviously assumes you are using split tunneling, if not skip to step 2, if you don’t know then ask yourself this “when I connect with the VPN client from home, can I browse the Internet at the same time on my remote PC?” – if the answer is yes then you probably are using split tunneling).
To find out, issue the following command;
MainSite# show run group-policy
group-policy GroupPolicy_ANYCONNECT-PROFILE internal
group-policy GroupPolicy_ANYCONNECT-PROFILE attributes
wins-server none
dns-server value 10.0.0.10 10.0.0.11
vpn-tunnel-protocol ikev2 ssl-client
split-tunnel-policy tunnelspecified
split-tunnel-network-list value SPLIT-TUNNEL
default-domain value petenetlive.com
MainSite#
That tells us that split tunneling is enabled, and it’s using an access list called “SPLIT-TUNNEL”. It’s almost like I set these things up neatly 🙂 Now you know what the access-list is called issue the following, command;
MainSite# show run access-list SPLIT-TUNNEL
access-list SPLIT-TUNNEL standard permit 10.0.0.0 255.255.255.0
MainSite#
So now we can add the remote sites network to the existing SPLIT-TUNNEL ACL;
MainSite# configure terminal
MainSite(config)# access-list SPLIT-TUNNEL line 2 permit 10.0.3.0 255.255.255.0
Step 2: Turn On Hair Pinning
Issue the following command;
MainSite(config)# same-security-traffic permit intra-interface
Step 3: Add the “Remote VPN Network” to the EXISTING site to site VPN on the Main Site.
To do this you need to add the “Pool” used for remote VPN access, to the ACL that the site to site VPN is using for the VPN, issue the following command (if you have a lot of VPN’s look for the one that has the IP address of the ASA at the remote site, in the example below 123.123.123.123).
MainSite(config)# show run crypto map
crypto map outside_map 19 match address VPN-INTERESTING-TRAFFIC
crypto map outside_map 19 set pfs
crypto map outside_map 19 set peer 123.123.123.123
crypto map outside_map 19 set transform-set ESP-3DES-SHA
This tells us the access-list that it’s using is called VPN-INTERESTING-TRAFFIC (Again I tend to give things descriptive names, yours may look more like, outside_1_cryptomap or something similar), let’s see what that’s doing, issue the following command;
MainSite(config)# show run access-list VPN-INTERESTING-TRAFIC
access-list VPN-INTERESTING-TRAFIC extended permit ip object OBJ-MainSite object OBJ-RemoteSite
So to add our remote VPN Pool do the following:
MainSite(config)# object network OBJ-REMOTE-VPN_CLIENTS
MainSite(config-network-object)# subnet 10.0.99.0 255.255.255.0
MainSite(config-network-object)# exit
MainSite#(config) access-list VPN-INTERESTING-TRAFIC line 2 permit ip object
OBJ-REMOTE-VPN_CLIENTS object OBJ-RemoteSite
Step 4: Add a NAT Exemption on the Main Site ASA.
Note: If your ASA is running an OS of 8.3 or newer you will need to perform the following additional step, (if your ASA is older than 8.3 then NAT is handled differently and you can skip to Step 5). Confusion Notice: Cisco documentation is misleading on this matter, it says you don’t have to do a NAT exemption., and that’s true if you are not already performing NAT/PAT. However, most people are! So you will need to add the following NAT exeption!
Why? After version 8.3 the ASA changed the way it handles NAT, because of this, if the main site is running an OS NEWER than 8.3, you need to add a NAT exemption. This will apply to traffic going from the remote VPN pool to the remote sites subnet. We can reuse the OBJ-REMOTE-VPN-CLIENTS object, (we created above,) to do this. Also (above) we found out the subnet at the remote site is already defined in an abject called OBJ-RemoteSite, so I’ll reuse that also.
MainSite(config)# nat (outside,outside) source static OBJ-REMOTE-VPN_CLIENTS
OBJ-REMOTE-VPN_CLIENTS destination static OBJ-RemoteSite OBJ-RemoteSite no-proxy-arp
route-lookup
That’s the config on the Main Site ASA Done – Don’t forget to save the config with a “write mem” command!
Step 5: Add a NAT Exemption on the Remote Site ASA
This is a NAT exemption on the existing site to site VPN, it’s basically saying don’t NAT any traffic from my network going to the remote VPN Subnet, how that’s done will differ depending on the age of the firewall e.g.
On a firewall Running Version 8.3 or Newer

RemoteSite# show run nat
nat (inside,outside) source static OBJ-RemoteSite OBJ-RemoteSite destination static
OBJ-MainSite OBJ-MainSite
!
object network OBJ-ANY-INTERNAL
nat (inside,outside) dynamic interface

On a firewall earlier than version 8.3

RemoteSite# show run nat
nat (inside) 0 access-list inside_nat0_outbound
nat (inside) 1 0.0.0.0 0.0.0.0
NEWER than 8.3: We need to create an object for the remote VPN clients, and add another NAT exemption for those clients.
OLDER than 8.3: For the uninitiated, on older firewalls NAT 0 means DONT NAT or ‘NAT exemption’, so this tells us the access-list doing the work is called inside_nat0_outbound, we just add the remote VPN subnet to that access list.
On a firewall Running Version 8.3 or Newer

RemoteSite# configure terminal
RemoteSite(config)# nat (inside,outside) source static OBJ-RemoteSite OBJ-RemoteSite
destination static OBJ-REMOTE-VPN_CLIENTS OBJ-REMOTE-VPN_CLIENTS
On a firewall earlier than version 8.3

RemoteSite# show run access-list inside_nat0_outbound
access-list inside_nat0_outbound extended permit ip 10.0.3.0 255.255.255.0 10.0.0.0
255.255.255.0

Then to add the remote VPN Subnet

RemoteSite# configure terminal
RemoteSite(config)# access-list inside_nat0_outbound line 2 permit ip 10.0.3.0
255.255.255.0 10.0.99.0 255.255.255.0
Step 6: Add the Remote VPN Pool to the EXISTING Site to Site VPN Access List.
This is the exact mirror of what we did in step 3, so to locate the correct cryptomap, once again issue the following command;
RemoteSite(config)# show run crypto map
crypto map outside_map 1 match address outside_1_cryptomap
crypto map outside_map 1 set pfs
crypto map outside_map 1 set peer 234.234.234.234
crypto map outside_map 1 set transform-set ESP-3DES-SHA
crypto map outside_map 1 set security-association lifetime seconds 28800
crypto map outside_map 1 set security-association lifetime kilobytes 4608000
As before, if you have many VPN tunnels, locate the one whose IP address matches the IP at the main site (in this example 234.234.234.234). So we now know that this cryptomap access-list is called outside_1_cryptomap, to see what that’s doing issue the following command:
RemoteSite(config)# show run access-list outside_1_cryptomap
access-list outside_1_cryptomap extended permit ip 10.0.3.0 255.255.255.0 10.0.0.0 255.255.255.0
So to add our Remote VPN pool simply issue the following command:
RemoteSite(config)# access-list outside_1_cryptomap line 2 permit ip 10.0.3.0
255.255.255.0 10.0.99.0 255.255.255.0
Job done, don’t forget to save the changes with a “Write mem” Command!
Testing Hair Pinning From the Client
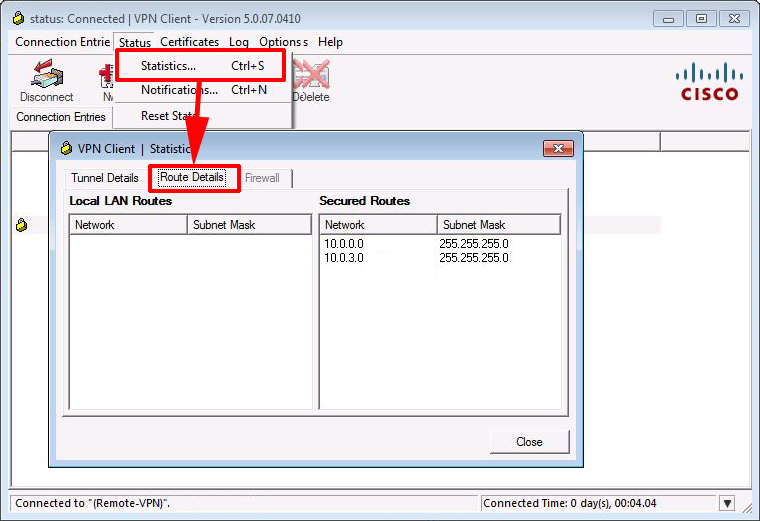
Using the IPSEC VPN Client
When connected, if you open the VPN client software and select Statistics > Route Details > you should see the subnet of both the main site and the remote site listed as ‘Secured Routes’
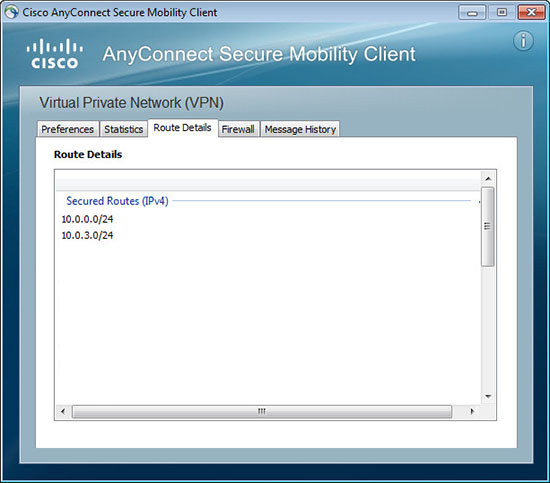
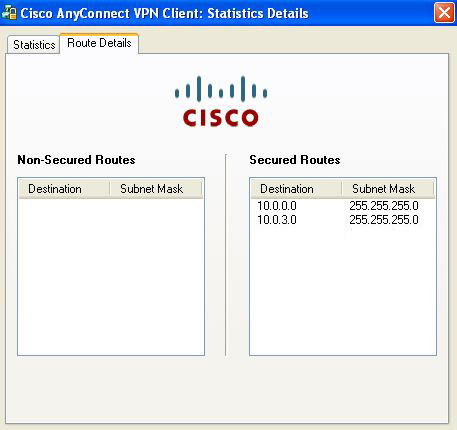
Using the AnyConnect VPN Client
When connected, if you open the VPN client software and select > Details > Route Details. Then you should see both the main site, and the remote site subnets.
AnyConnect Version 3 and 4
AnyConnect Version 2
Related Articles, References, Credits, or External Links
Original article written 01/07/09 updated 22/05/12, updated 10/07/2019