KB ID 0001392
Problem
In my scenario my Windows Server is a VMware virtual machine. To enable MPIO (Multipath I/O) I’m going to need two network cards, connected to the two iSCSI networks.
Above I’ve shown both iSCSI networks in different colours 192.168.51.0/24 and 192.168.50.0/24 in production I would also have these in their own VLANs, (or even separate physical networks).
This article is not about setting up your iSCSI Target/Storage, I’m assuming you have this up and running with the correct IP addresses connected to the correct networks ready to go.
Note: I’m also NOT using iSCSI authentication, and I’m also assuming you have allowed either the two IP addresses of the Windows server, (or more likely its iSCSI iqn address), access to the storage.
Solution
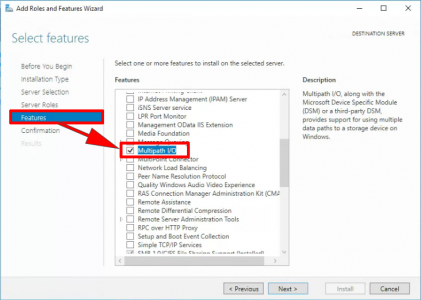
Firstly MPIO is NOT enabled or installed by default, you need to add it. Open Server Manager > Manage > Add Roles and Features > Follow the wizard all the way to ‘features’ > Enable Multipath I/O > Complete the Wizard.
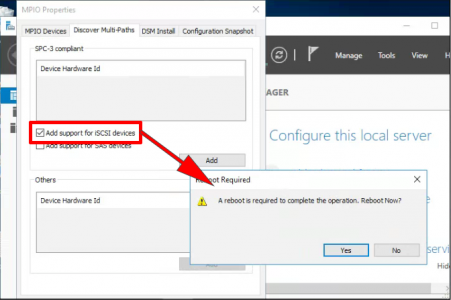
Back in Server Manager > Tools > MPIO > Discover Multi-Paths > Add support for iSCSI devices > Yes > Let the server reboot.
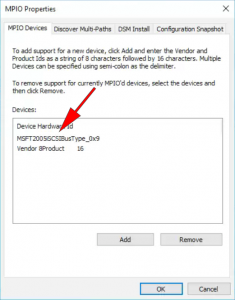
After the reboot go back into the MPIO properties, and make sure iSCSI is now listed, (MSFT2005iSCSIBusType_0x9). You can close the MPIO properties now.
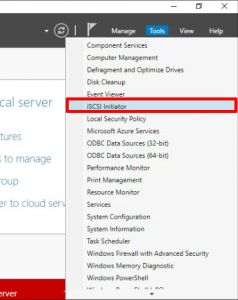
Now back in Server Manager > Tools > iSCSI Initiator.
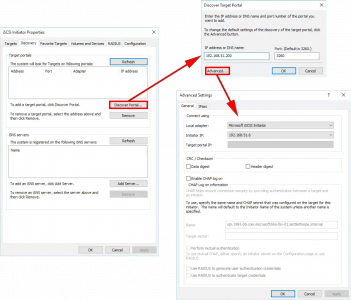
First task is to add the TWO iSCSI Target IP’s (192.168.50.200 and 192.168.51.200) > Discovery > Discover Portal > Put in the first iSCSI Target IP > Advanced > Local Adapter = Microsoft iSCSI Initiator > Initiator IP = The Servers NIC that’s on the same iSCSI network as this target, (i.e. 192.168.50.6 or 192.168.51.6) > OK > OK > Apply > OK.
NOW REPEAT THE PROCEDURE FOR THE SECOND iSCSI TARGET
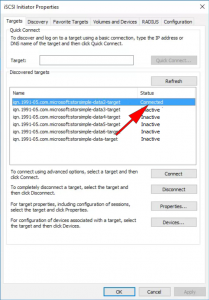
Assuming your iSCSI and networking setup are correctly, you should start to see the storage appearing on the ‘Targets’ tab. Select the first piece of storage you want to attach > Connect > Tick ‘Enable Multi-path’ > Advanced > Local Adapter = Initiator IP (either 192.168.50.6 or 192.168.51.6) > Target Portal IP = (The iSCSI Target IP that corresponds to the IP you have just set, either 192.168.50.200 or 192.168.51.200) > OK > OK > Apply > OK.
The status should change to connected.
NOW REPEAT THE PROCEDURE A ‘SECOND TIME’ FOR THE SAME PEICE OF STORAGE, BUT CONNECT TO IT FROM THE OTHER iSCSI IP ADDRESS, TO THE OTHER iSCSI TARGET IP. THERE YOU CONNECT TO EACH ONE ‘TWICE’ (ONCE OVER EACH iSCSI NETWORK).
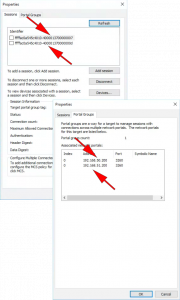
If you now look in the properties of the storage, you will see it has two identifiers and two IPv4 Portal groups.
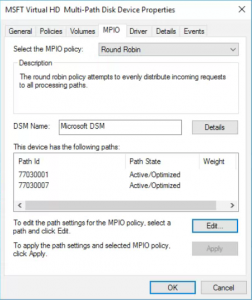
At this point you would need to go into ‘Disk Management’ (Server Manager > Tools > Computer Management > Disk Management). You will see the storage presented but ‘Offline’ you will need to bring the drive online > Create a partition on it, (if it does not already have one), and you can also assign a new drive letter. Note: Look in the Properties here, and you can prove MPIO is working and change the MPIO policy (if you require).
Related Articles, References, Credits, or External Links
NA



23/07/2020
I have one initiator host with a single iSCSI port receiving a disk from an iSCSI target with four ports. Is MPIO needed? (No switch space for additional initiator port sadly.)
23/07/2020
If it a single ‘Path’ then no.