
KB ID 0001114
Usually when I’m asked to setup Active/Active I cringe, not because its difficult, its simply because people assume active/active is better than active/standby. I hear comments like ‘we have paid for both firewalls lets use them’, or ‘I want to sweat both assets’.
The only real practical use cases I can think of for Active /Active are;
- You have a multi-tenancy environment and want to offer your tenants failover firewall capability.
- You have multiple LAN subnets and what to split them though different firewalls.
What Active/Active Wont Give You
Load balancing: It’s a firewall! If you want load balancing buy a load balancer! People assume because both firewalls are passing traffic, they must load balance, they don’t, in fact they don’t even pass traffic from the same subnet.
VPNS: Yes theres no VPNs with Active Active. (This is 100% the case up to an including version 9.0, after version 9.0 they have stopped saying it’s not supported, but don’t say it’s supported).
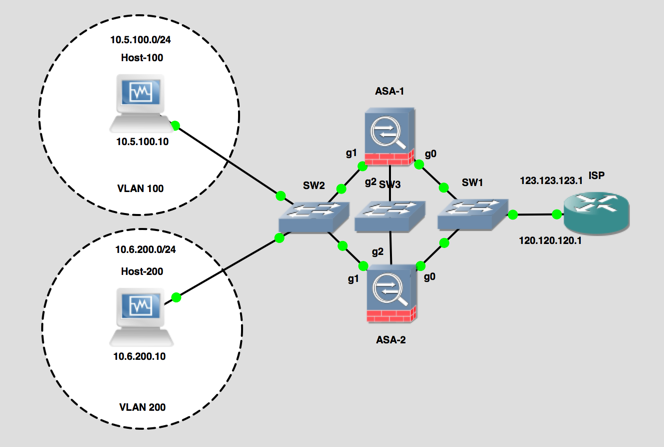
Deploy Cisco ASA in Active/Active Failover
Here’s what Im going to setup;
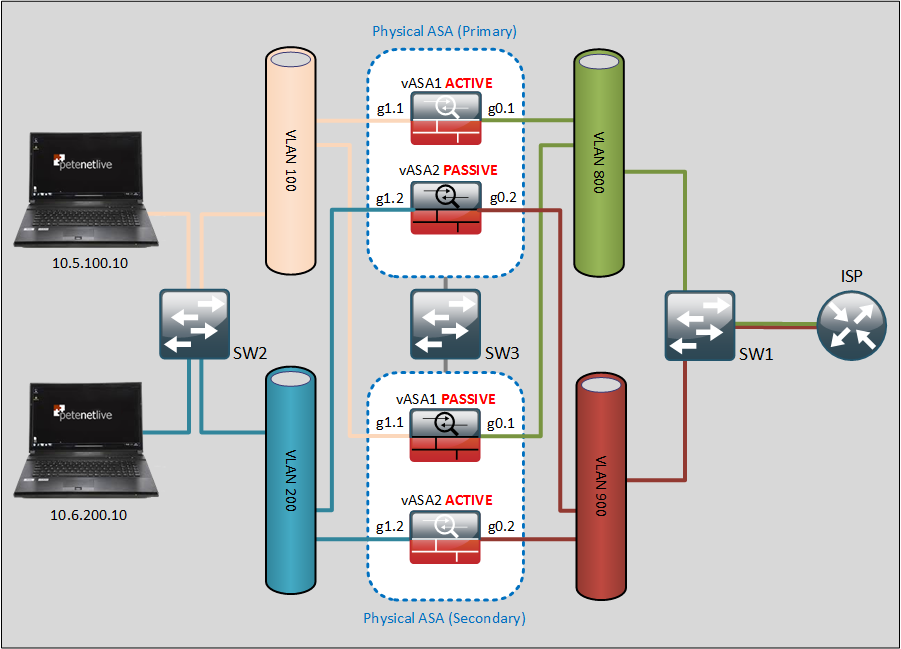
For a more ‘logical’ view heres what is actually being setup;
1. Make sure the Licences are on the firewalls allow multiple contexts. and Active/Active, for 5510, 5512-X, and 5508-X that means Security Plus, for all other models a ‘base’ licence is required. (Note: This CANNOT be done on an ASA 5505 or 5506-X).
ciscoasa(config)# show version

Cisco Adaptive Security Appliance Software Version 8.4(2)

——OUTPUT REMOVED FOR THE SAKE OF BREVITY—

Failover                          : Active/Active  perpetual
VPN-DES                           : Enabled        perpetual
VPN-3DES-AES                      : Disabled       perpetual
Security Contexts                 : 5              perpetual
GTP/GPRS                          : Disabled       perpetual

——OUTPUT REMOVED FOR THE SAKE OF BREVITY—

Configuration last modified by enable_15 at 08:04:40.249 UTC Wed Oct 14 2015
ciscoasa(config)#
2. Put the firewalls in Multiple context mode.
ciscoasa(config)# mode multiple
WARNING: This command will change the behavior of the device
WARNING: This command will initiate a Reboot
Proceed with change mode? [confirm]
Convert the system configuration? [confirm]
!
The old running configuration file will be written to flash

Converting the configuration - this may take several minutes for a large configuration

The admin context configuration will be written to flash

The new running configuration file was written to flash
Security context mode: multiple
3. Let it reboot.
4. Make sure the firewall is in routed mode, and multiple context mode, repeat on the other firewall.
ciscoasa> enable
Password: *********
ciscoasa# show mode
Security context mode: multiple
ciscoasa# show firewall
Firewall mode: Router
ciscoasa#
5. Once ASA1 is backup give it a sensible hostname, and ensure all the physical interfaces (and any sub interfaces) are NOT shutdown, and add then to the relevant VLAN (they are shut down by default).
ciscoasa(config)# hostname PHYSICAL-ASA
PHYSICAL-ASA(config)# interface gigabitEthernet 0
PHYSICAL-ASA(config-if)# no shut
PHYSICAL-ASA(config)# interface gigabitEthernet 0.1
PHYSICAL-ASA(config-subif)# no shut
PHYSICAL-ASA(config-subif)# vlan 800
PHYSICAL-ASA(config)# interface gigabitEthernet 0.2
PHYSICAL-ASA(config-subif)# no shut
PHYSICAL-ASA(config-subif)# vlan 900
PHYSICAL-ASA(config)# interface gigabitEthernet 1
PHYSICAL-ASA(config-if)# no shut
PHYSICAL-ASA(config-if)# interface gigabitEthernet 1.1
PHYSICAL-ASA(config-subif)# no shut
PHYSICAL-ASA(config-subif)# vlan 100
PHYSICAL-ASA(config-subif)# interface gigabitEthernet 1.2
PHYSICAL-ASA(config-subif)# no shut
PHYSICAL-ASA(config-subif)# vlan 200
PHYSICAL-ASA(config-subif)# exit
PHYSICAL-ASA(config)# exit
PHYSICAL-ASA#
6. Failover link NEEDS to be configured and used by the SYTEM Context, so its configured here. (Note: I’m using the same physical interface for LAN and Stateful failover information).
PHYSICAL-ASA(config)# failover lan unit primary
PHYSICAL-ASA(config)# failover lan interface FAILOVER GigabitEthernet2
INFO: Non-failover interface config is cleared on GigabitEthernet2 and its sub-interfaces
PHYSICAL-ASA(config)# failover link FAILOVER GigabitEthernet2
PHYSICAL-ASA(config)# failover interface ip FAILOVER 172.16.1.1 255.255.255.0 standby 172.16.1.2
PHYSICAL-ASA(config)#
7. You can only have TWO failover groups (you can have many contexts, depending on the licence on your firewall).
PHYSICAL-ASA(config)# failover group 1
PHYSICAL-ASA(config-fover-group)# polltime interface msec 500 holdtime 5
PHYSICAL-ASA(config-fover-group)# primary
PHYSICAL-ASA(config-fover-group)# preempt 100
PHYSICAL-ASA(config-fover-group)# exit
PHYSICAL-ASA(config)# failover group 2
PHYSICAL-ASA(config-fover-group)# polltime interface msec 500 holdtime 5
PHYSICAL-ASA(config-fover-group)# secondary
PHYSICAL-ASA(config-fover-group)# preempt 200
Note: Unlike Active/Passive the ASA can preempt and ‘fail-back’ automatically.
8. Setup and assign your CONTEXTS (virtual firewalls), to these groups.
PHYSICAL-ASA(config)# admin-context admin
PHYSICAL-ASA(config)# context admin
PHYSICAL-ASA(config-ctx)# config-url disk0:/admin.cfg

Cryptochecksum (changed): d9951253 3b82d2ce 840166f8 ccd3d7f1
INFO: Context admin was created with URL disk0:/admin.cfg
INFO: Admin context will take some time to come up .... please wait.
PHYSICAL-ASA(config-ctx)# context vASA1
Creating context 'vASA1'... Done. (2)
PHYSICAL-ASA(config-ctx)# allocate-interface GigabitEthernet1.1 inside_vASA1
PHYSICAL-ASA(config-ctx)# allocate-interface GigabitEthernet0.1 outside_vASA1
PHYSICAL-ASA(config-ctx)# config-url disk0:/vASA1.cfg

WARNING: Could not fetch the URL disk0:/vASA1.cfg
INFO: Creating context with default config
PHYSICAL-ASA(config-ctx)# join-failover-group 1
PHYSICAL-ASA(config-ctx)# context vASA2
Creating context 'vASA2'... Done. (3)
PHYSICAL-ASA(config-ctx)# allocate-interface GigabitEthernet1.2 inside_vASA2
PHYSICAL-ASA(config-ctx)# allocate-interface GigabitEthernet0.2 outside_vASA2
PHYSICAL-ASA(config-ctx)# config-url disk0:/vASA2.cfg

WARNING: Could not fetch the URL disk0:/vASA2.cfg
INFO: Creating context with default config
PHYSICAL-ASA(config-ctx)# join-failover-group 2
The following will show you a summary of the contexts.
PHYSICAL-ASA(config)# show run | b context
admin-context admin
context admin
  config-url disk0:/admin.cfg
!

context vASA1
  allocate-interface GigabitEthernet0.1 outside_vASA1
  allocate-interface GigabitEthernet1.1 inside_vASA1
  config-url disk0:/vASA1.cfg
  join-failover-group 1
!

context vASA2
  allocate-interface GigabitEthernet0.2 outside_vASA2
  allocate-interface GigabitEthernet1.2 inside_vASA2
  config-url disk0:/vASA2.cfg
  join-failover-group 2
!
10. Now configure vASA1.
PHYSICAL-ASA(config)# changeto context vASA1
PHYSICAL-ASA/vASA1(config)# interface outside_vASA 1
PHYSICAL-ASA/vASA1(config-if)# nameif outside
INFO: Security level for "outside" set to 0 by default.
PHYSICAL-ASA/vASA1(config-if)# ip address 123.123.123.123 255.255.255.0 standby 123.123.123.124
PHYSICAL-ASA/vASA1(config-if)# no shut
PHYSICAL-ASA/vASA1(config)# interface inside_vASA 1
PHYSICAL-ASA/vASA1(config-if)# nameif inside
INFO: Security level for "inside" set to 100 by default.
PHYSICAL-ASA/vASA1(config-if)# ip address 10.5.100.1 255.255.255.0 standby 10.5.200.2
PHYSICAL-ASA/vASA1(config-if)# no shut
PHYSICAL-ASA/vASA1(config-if)# exit
PHYSICAL-ASA/vASA1(config)# route outside 0.0.0.0 0.0.0.0 123.123.123.1
PHYSICAL-ASA/vASA1(config)# monitor-interface inside
PHYSICAL-ASA/vASA1(config)# monitor-interface outside
PHYSICAL-ASA/vASA1(config)# object network obj_any
PHYSICAL-ASA/vASA1(config-network-object)# subnet 0.0.0.0 0.0.0.0
PHYSICAL-ASA/vASA1(config-network-object)# nat (inside,outside) dynamic interface
PHYSICAL-ASA/vASA1(config-network-object)# exit
PHYSICAL-ASA/vASA1(config)# exit
PHYSICAL-ASA/vASA1#
11. Now configure vASA2.
PHYSICAL-ASA/vASA1(config)# changeto context vASA2
PHYSICAL-ASA/vASA2(config)# interface inside_vASA 2
PHYSICAL-ASA/vASA2(config-if)# nameif inside
INFO: Security level for "inside" set to 100 by default.
PHYSICAL-ASA/vASA2(config-if)# ip address 10.6.200.1 255.255.255.0 standby 10.6.200.2
PHYSICAL-ASA/vASA2(config-if)# no shut
PHYSICAL-ASA/vASA2(config)# interface outside_vASA 2
PHYSICAL-ASA/vASA2(config-if)# nameif outside
INFO: Security level for "outside" set to 0 by default.
PHYSICAL-ASA/vASA2(config-if)# ip address 120.120.120.120 255.255.255.0 standby 120.120.120.122
PHYSICAL-ASA/vASA2(config-if)# exit
PHYSICAL-ASA/vASA2(config)# route outside 0.0.0.0 0.0.0.0 120.120.120.1
PHYSICAL-ASA/vASA2(config)# object network obj_any
PHYSICAL-ASA/vASA2(config-network-object)# subnet 0.0.0.0 0.0.0.0
PHYSICAL-ASA/vASA2(config-network-object)# nat (inside,outside) dynamic interface
PHYSICAL-ASA/vASA2(config-network-object)# exit
PHYSICAL-ASA/vASA2(config)#
12. Go back the the System context and save ALL the changes.
PHYSICAL-ASA/vASA2(config)# changeto system
PHYSICAL-ASA(config)# wr mem all
Building configuration...
Saving context :           system : (000/003 Contexts saved)
Cryptochecksum: e63d00e3 18224da1 be9d77c6 27c6e54d

2109 bytes copied in 0.300 secs
Saving context :            admin : (001/003 Contexts saved)
Cryptochecksum: f2f07827 f2784851 89925ac1 86c1e96f

974 bytes copied in 0.330 secs
Saving context :            vASA1 : (002/003 Contexts saved)
Cryptochecksum: 037e3a39 fe10e4d0 ff72d306 36fcf1ed

1930 bytes copied in 0.330 secs
Saving context :            vASA2 : (003/003 Contexts saved)
Cryptochecksum: e9024f22 53ad6316 70f7ccad 4394c81c

1879 bytes copied in 0.230 secs
[OK]
PHYSICAL-ASA(config)#
Note: Configuration on the main (physical) firewall is complete, the ‘failover’ configuration needs to now be setup on the second physical ASA.
13. On the ’Secondary’ Physical ASA.
ciscoasa# configure terminal
ciscoasa(config)# interface gigabitEthernet 0
ciscoasa(config-if)# no shut
ciscoasa(config-if)# interface gigabitEthernet 0.1
ciscoasa(config-subif)# no shut
ciscoasa(config-subif)# vlan 800
ciscoasa(config-subif)# interface gigabitEthernet 0.2
ciscoasa(config-subif)# no shut
ciscoasa(config-subif)# vlan 900
ciscoasa(config-subif)# interface gigabitEthernet 1
ciscoasa(config-if)# no shut
ciscoasa(config-if)# interface gigabitEthernet 1.1
ciscoasa(config-subif)# no shut
ciscoasa(config-subif)# vlan 100
ciscoasa(config-subif)# interface gigabitEthernet 1.2
ciscoasa(config-subif)# no shut
ciscoasa(config-subif)# vlan 200
ciscoasa(config-subif)# exit
ciscoasa(config)# failover lan unit secondary
ciscoasa(config)# failover lan interface FAILOVER GigabitEthernet2
INFO: Non-failover interface config is cleared on GigabitEthernet2 and its sub-interfaces
ciscoasa(config)# failover link FAILOVER GigabitEthernet2
ciscoasa(config)# failover interface ip FAILOVER 172.16.1.1 255.255.255.0 standby 172.16.1.2
ciscoasa(config)#
14. Remember failover is off by default, and we have not switched it on, this needs to be done on both of the physical ASA’s (primary and secondary). Note: Make sure the ‘failover’ interface is NOT in a shut down state first!
Secondary


ciscoasa(config)# interface GigabitEthernet2
ciscoasa(config)# no shut
ciscoasa(config)# failover
ciscoasa(config)#

Primary

PHYSICAL-ASA(config)# int gigabitEthernet 2
PHYSICAL-ASA(config-if)# no shut
PHYSICAL-ASA(config)# failover
PHYSICAL-ASA(config)#
Note: If building in GNS3 sometimes you need to put a switch in the middle of the ‘backup link’ or the firewalls don’t detect each other!
17. Top Tip: Remember that you need to make the changes on the active firewall context in the correct failover group. Change the firewall prompt to show you all this information.
PHYSICAL-ASA# conf t
PHYSICAL-ASA(config)# prompt hostname context priority state
PHYSICAL-ASA/pri/act(config)#
Testing Active/Active Failover
If you change to vASA1 (notice it’s active).
PHYSICAL-ASA/pri/act(config)# changeto context vASA1
PHYSICAL-ASA/vASA1/pri/act(config)#
Now change to vASA2, (This ones in standby so DONT make changes here or they wont get replicated / saved).
PHYSICAL-ASA/vASA1/pri/act(config)# changeto context vASA2
PHYSICAL-ASA/vASA2/pri/stby(config)#
Note: Moral of the story is you need to be aware what physical firewall you are on (primary or secondary) what mode you are in (active or standby) and what context you are in (vASA1 or vASA2). So in this example to make a change to vASA2 you would need to go to Secondary/Standby/vASA2 to edit the active firewall, (confusing eh! That’s why I change the firewall prompt).
Now you will want to test things, probably by pinging, don’t forget ICMP is not enabled by default an you will need to enable it, (in each context).
vASA1 (as specified above), make sure it says ‘act’ on the end of the prompt.

PHYSICAL-ASA/pri/act(config)# changeto context vASA1
PHYSICAL-ASA/vASA1/pri/act(config)# policy-map global_policy
PHYSICAL-ASA/vASA1/pri/act(config-pmap)# class inspection_default
PHYSICAL-ASA/vASA1/pri/act(config-pmap-c)# inspect icmp
PHYSICAL-ASA/vASA1/pri/act(config-pmap-c)# exit
PHYSICAL-ASA/vASA1/pri/act(config-pmap)# exit
PHYSICAL-ASA/vASA1/pri/act(config)# exit
PHYSICAL-ASA/vASA1/pri/act#

vASA2 (as specified above), make sure it says ‘act’ on the end of the prompt.

PHYSICAL-ASA/sec/stby# changeto context vASA2
PHYSICAL-ASA/vASA2/sec/act# conf t
PHYSICAL-ASA/vASA2/sec/act(config)# policy-map global_policy
PHYSICAL-ASA/vASA2/sec/act(config-pmap)# class inspection_default
PHYSICAL-ASA/vASA2/sec/act(config-pmap-c)# inspect icmp
PHYSICAL-ASA/vASA2/sec/act(config-pmap-c)# exit
PHYSICAL-ASA/vASA2/sec/act(config-pmap)# exit
PHYSICAL-ASA/vASA2/sec/act(config)# exit