
KB ID 0001081
Problem
I see this question get asked a lot on forums, most people never touch the firewall, ‘if it’s working leave it alone’. And that’s great until you move offices, or get a newer faster (or cheaper) Internet connection.

What if you have lots of public IP addresses? What if you have VPN’s (or AnyConnect clients). What’s the best way to do this with a minimum of downtime?
Note: If you get your all your outside IP details via DHCP, and no one speaks you you from outside (i.e. The ISP always reserves and issues the same IP details to you because you have a mail server or have VPN connections etc). Then you can probably simply plug into the new Router/Modem/Socket and reboot the ASA.
Solution
Time spent on reconnaissance is seldom wasted.
OK lets not run to the comms rack with a laptop and get stuck into the problem, get all your ducks in a row first.
1. Your Current Internet Connection: I know you’re going to turn this off, but if there’s a problem and everything ‘goes to hell in a hand cart’, you might need to connect back to this one in a hurry, (best not to look like a clown because you deleted all those settings and don’t know what they are). As a bare minimum have the following;
- ISP Name.
- ISP Tech Support phone number.
- IP Address(s) allocated to you from the ISP. (Including the subnet mask and IP of their router if applicable).
- Username and Passwords for your Internet Connection (if applicable i.e. for ADSL, PPPoE etc).
- The details, of any public DNS records that point to you i.e. The MX records for your email, or URLs for any web services you host etc. If you have a web portal for managing this make sure you can log in. Or if your ISP handles this, get the information on how you can change your host records to point to the new IP address, (i.e. a fax on company headed notepaper, or a call to your account manager etc).
Setting up the Correct DNS Records for your Web or Mail Server
Then ring the old ISP make sure you can log a technical call without having to give them a password, (that everyone’s forgotten), or the only person who they will talk to left the company five years ago. (Get the feeling I’ve done this a lot!)
2. Your New Internet Connection: See everything you did above? get all the same information for the new ISP.
3. Backup: You are only ever as good as your last backup, make sure the ASA is backed up before you start, and backup to TFTP, or via the ASDM NOT by copy pasting the config into Notepad (this tends to hide shared secrets etc).
Backup and Restore a Cisco Firewall.
4. Test The New Internet Connection: I’ve had many a call from a colleague, that they can’t get an ASA working through a new Internet connection. And when I tell then to turn off the ASA and plug their Laptop into the Router/Modem/Socket guess what? Yes, the connection that the salesmen at the ISP said was live, really isn’t!
Warning: Sometimes you find that if you have used the public IP your ISP gave you on your laptop, that when you plug in the ASA it won’t work, (this happens because the router ‘caches’ the MAC address of the Laptop, and get confused when the ASA uses the same IP). So if possible use a different IP for testing, (if you have more than one IP). Or turn the ISP equipment off for a while after testing.
5. Who talks to you? What speaks to the ASA from outside? Do you have a web server, email server, FTP server, public facing service. Do have other offices that connect to you via VPN? Do you have remote workers that connect via VPN/AnyConnect?
5a. What Other Public IP’s Do You Use? You may have covered this in point 5 but now I’m talking about the public IP addresses that are in use but NOT assigned to the outside interface. Typically these are used in what we call static NAT.
If you have other sites with VPNs to you, they will need changing to point to the new public IP address.
Cisco ASA – Changing VPN IP Addresses
Changing The ‘Outside’ IP of the ASA
Now you’ve read all the above, you have a better appreciation of what you might break, and how much downtime to expect. The outside interface of the ASA is exactly the same as any network connection it needs an IP address, a subnet mask, and a default route (same as default gateway for you Windows types).
Again never assume the outside interface is called ‘outside’, I’ve seen all sorts of naming outside, Outside, Public, WAN etc. You already know the public IP so let’s see what the interface name that’s using it is;
From CLI;
Petes-ASA> enable
Password: ********
Petes-ASA# show ip
System IP Addresses:
Interface                Name                   IP address      Subnet mask     Method
GigabitEthernet0         outside                91.91.91.1      255.255.255.248 CONFIG
GigabitEthernet1         inside                 192.168.1.1     255.255.255.0   CONFIG
Current IP Addresses:
Interface                Name                   IP address      Subnet mask     Method
GigabitEthernet0         outside                91.91.91.1      255.255.255.248 CONFIG
GigabitEthernet1         inside                 192.168.1.1     255.255.255.0   CONFIG
Petes-ASA#

Or on an ASA 5505

Password: ********
Petes-ASA# show ip
System IP Addresses:
Interface                Name                   IP address      Subnet mask     Method
Vlan1                    inside                 192.168.1.1     255.255.255.0   CONFIG
Vlan2                    outside                91.91.91.1      255.255.252.248 CONFIG
Current IP Addresses:
Interface                Name                   IP address      Subnet mask     Method
Vlan1                    inside                 192.168.1.1     255.255.255.0   CONFIG
Vlan2                    outside                91.91.91.1      255.255.252.248 CONFIG
Petes-ASA#

Notice: On smaller ASA's the IP address is allocated to a VLAN, on larger ones the IP
is allocated to a physical interface. Also the 'Method' says 'CONFIG', if it said DHCP
then you are getting these settings dynamically from your ISP.
From ASDM;
Configuration > Device Setup > Interfaces.

Now we know out interface name and where the IP address and the subnet mask are. Now we need to locate the default route for the ‘outside’ interface, (or whatever yours is called).
From CLI;
ASA-1# show run route
route outside 0.0.0.0 0.0.0.0 91.91.91.2 1
ASA-1#

Or to get the same information from the routing table;

Petes-ASA# show route

Codes: C - connected, S - static, I - IGRP, R - RIP, M - mobile, B - BGP
       D - EIGRP, EX - EIGRP external, O - OSPF, IA - OSPF inter area
       N1 - OSPF NSSA external type 1, N2 - OSPF NSSA external type 2
       E1 - OSPF external type 1, E2 - OSPF external type 2, E - EGP
       i - IS-IS, L1 - IS-IS level-1, L2 - IS-IS level-2, ia - IS-IS inter area
       * - candidate default, U - per-user static route, o - ODR
       P - periodic downloaded static route

Gateway of last resort is 10.2.2.10 to network 0.0.0.0

C    91.91.91.0 255.255.255.248 is directly connected, outside
C    192.168.1.0 255.255.255.0 is directly connected, inside
S*   0.0.0.0 0.0.0.0 [1/0] via 91.91.91.2 outside
Petes-ASA#
From ASDM;
Configuration > Device Setup > Routing > Static Routes.
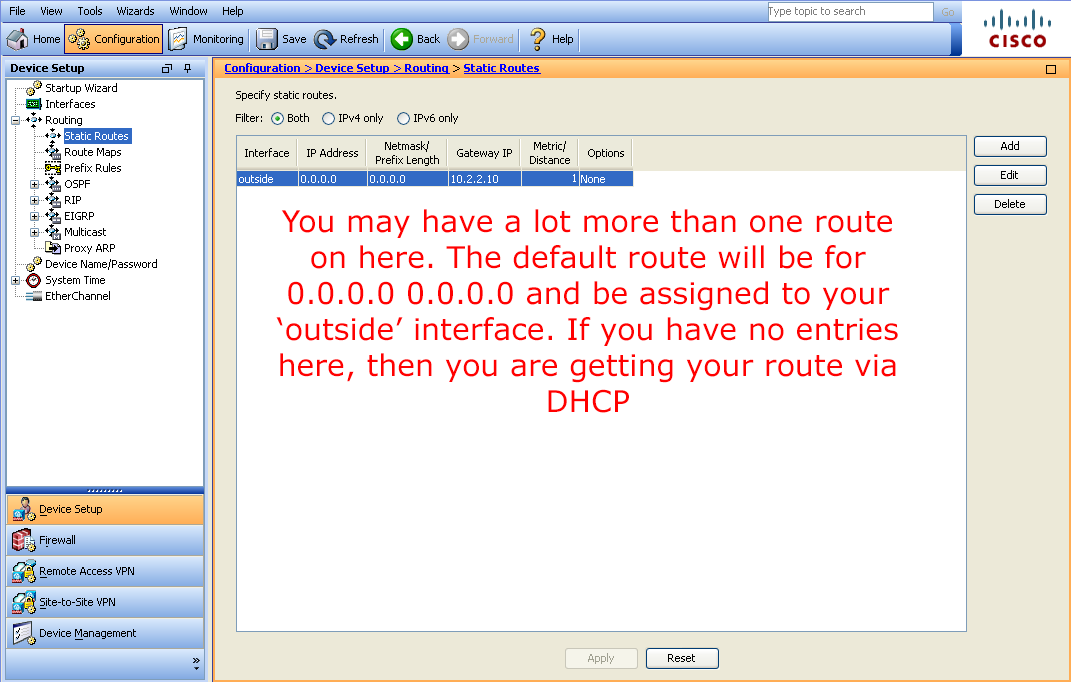
Now you know the interface name, you know know its physical name, (GigabitEthernet0, Vlan 2, etc.) You have all the information you need to change the IP address, subnet mask and default route.
From CLI;
Petes-ASA> enable
Password: *********
Petes-ASA# Configure Terminal
Petes-ASA(config)# int gigabitEthernet 0
Petes-ASA(config-if)# ip address 60.60.60.1 255.255.255.240
Petes-ASA(config-if)# exit

You can only have one 'Default route', so you can't just add the new one, (or it will error)
so you need to remove that route, (by prefixing the command with a 'no'). Then add the new
default route in.

Note: If there's a number at the end of the route command, you can leave that off it's just
a routing metric number.

Petes-ASA(config)# no route outside 0.0.0.0 0.0.0.0 91.91.91.2
Petes-ASA(config)# route outside 0.0.0.0 0.0.0.0 60.60.60.2
From ASDM;
In the ASDM you go to the same sections you did above, select the interface or route, click edit, then make the change. Note if you are going to use PPPoE read the following article.
Cisco ASA 5500 – Configuring PPPoE

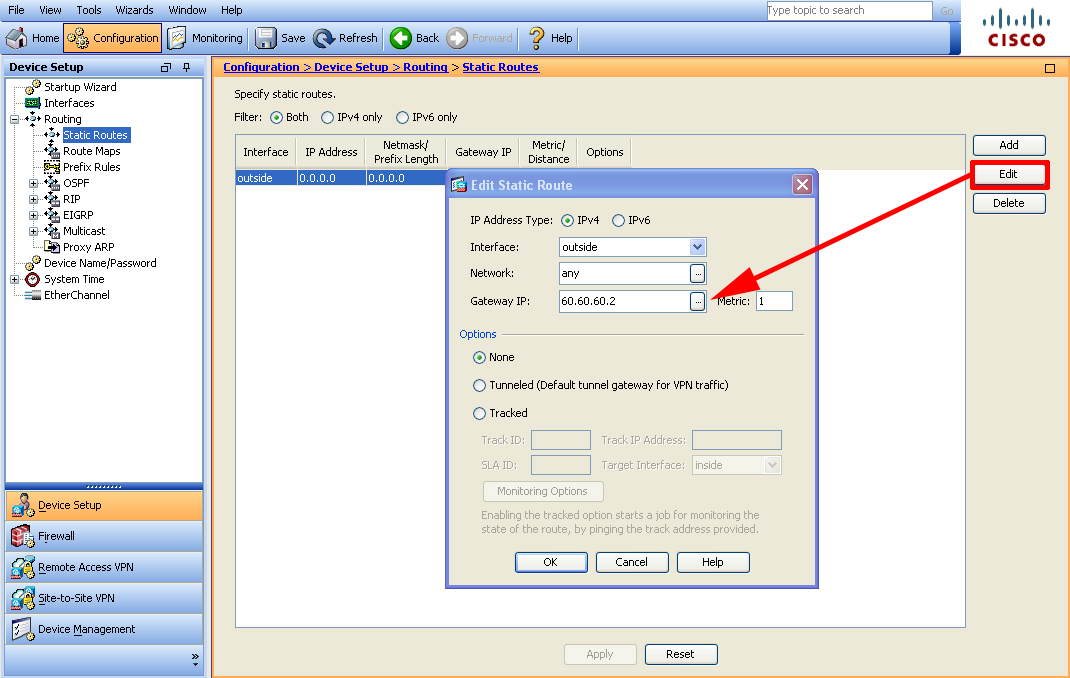
Don’t forget to click Apply!
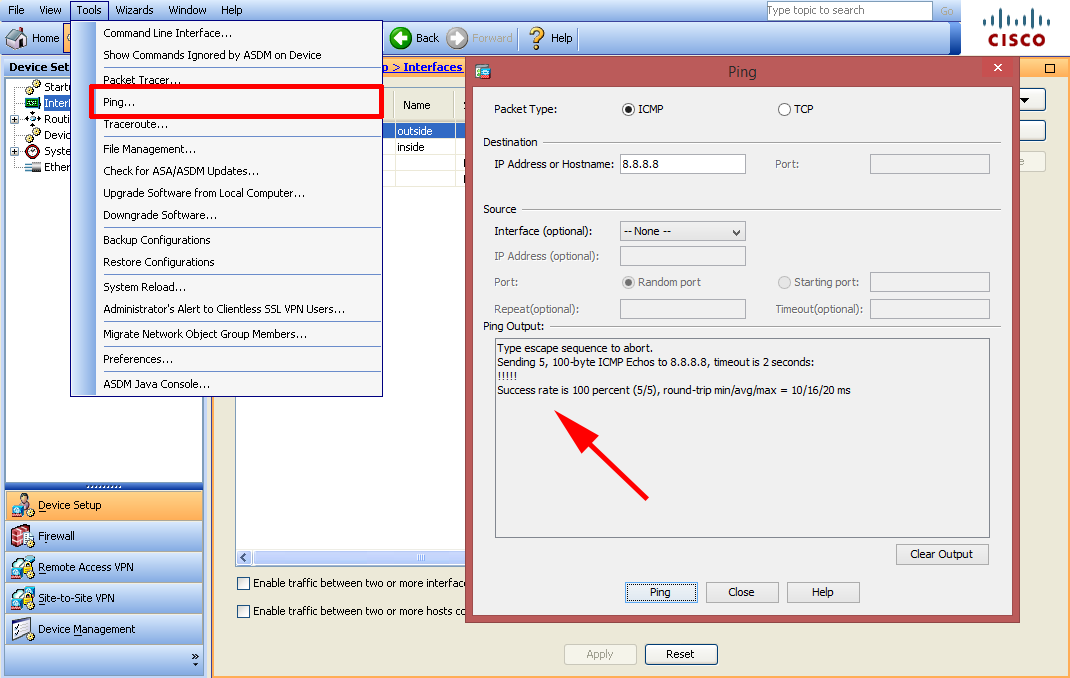
Test – The New Public IP Address
Before we look at anything else we need to make sure the ASA has connectivity to the Internet, and THE ASA can ping a public ip address (Note: I said the ASA, not something on your network). I usually ping 8.8.8.8 (Google DNS server) because it always responds.
User Access Verification

Password: *******
Type help or '?' for a list of available commands.
Petes-ASA> enable
Password: ********
Petes-ASA# ping 8.8.8.8
Type escape sequence to abort.
Sending 5, 100-byte ICMP Echos to 8.8.8.8, timeout is 2 seconds:
!!!!!
Success rate is 100 percent (5/5), round-trip min/avg/max = 10/14/20 ms
Petes-ASA#
If this fails, ensure you can ping your ISP router (default route IP) this should be pretty easy to troubleshoot with the assistance of the ISP.
Once the ASA can connect to the Internet make sure your internal clients can, remember if you are going to use ping to test connectivity though the firewall you need to have ICMP inspection setup see the following article;
Cisco ASA – Migrating Other Public IP Addresses
If you are performing ‘port forwarding‘ from the outside interface, i.e. taking all SMTP (TCP Port 25) traffic and forwarding it to an internal host, then the firewall should require no further configuration as that should be done from the interface name NOT the old public IP address.
You can quickly setup port forwarding if it’s stopped by reading the following article;
Cisco PIX / ASA Port Forwarding
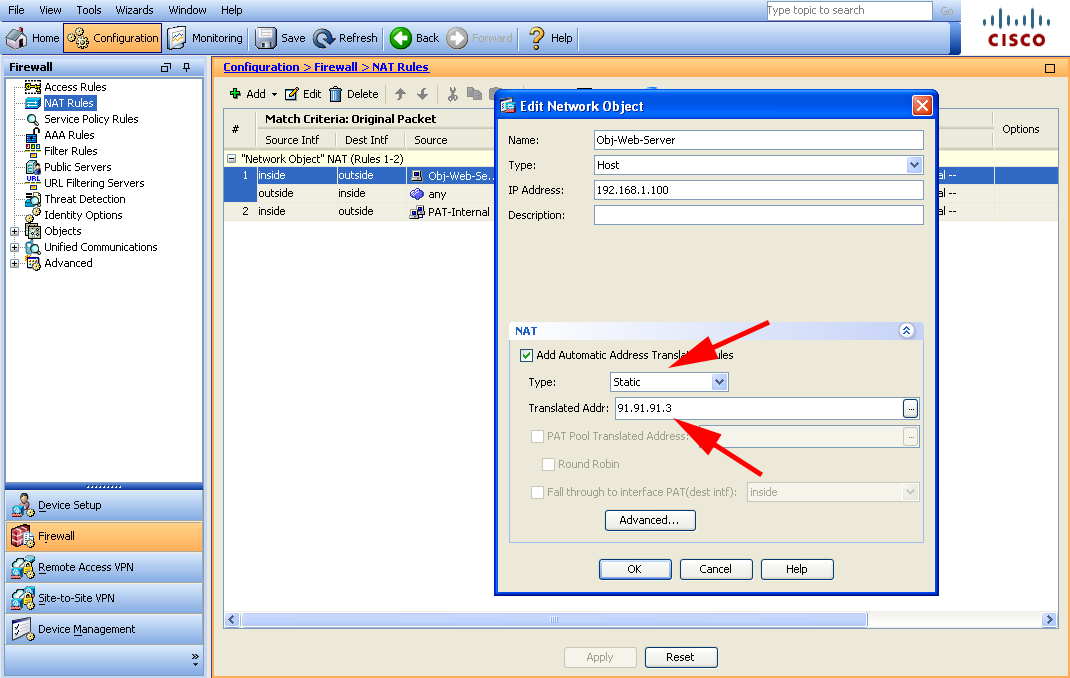
If you have public IP addresses statically mapped to public IP addresses from your old ISP range then these will need to be changed. here you can see Ive got a static NAT for an internal server;
Petes-ASA# show nat

Auto NAT Policies (Section 2)
1 (inside) to (outside) source static Obj-Web-Server 91.91.91.3
    translate_hits = 101, untranslate_hits = 100
2 (inside) to (outside) source dynamic PAT-Internal interface
    translate_hits = 999, untranslate_hits = 52
Petes-ASA#

Petes-ASA# show run nat
!
object network PAT-Internal
 nat (inside,outside) dynamic interface
object network Obj-Web-Server
 nat (inside,outside) static 91.91.91.3
ASA-1#

To Change

Petes-ASA# configure terminal
Petes-ASA(config)# object network Obj-Web-Server
Petes-ASA(config-network-object)# no nat (inside,outside) static 91.91.91.3
Petes-ASA(config-network-object)# nat (inside,outside) static 60.60.60.3
Petes-ASA(config-network-object)# exit
Petes-ASA(config)# clear xlate
INFO: 453 xlate deleted
Petes-ASA(config)#
To do the same in the ASDM, is a little more convoluted you need to check every NAT rule and see if you have one thats type is ‘static’ and has an IP address from your old ISP range, then you can change it accordingly.
Configuration > Firewall > NAT Rules
Don’t forget to click Apply!
For more information on Static (One to One) NAT see the following article;
Add a Static (One to One) NAT Translation to a Cisco ASA 5500 Firewall
Cisco ASA – Migrating VPN’s Post IP Address Change
Site to Site VPN
If you have site to site (IPSEC) VPN’s then these will have gone down when the public IP address changed. If the device at the other end is a Cisco ASA/PIX then follow the advice in the following article;
Cisco ASA – Changing VPN IP Addresses
Client VPN
For remote workers using the older IPSEC VPN client, you will need to send them a new PCF file to import into their VPN client with the new IP address in it, (unless they are pointing at your public DNS name, then you simply need to change the IP address that the DNS name points to). PCF files are explained in the following article;
Working with the Cisco VPN Client. (IPSEC)
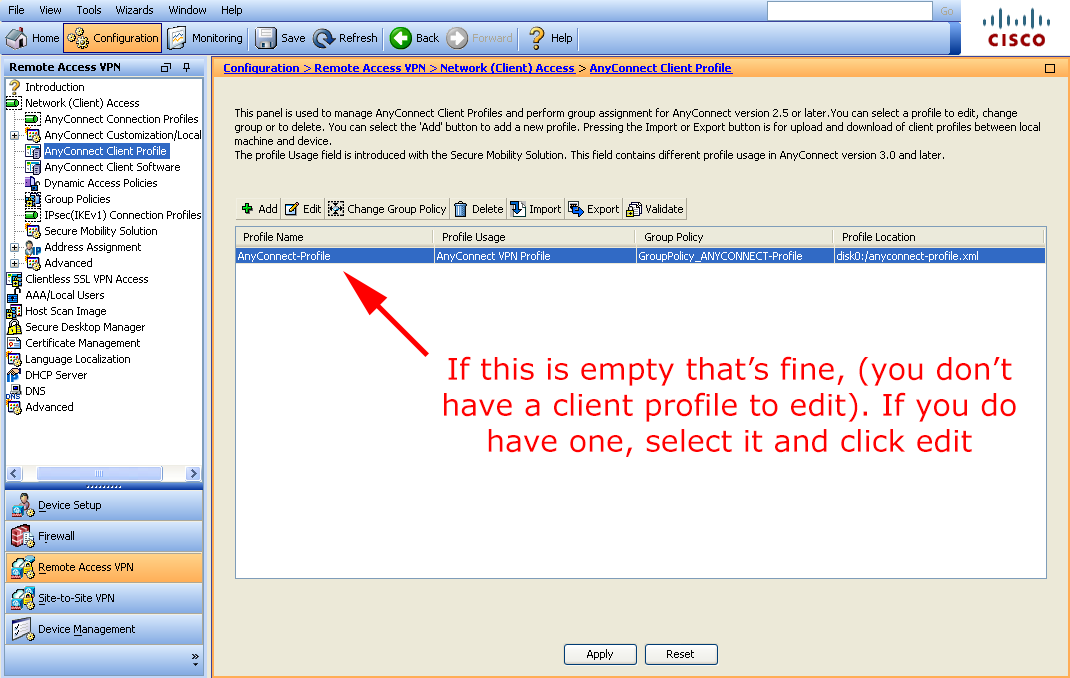
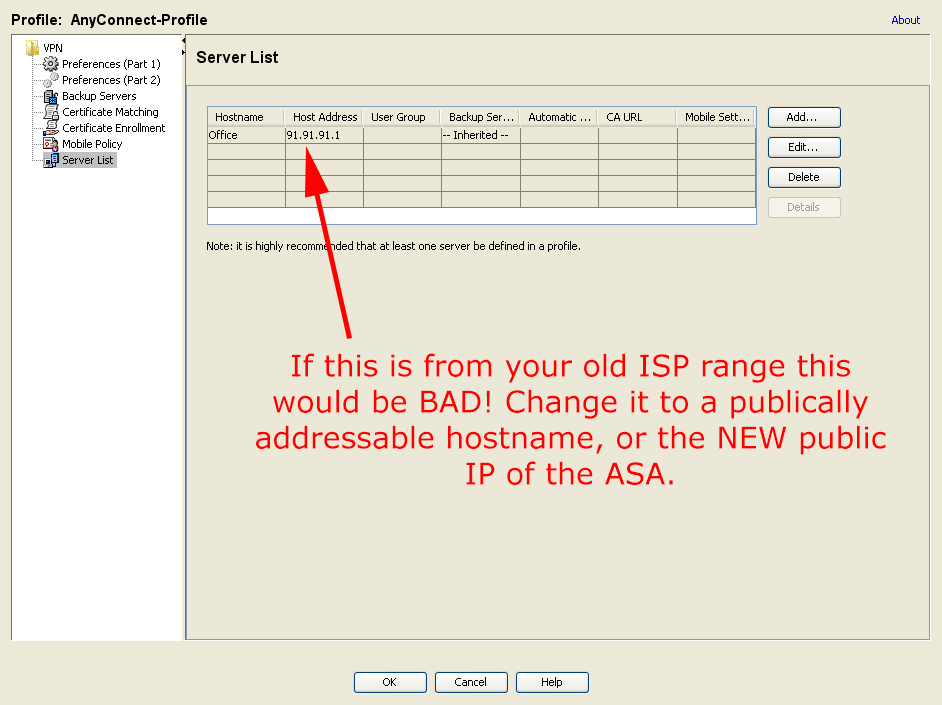
AnyConnect
As above if your AnyConnect clients connect directly to a public name like vpn.yourbusiness.com then just change that record to point to the new public IP address. Just be aware if you have set the AnyConnect profile to point to your old IP address, then your remote clients will automatically break themselves every-time they connect and download the profile, change it to the new IP address, or even better a public name/URL.
Configuration > Remote Access VPN > Network (Client) Access > AnyConnect Client Profile.
Dont Forget: Save any changes you have made to the firewall either with a ‘write mem‘ command, or File > Save running configuration to flash, if you’re in the ASDM.
I think I’ve got most stuff covered, if I’ve missed something that’s caused you problems let me know, and I will update this article accordingly (contact link below).
Related Articles, References, Credits, or External Links
Cisco ASA 5500 – Adding New ‘Different Range’ Public IP Addresses