
KB ID 0000172
Problem
It’s not unusual for nasty Virus’s and Malware once they have infected a machine, to set up outbound communications on the mail protocol SMTP (TCP Port 25), which can lead to your public address being blacklisted.
So it’s considered good practice to stop all your clients getting mail access outbound through your firewall, while still allowing your mail server.
Note: On Cisco firewall’s, access lists are processed in order – so the ALLOW must come before the DENY, they are read from the top down (If you don’t have a clue what I’m talking about don’t worry).
Microsoft Exchange Users Note
If your firewall is using the default inspection map, it will be doing ESMTP inspection. Microsoft has it’s own opinion on what should be allowed in SMTP which differs form Cisco’s. The result is you will need to disable ESMTP inspection for Exchange to work properly. Go here to find out how to Disable ESMTP Inspection on the Cisco ASA.
Solution
Option 1 Via Command Line
1. Connect to the firewall, go to enable mode.
User Access Verification
Password:
Type help or '?' for a list of available commands.
PetesASA> enable
Password: ********
PetesASA#
2. Now you need to find if an access control list is being applied to your inside interface, to do that issue the “show run access-group” command, below are two possible results.
Result 1 (there IS NOT an access list applied to the inside Interface).

PetesASA# show run access-group
access-group inbound in interface outside
PetesASA#

Result 2 (There IS and access List applied to the inside interface).

PetesASA# show run access-group
access-group outbound in interface inside <Here it is
access-group inbound in interface outside

Note:In the Example above the Access List is called "outbound" it can be called anything!
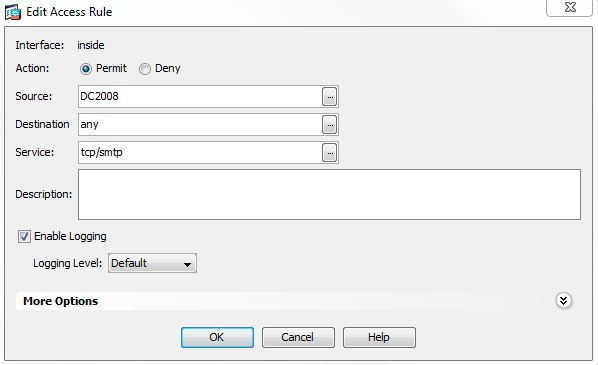
3. Now you need to allow your mail server SMTP access (In this example my mail server is on 10.254.254.5), then deny SMTP to everyone else, Then allow everything else. (REMEMBER with Cisco firewalls, once you have an access list everything that is not allowed is DENIED that’s why you need to allow at the end. (To see this look in the ASDM you will see an “Implicit Deny” at the end.
Note: If you already had an outbound access list (Result 2 above), substitute the name of yours for the work outbound below.

PetesASA# configure terminal
PetesASA(config)# access-list outbound permit tcp host 10.254.254.5 any eq smtp
PetesASA(config)# access-list outbound deny tcp any any eq smtp
PetesASA(config)# access-list outbound permit ip any any
PetesASA(config)#
4. If you already had an access list applied (result 2 above) then you are finished skip to step 5 to save, If you DID NOT then you need to apply the access list you just created to the inside interface, with an access-group command.
Note: Only do this if you got Result 1 above.

PetesASA(config)#
PetesASA(config)# access-group outbound in interface inside
PetesASA(config)#
5. Save your hard work with a “write mem” command.
PetesASA# write mem
Building configuration...
Cryptochecksum: 79745c0a 509726e5 b2c66028 021fdc7d
7424 bytes copied in 1.710 secs (7424 bytes/sec)
[OK]
PetesASA#
Option 2 Block SMTP via ASDM
1. Connect to the ASDM, and add a rule allowing your host to SMTP (At the top!)
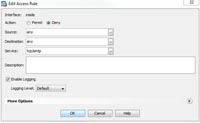
2. Below that create a rule that denies SMTP from “any” to “any”.
3. Below that create a rule that allows “ip” from “any” to “any”.
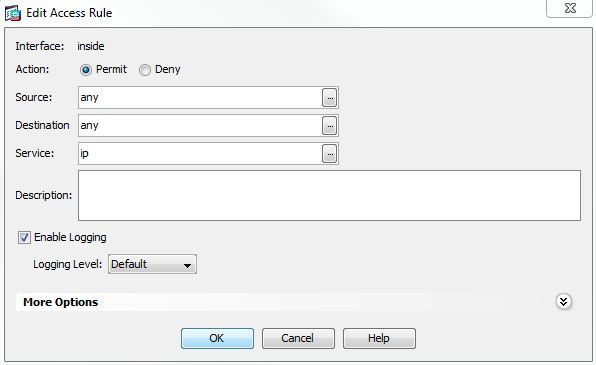
4. This is what it should look like when you are finished.

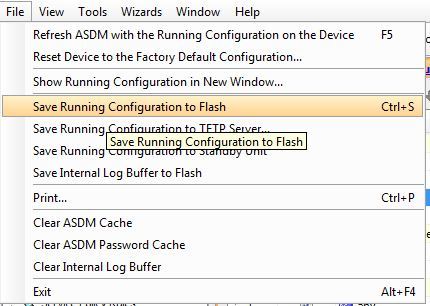
5. Finally save the config, click File > Save running config to flash.
Related Articles, References, Credits, or External Links
NA