
KB ID 0000092
Problem
Anyone who has tried the version of Hyper-V that came in the first release of Server2008 may well have written it off as a bad lot, In Microsoft’s defence it was still a Beta product in that initial release, but for many the damage has now already been done. (It seems the mistakes made by releasing “Longhorn Beta 1.00001 to the public have still not been learned).
I’ve been meaning to spend more time with this product, as I spend a lot of time with VMWare ESX and Virtual Centers, I know the questions people are going to ask, and unlike many I’m happy to to give Hyper-V a fair chance
So If the initial release is the one you have, either in your DVD’s, Technet/MSDN folders or downloads then they are buggy and problematic. You can patch the server when its built, but I Intend to a do a lot of work with the product so I want the DVD/ISO fixed before I start. Yeah I could use nLiteto include the update but, I’ll stick with the Windows Automated Install Kit.
Before you start you need…….
1. Windows Automated Install Kit CLICK HERE
2. Server 2008 x64 Media (DVD or ISO)
3. The Hyper V RTM Update CLICK HERE
4. About 10 GB of Free HDD Space
5. Some DVD Burning software.
Solution
1. Install the WAIK, select “Windows AIK Setup” > Next > I Agree > Next > Next > WAIK will install > Close. Then close down the window.

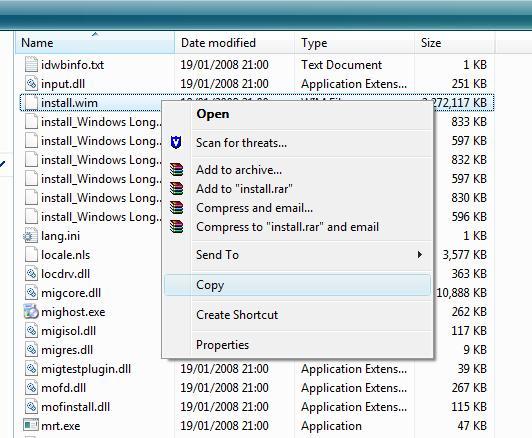
2. Copy the contents of the Server 2008 DVD to a folder on your C: Drive called C:2008×64, Create another folder called C:WIM, then locate the install.wim file and copy it from C:2008x64sources to C:WIM.
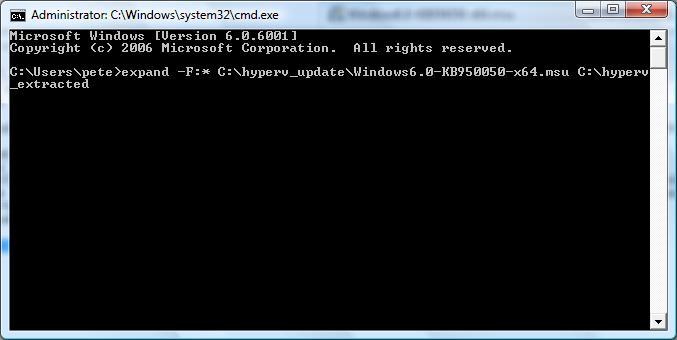
3. Create a further 2 directories on the C: Drive one called C:hyperv_update the other folder called C:hyperv_extracted, Place the update into the C:hyperv_update folder. Then drop to command line and issue the following command,
expand -F:* C:hyperv_updateWindows6.0-KB950050-x64.msu C:hyperv_extracted
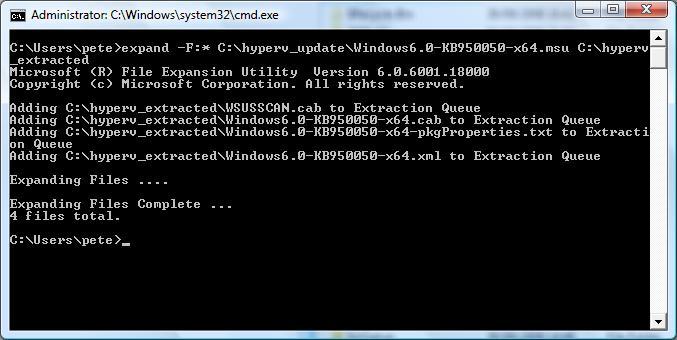
4. This is what you should see (4 files extracted).
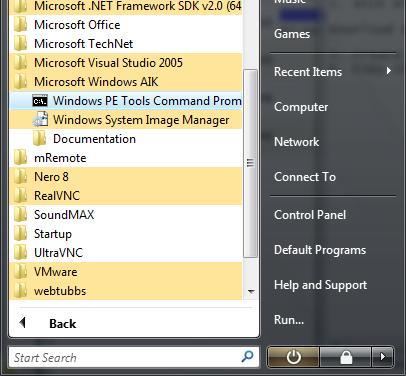
5. From within the Windows Automated Installation Kit Program group, launch the “Windows PE Tools Command Prompt”
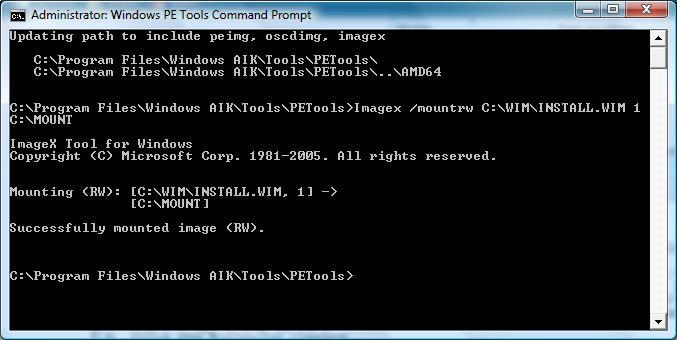
6. We now need to create yet another folder on the C: Drive to work in, we will call it C:MOUNT. Then issue the following command.
Imagex /mountrw C:WIMINSTALL.WIM 1 C:MOUNT
Note: There are FIVE install images inside the install.wim file you have to do each one at a time, In step 5 above you see there is a number 1, this command updates image number 1, you will need to repeat this process for images 2 to 5.
Image 1=Server Standard,
Image 2=Server Enterprise,
Image 3=Datacenter Server,
Image 4=Server standard CORE
Image 5=Server Enterprise CORE.
7. Now we will apply the update to the mounted image, issue the following command,
start /w pkgmgr /ip /m:C:hyperv_extractedWindows6.0-KB950050-x64.cab /o:c:mnt;C:MOUNTwindows /s:%temp%
This will take a while and when finished gives no clue how it got on, Issue an “echo %errorlevel%” command, and it should return a Zero to let you know it ran OK.

8. Now we will commit the changes made to the mounted image and aply then to our install.wim file, issue the following command,
imagex /unmount /commit c:MOUNT

Note: Now repeat the process from step 5 for the other 4 images
9. You will now have an updated install.wim file (In C:WIM) copy that back to the C:2008x64sources folder (Overwrite the original when prompted).
10. Now we need to create a bootable .iso image again, there is a tool already at your fingertips to do this, (assuming you still have the Windows PE Tools Command Prompt window open), issue the following command,
oscdimg -n -m -bc:2008x64bootetfsboot.com c:2008×64 c:2008×64.iso
Note: DO NOT use copy and paste, type the command in manually – there is a bug in some versions of oscdimg that will only work if you manually type in the command. It gives you Error number 3 if you try and use copy /paste.

11. All done 🙂 Your DVD image is at C:2008×64.iso you can burn it with your CD burning program (Or mount it in a Virtual Machine). Dont forget to delete the following folders,
C:2008×64
C:hyperv_extracted
C:hyperv_update
C:WIM
C:MOUNT

You can now install Server 2008 with the Hyper-V role, In Part 2 I’ll run that up and take a look a the remote Hyper-V Management tools for Vista.
Related Articles, References, Credits, or External Links
NA