
KB ID 0000059
Problem
If you need to remote a distant PC, either for work purposes or you have a friend or relative who is technically challenged. Or you simply would like to be able to get back to watching TV, or having a life quicker, you would rather “Fix” it yourself than talking a frightened technophobe though the registry etc. Then UltraVNC SC is the tool you need.
Normally using VNC you would need to talk the person at the other end through downloading a version of VNC installing it, finding out their IP address etc before you could even start to help, if like me you have no patience at all, then removing all these steps is much quicker.
If you are unfamiliar with VNC products, you install the software on the “Controlled” end in server mode which “Listens” for connections and you install the software on the “Controlling” end in viewer mode and point it to the target. This is all well and good but what if you want the other end to request a remote control session without needing to install or configure anything so you can get on quickly and get back doing something more interesting like watching 24 or drinking Vodka.
Technical Hurdles (READ THIS FIRST)
1. If you don’t have a static IP then you need to get something that will resolve to your IP address – If your IP address changes then get an account with no-ip http://www.no-ip.com (this is who I use for www.petenetlive.com ) or DynDNS http://www.dyndns.com
2. You need to have TCP port 5500 open to your PC/Server – so you will need to do some port forwarding and if you have a firewall allow traffic in on this port.
Solution
Step 1 Create the .exe file to send to the “Target”
1. Go to http://www.uvnc.com/addons/singleclick
2. Download http://sc.uvnc.com/custom.zip
3. Open this Zip File and you will see the following:
![]() Icon1.ico
Icon1.ico![]() Icon2.ico
Icon2.ico![]() Logo.bmp
Logo.bmp![]() Background.bmp (note the actial file is 1×283 pixels)
Background.bmp (note the actial file is 1×283 pixels)
| Icon1.ico | |
| Icon2.ico | |
| Logo.bmp | |
| Background.bmp (note the actial file is 1×283 pixels) |
4. You will also see helpdesk.txt this is the configuration file used to create the .exe file.
5. Edit the files as appropirate the icons are 32×32 and keep the bitmaps below 256 colour .
6. Here Is what Im going to use.
 Logo.bmp Logo.bmp |
|
|
7. Here is the helpdesk.txt file I’m going to use.
———————-Start—————————
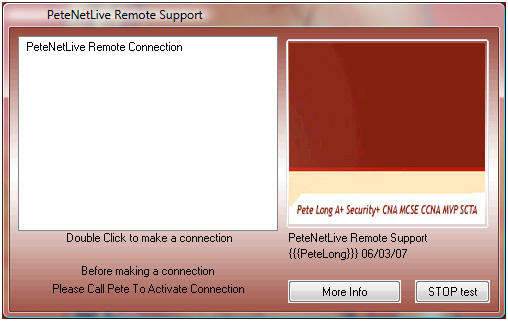
[TITLE] PeteNetLive Remote Support
[HOST] PeteNetLive Remote Connection -connect www.petenetlive.com:5500 -noregistry
[TEXTTOP] Double Click to make a connection
[TEXTMIDDLE] Before making a connection
[TEXTBOTTOM] Please Call Pete To Activate Connection
[TEXTRBOTTOM]
[TEXTRMIDDLE] {{{PeteLong}}} 06/03/07
[TEXTRTOP] PeteNetLive Remote Support
[TEXTBUTTON] More Info
[WEBPAGE] http://www.petenetlive.com
[TEXTCLOSEBUTTON] STOP test
[BALLOON1TITLE] Establishing connection …
[BALLOON1A] 5 min try period
[BALLOON1B] If it fails, the software will remove himself
[BALLOON1C] from your system.
[BALLOON2TITLE] Connection active.
[BALLOON2A] Warning, your desktop is remote visable
[BALLOON2B] You can break the connection any time
[BALLOON2C] by using the close button
[WEBPAGE] http://www.petenetlive.com
———————-Finish————————–
8. All these will eventially give you an application that looks like this,
9. To actially build this application you need to go to http://sc.uvnc.com
10.Log in username:foo Password:foobar Upload file: Navigate to the zip file with all your icons and bitmaps in (change the name of custom.zip whatever you call the zip file the executable will be called).
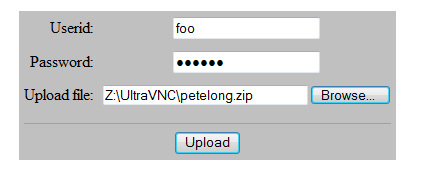
11. Click Upload
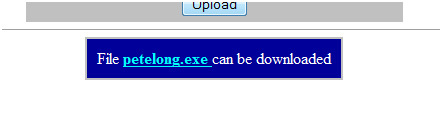
12. Download the Executable it creates for you.
Step 2 Configure “You’re End”
1.On your PC/Server Install UltraVNC http://www.uvnc.com/download/index
2.Launch the Installer > English > OK > Next > I Accept > Next > Next > Next > Next > Next > Next > Install > Continue Anyway > Next > Finish.
3.On the Server Click > Start > All Programs > UraVNC Viewer> ULTRAVNC Viewer (Listen mode.)

4.Send the executable you created earlier to the person at the other end and get them to run it.
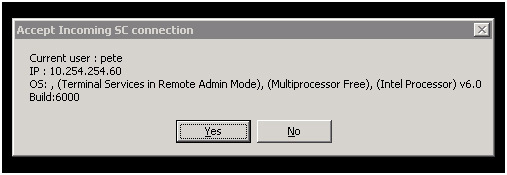
5.When they open the connection your PC will ask you if you want to allow the connection > Click Yes.
6. Job done
![]() Icon1.ico
Icon1.ico ![]() Icon2.ico Logo.bmp
Icon2.ico Logo.bmp ![]() Background.bmp
Background.bmp
7. Here is the helpdesk.txt file I’m going to use.
----------------------Start---------------------------[TITLE]
PeteNetLive Remote Support[HOST]
PeteNetLive Remote Connection
-connect www.petenetlive.com:5500 -noregistry[TEXTTOP]
Double Click to make a connection[TEXTMIDDLE]
Before making a connection[TEXTBOTTOM]
Please Call Pete To Activate Connection[TEXTRBOTTOM][TEXTRMIDDLE]
{{{PeteLong}}} 06/03/07[TEXTRTOP]
PeteNetLive Remote Support[TEXTBUTTON]
More Info[WEBPAGE]
http://www.petenetlive.com[TEXTCLOSEBUTTON]
STOP test[BALLOON1TITLE]
Establishing connection ...[BALLOON1A]
5 min try period[BALLOON1B]
If it fails, the software will remove himself[BALLOON1C]
from your system.[BALLOON2TITLE]
Connection active.[BALLOON2A]
Warning, your desktop is remote visable[BALLOON2B]
You can break the connection any time[BALLOON2C]
by using the close button[WEBPAGE]
http://www.petenetlive.com
----------------------Finish--------------------------
8. All these will eventially give you an application that looks like this,
9. To actially build this application you need to go to http://sc.uvnc.com
10.Log in username:foo Password:foobar Upload file: Navigate to the zip file with all your icons and bitmaps in (change the name of custom.zip whatever you call the zip file the executable will be called).
11. Click Upload 12. Download the Executable it creates for you.
Step 2 Configure “You’re End”
1.On your PC/Server Install UltraVNC http://www.uvnc.com/download/index
2.Launch the Installer > English > OK > Next > I Accept > Next > Next > Next > Next > Next > Next > Install > Continue Anyway > Next > Finish.
3.On the Server Click > Start > All Programs > UraVNC Viewer> ULTRAVNC Viewer (Listen mode.)
4.Send the executable you created earlier to the person at the other end and get them to run it.
5.When they open the connection your PC will ask you if you want to allow the connection > Click Yes.
6. Job done
Related Articles, References, Credits, or External Links
NA